Repotting/ moss removal

Choppychan

Yamadori
Messages
52
Reaction score
16
Location
Glasgow
USDA Zone
8
Hi,

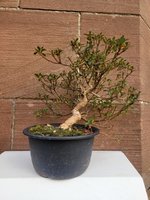
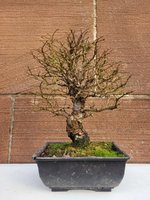
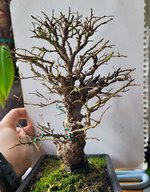
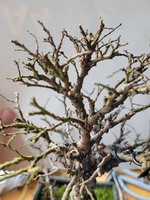
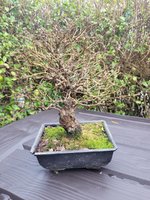
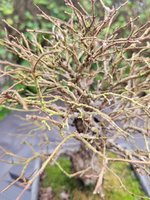
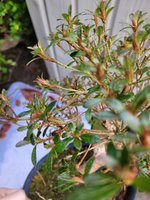
I am thinking of repotting my corkbark elm and my sazuki azelea.
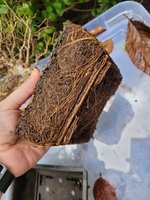
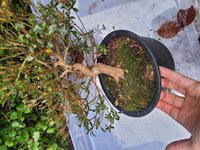
The soil they are in is not the best and they look pretty tight in their pot. I could not take the azelea out of its pot for the pic. I have kaizen no 2 soil, would that be suitable?

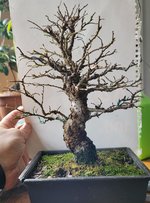
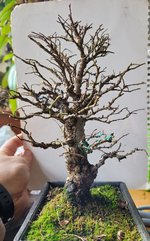
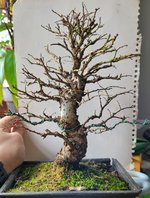
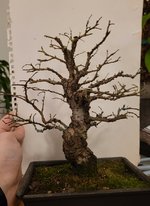
The elm is in a 10 cm by 15cm (4 inch by 6 inch approx). Thinking of going for 7 inch oval pot.

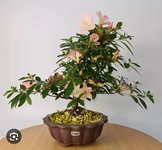
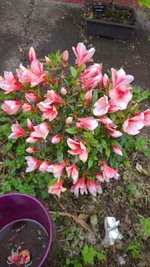
The azelea is in a 18cm pot (7inch). I am thinking of going for an 8 inch white/off white glazed pot for the azalea (flowers are white and pink).

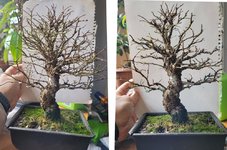
Can you please advise on size and shape for both? Would I need to wait for the repotting?
Also, can I remove the moss by spraying 100% white vinegar on them while covering the soil?
 

Attachments

  • 20240216_155125.jpg
    20240216_155125.jpg
    308.9 KB · Views: 83
  • 20240216_155131.jpg
    20240216_155131.jpg
    217.4 KB · Views: 74
  • 20240216_155244.jpg
    20240216_155244.jpg
    217.8 KB · Views: 66
  • 20240216_155344.jpg
    20240216_155344.jpg
    284.3 KB · Views: 65
  • 20240216_155157.jpg
    20240216_155157.jpg
    199.3 KB · Views: 84
Messages
203
Reaction score
556
Location
Northeast Connecticut, USA
USDA Zone
6A
Don’t use vinegar to remove the moss. Peel it off by hand and then get a chop stick to scrape the rest and refresh the top layer of soil.

Some good techniques can be seen in this video.

Pot size has some “rules,” but strong conventions is a better term. Check out the guidelines from this article:

1. The tree should be placed behind the mid line of the pot, and to the left or right of the center line.
2. The depth of the pot should be the caliper of the trunk, except for cascades.

3. Colored glazed pots should be used for flowering and fruiting trees and the colors should complement the flower color.

4. The width of the pot should two thirds the height of the tree. For very short trees, the width should be two thirds the spread of the tree.

5. Style of the pot should match the tree. Uprights without much movement should be in rectangular pots, informal uprights with a lot of trunk movement should be in oval or round pots. Massive trees should be in deep rectangular pots.
 

Shibui

Imperial Masterpiece
Messages
7,682
Reaction score
15,491
Location
Yackandandah, Australia
USDA Zone
9?
Slightly larger pots are not strictly necessary but will give you extra rom for error while you learn to water properly.
Both look ready for repotting. I'm always in favour of repotting as soon as possible after purchase because that lets us get all the trees into a similar potting soil which then means watering each individual is much easier to manage.
As for timing for repots, Chinese elm can be repotted almost any time of year but spring, as the new buds start to open is usually preferred. That should be quite soon for you as Chinese elms are often one of the first to come out of dormancy.
Azalea are different. As spring flowering they are often repotted immediately after flowering. That's also when new shoots start to grow. Azalea is anotehr family that's not too fussy about repot timing. I've transplanted azaleas out of gardens successfully at all times of the year though our winters are a bit milder than Glasgow so you might like to avoid winter repotting.

I do not know kaizan no 2 but it should be suitable for most species. I use the same soil mix for all species here and all seem to grow well in the same basic mix. Azaleas need acid soil to thrive and many growers use an imported soil called Kanuma for azaleas but all of mine seem to be happy in my standard mix so I don't feel that Kanuma is absolutely vital. Failure with azaleas is more often attributed to alkaline water rather than soil so check your water. Alkaline water can be counteracted by using an acidifying fertiliser.

Thanks for a better front on shot of the elm. makes it so much easier to get a good look at trunk and branches. That elm is in the typical deciduous style some are now calling 'natural' with ascending branches and a rounded canopy, just like many big elms you might see in parks or forests. The branches do look a bit crowded. Good for selling a tree but maybe not so good long term. I'd be cutting back long shoots wherever they are and looking for opportunities to remove entire branches from places where growth is crowded. Almost impossible to mark on photo of such a tightly congested tree. The good thing about pruning Chinese elm is that they almost always grow back so if you cut a bit far or find you've taken off one that looked good it will soon grow back if you let it.

Hard to comment on the azalea as we have another odd angle looking partly down on the trunk. We generally try to trim azalea to allow the branches to show the flowers so some spaces between branches is good. You can already see the potential flower buds. They start to form at the tips of shoots in Autumn so pruning through winter will remove most of your spring flowers before they get to open. Leave off trimming that one until after flowering.

Vinegar will kill moss. 50% vinegar with water is effective and less acidifying on the soil. I use it to kill moss growing on trunks and branches where it is harder to remove manually. Where the moss is on the soil it is just as easy to rake it off as explained above. If conditions are right, moss will soon return.
 

Deep Sea Diver

Masterpiece
Messages
4,534
Reaction score
9,502
Location
Bothell, WA
USDA Zone
8b
Azaleas are usually up potted into larger containers consistent with the nature of the azalea. Looks like the azalea pictured could stand a larger pot. No matter the color chosen, the interior depth in an 8” pot should be about 2 1/2”+.

Timing: We no longer repot after flowering due to summer hot spells, so late March to April, and the desire to get the longest amount of growing time after the repot before winter. This allows the tree to recover from the repot before summer pruning. That’s the optimal scenario. However as @Shibui mentioned azalea can be repotted throughout most of the year given protection during the winter.

Media: Kaizen #2 is for large trees, not for azalea. Best to check what the local folks are using. Nearest bonsai groups are Ayrshire and Lanarkshire. Azalea can be repotted in a number of acidic medias. 90:10 Kanuma:pumice is our go to. The key is whatever one uses it needs to be the only media in the pot. This means root washing unless the previous media matches the same characteristics as the new media. Many azaleas have been lost due to poor technique for repots, improper media and mismatched media than most anything else.

If you need to end up water washing the roots check this thread.

Cheers
DSD sends
 

Choppychan

Yamadori
Messages
52
Reaction score
16
Location
Glasgow
USDA Zone
8
Thank you. I got a small bag of kanuma soil just for the azelea. I've read that kanuma can be mixed with spag moss which I already have (2 to 1 ratio). Would that also be okay?

Agreed on the kaizen no2, most of my trees are larger pots so it will be suitable for those. I will look into getting finer bonsai mix.


As for the pots, when people give measuraments are those measuraments from the inside of the pot i.e. rim excluded? I have re measured the pots to make sure and the cork is in a 14 cm pot whereas the azalea is in a 17 cm pot (inside pot measuraments).

I have been looking at different options. I quite like the look of round pots for the smaller elms (the one in the pic is 16 cm). For the azalea I also looked at an unglazed pot which is 18cm pot like the one in the pic (the azalea in the advert is over 30 cm whereas mine is shorter than that so might be a good option)

I have re taken pics of both straight on as well since I have a habit of taking pics at an angle.
 

Attachments

  • 20240218_100723.jpg
    20240218_100723.jpg
    317.1 KB · Views: 52
  • Screenshot_20240218_095621_Google.jpg
    Screenshot_20240218_095621_Google.jpg
    115.4 KB · Views: 45
  • 20240218_100659.jpg
    20240218_100659.jpg
    353.8 KB · Views: 40
  • Screenshot_20240218_094024_eBay.jpg
    Screenshot_20240218_094024_eBay.jpg
    79.8 KB · Views: 38

Choppychan

Yamadori
Messages
52
Reaction score
16
Location
Glasgow
USDA Zone
8
Slightly larger pots are not strictly necessary but will give you extra rom for error while you learn to water properly.
Both look ready for repotting. I'm always in favour of repotting as soon as possible after purchase because that lets us get all the trees into a similar potting soil which then means watering each individual is much easier to manage.
As for timing for repots, Chinese elm can be repotted almost any time of year but spring, as the new buds start to open is usually preferred. That should be quite soon for you as Chinese elms are often one of the first to come out of dormancy.
Azalea are different. As spring flowering they are often repotted immediately after flowering. That's also when new shoots start to grow. Azalea is anotehr family that's not too fussy about repot timing. I've transplanted azaleas out of gardens successfully at all times of the year though our winters are a bit milder than Glasgow so you might like to avoid winter repotting.

I do not know kaizan no 2 but it should be suitable for most species. I use the same soil mix for all species here and all seem to grow well in the same basic mix. Azaleas need acid soil to thrive and many growers use an imported soil called Kanuma for azaleas but all of mine seem to be happy in my standard mix so I don't feel that Kanuma is absolutely vital. Failure with azaleas is more often attributed to alkaline water rather than soil so check your water. Alkaline water can be counteracted by using an acidifying fertiliser.

Thanks for a better front on shot of the elm. makes it so much easier to get a good look at trunk and branches. That elm is in the typical deciduous style some are now calling 'natural' with ascending branches and a rounded canopy, just like many big elms you might see in parks or forests. The branches do look a bit crowded. Good for selling a tree but maybe not so good long term. I'd be cutting back long shoots wherever they are and looking for opportunities to remove entire branches from places where growth is crowded. Almost impossible to mark on photo of such a tightly congested tree. The good thing about pruning Chinese elm is that they almost always grow back so if you cut a bit far or find you've taken off one that looked good it will soon grow back if you let it.

Hard to comment on the azalea as we have another odd angle looking partly down on the trunk. We generally try to trim azalea to allow the branches to show the flowers so some spaces between branches is good. You can already see the potential flower buds. They start to form at the tips of shoots in Autumn so pruning through winter will remove most of your spring flowers before they get to open. Leave off trimming that one until after flowering.

Vinegar will kill moss. 50% vinegar with water is effective and less acidifying on the soil. I use it to kill moss growing on trunks and branches where it is harder to remove manually. Where the moss is on the soil it is just as easy to rake it off as explained above. If conditions are right, moss will soon return.
Thanks for the advice. I have re taken front on pics which show the trees better.

Got a small kanuma bag for the azalea and I have some spag moss so looking to do a 2:1 mix Kanuma & spag moss. For the elm, I will get a finer mix as I think kaizen no2 is too chuncky. Looking at an akadama, pumice lava rock mix which says it's better suited for mame and shohin trees but will read up more before I get it.

I am now considering different pots. Round glazed 16 cm pot for the elm (currently in 14 cm pot, inside pot measurament) and an unglazed brown round pot 18 cm for the azalea (currently in 17 cm pot, inside pot measurament).

The corkbark elm is bushy but not as bushy as it appears in the first pic I posted. I think the background was not helping either. I'll try to take better pics in the future.
 

Attachments

  • 20240218_100723.jpg
    20240218_100723.jpg
    317.1 KB · Views: 31
  • 20240218_100659.jpg
    20240218_100659.jpg
    353.8 KB · Views: 24
  • Screenshot_20240218_095621_Google.jpg
    Screenshot_20240218_095621_Google.jpg
    115.4 KB · Views: 21
  • Screenshot_20240218_094024_eBay.jpg
    Screenshot_20240218_094024_eBay.jpg
    79.8 KB · Views: 22
  • Screenshot_20240218_102241_eBay.jpg
    Screenshot_20240218_102241_eBay.jpg
    174.9 KB · Views: 26

Deep Sea Diver

Masterpiece
Messages
4,534
Reaction score
9,502
Location
Bothell, WA
USDA Zone
8b
Thanks for the advice. I have re taken front on pics which show the trees better.
You are most welcome. They are better images. That’s a nice azalea!
Got a small kanuma bag for the azalea and I have some spag moss so looking to do a 2:1 mix Kanuma & spag moss.
Great! We don’t use as much Sphagnum moss, although it is common to use 3:1 in the UK from what I’ve gleaned. Instead preferring a drier mix as described above with Yamagoke (mountain moss) well tucked in on the surface to create a nice barrier to deter evaporation.

For the elm, I will get a finer mix as I think kaizen no2 is too chuncky. Looking at an akadama, pumice lava rock mix which says it's better suited for mame and shohin trees but will read up more before I get it.
Mostly folks here use a 2:1:1 Akadama:pumice:Lava mix for Elms.
I am now considering different pots. Round glazed 16 cm pot for the elm (currently in 14 cm pot, inside pot measurament) and an unglazed brown round pot 18 cm for the azalea (currently in 17 cm pot, inside pot measurament).
We prefer gla pots for azaleas, though we use Tokaname training pots until they are grown and sorted. Whatever is selected, please assure each is larger.

For the azalea roughly a 2.5 cm increase all around when potting for this stage of development. The uppotting interval once that tree gets into kanuma is about every 2-3 years.

btw The azaleas branches are in need to wiring and sorting out so you can start selecting the key branches and developing pads.

Usually azaleas are wired for primary structure, then it’s clip and grow from there to get pads started…best wiring.timing …after - after flowering pruning or during late winter.

The corkbark elm is bushy but not as bushy as it appears in the first pic I posted. I think the background was not helping either. I'll try to take better pics in the future.
Might make the exact same comments on wiring etc on the Elm. However there are many folks like @Shibui that are much more knowledgeable on that species that I.

Keep us updated over time.

Cheers
DSD sends
 

Choppychan

Yamadori
Messages
52
Reaction score
16
Location
Glasgow
USDA Zone
8
You are most welcome. They are better images. That’s a nice azalea!

Great! We don’t use as much Sphagnum moss, although it is common to use 3:1 in the UK from what I’ve gleaned. Instead preferring a drier mix as described above with Yamagoke (mountain moss) well tucked in on the surface to create a nice barrier to deter evaporation.


Mostly folks here use a 2:1:1 Akadama:pumice:Lava mix for Elms.

We prefer gla pots for azaleas, though we use Tokaname training pots until they are grown and sorted. Whatever is selected, please assure each is larger.

For the azalea roughly a 2.5 cm increase all around when potting for this stage of development. The uppotting interval once that tree gets into kanuma is about every 2-3 years.

btw The azaleas branches are in need to wiring and sorting out so you can start selecting the key branches and developing pads.

Usually azaleas are wired for primary structure, then it’s clip and grow from there to get pads started…best wiring.timing …after - after flowering pruning or during late winter.


Might make the exact same comments on wiring etc on the Elm. However there are many folks like @Shibui that are much more knowledgeable on that species that I.

Keep us updated over time.

Cheers
DSD sends
Thank you. I have good quality New Zealand spag moss. Would that still be okay? I've seen a repotting video were the guy was shredding up the moss and mixing it in with Kanuma.

As for the unglazed pot, I saw different pics of azaleas in unglazed pots so I thought that might have been the preference. I haven't got a pot for it yet but I'll look to see if I can find a glazed one slightly larger, 19 to 20 cm diameter. Since it's not a large tree and it has good movement in the trunk, I thought it would suit a round pot best or oval.

For the styling, I agree. It needs to be tidied up. I had it for a year but I haven't trimmed or wired it as I was not sure where to start. Unfortunately I can't remember the name of this specific variety but the flowers are a lovely white/pink. I'll propagate when I get around trimming it.
 

Attachments

  • IMG-20230528-WA0004.jpeg
    IMG-20230528-WA0004.jpeg
    159 KB · Views: 28

Deep Sea Diver

Masterpiece
Messages
4,534
Reaction score
9,502
Location
Bothell, WA
USDA Zone
8b
Thank you. I have good quality New Zealand spag moss. Would that still be okay?
Yes it would.
I've seen a repotting video were the guy was shredding up the moss and mixing it in with Kanuma.
Have seen that or a similar series of videos.
As for the unglazed pot, I saw different pics of azaleas in unglazed pots so I thought that might have been the preference. I haven't got a pot for it yet but I'll look to see if I can find a glazed one slightly larger, 19 to 20 cm diameter. Since it's not a large tree and it has good movement in the trunk, I thought it would suit a round pot best or oval.
Either type shape or glaze will work for now. Even a production pot. Later 5 years or so down the line when the tree gets more finished is the time to really think hard about pots.

Some of the satsuki at Kokofu this year were posted here on BN by @Yamabudoudanshi in unglazed pots. These are mainly used for satsuki shown when not in flower. So unglazed is

IMG_0109.jpegIMG_0107.jpegIMG_0108.jpeg

For the styling, I agree. It needs to be tidied up. I had it for a year but I haven't trimmed or wired it as I was not sure where to start.
One doesn’t actually have to wire at all, but it helps to create basic branch structure. The tree posted seems to be a slant style at the movement. Somewhat unique and can be very impressive. If so the branches on the end of bends are key along with any branches on top. Those inside the curve of a bend not so much except near the apex as those branches tend to soften bends and traditionally are removed.

When ready to get started, first thing go through the tree and prune to create a basic out line of the shape desired. Be conservative. One can’t put growth back. So no shearing, only intentional step by step pruning.

Second go through the entire tree and trim to ensure each junction has only two sub branches. Leave the rest

Then go back through the tree and choose a branch at each desired location. People have preferences on which type to choose when rebuilding a structure. I prefer the younger branches with the most foliage close to the trunk and spread out through the branch, rather then those with most at the ends. This gives one something to build on or prune back to… both very important. But it’s a situational thing.

Ideally branches should be a bit smaller when proceeding towards the apex, but all the same is ok.…As later the lower ones will be allowed to grow more foliage, so they will thicken up faster

Unfortunately I can't remember the name of this specific variety but the flowers are a lovely white/pink. I'll propagate when I get around trimming it.
Which image is the satsuki you have? The first post with the flowers above is different than the second. Second almost looks like a young Hino Maru. @Glaucus has the best handle on satsuki cultivars.

cheers
DSD sends
 

Glaucus

Chumono
Messages
972
Reaction score
1,787
Location
Netherlands
USDA Zone
7b
Second is Nanso no Haru, or very very close. The first is very different and doesn't ring a bell right now, but might be IDable with better pictures of peak flower, so more opened. Half opened flowers can be a little deceptive.
 

Choppychan

Yamadori
Messages
52
Reaction score
16
Location
Glasgow
USDA Zone
8
Yes it would.

Have seen that or a similar series of videos.

Either type shape or glaze will work for now. Even a production pot. Later 5 years or so down the line when the tree gets more finished is the time to really think hard about pots.

Some of the satsuki at Kokofu this year were posted here on BN by @Yamabudoudanshi in unglazed pots. These are mainly used for satsuki shown when not in flower. So unglazed is

View attachment 529424View attachment 529425View attachment 529426


One doesn’t actually have to wire at all, but it helps to create basic branch structure. The tree posted seems to be a slant style at the movement. Somewhat unique and can be very impressive. If so the branches on the end of bends are key along with any branches on top. Those inside the curve of a bend not so much except near the apex as those branches tend to soften bends and traditionally are removed.

When ready to get started, first thing go through the tree and prune to create a basic out line of the shape desired. Be conservative. One can’t put growth back. So no shearing, only intentional step by step pruning.

Second go through the entire tree and trim to ensure each junction has only two sub branches. Leave the rest

Then go back through the tree and choose a branch at each desired location. People have preferences on which type to choose when rebuilding a structure. I prefer the younger branches with the most foliage close to the trunk and spread out through the branch, rather then those with most at the ends. This gives one something to build on or prune back to… both very important. But it’s a situational thing.

Ideally branches should be a bit smaller when proceeding towards the apex, but all the same is ok.…As later the lower ones will be allowed to grow more foliage, so they will thicken up faster


Which image is the satsuki you have? The first post with the flowers above is different than the second. Second almost looks like a young Hino Maru. @Glaucus has the best handle on satsuki cultivars.

cheers
DSD sends
Thank you so much! Lots to take in. Both the azalea and the cork bark elm are my favourites, the rest are more experimental pre bonsai.

I know the pot is not super important but I would like something half decent look just for these two.

The azalea is indeed a slanted style. It was the only one I could see in that style that had the widest root spread/trunk compared to the others. I know it's nothing super impressive but I liked the movement, the taper and unusual style compared to the others.

I must admit I am not a huge fan of the way New Zealand Spag moss looks but maybe once it's all together it won't look so bad.

I will take some time to look at specimen azaleas in a similar style and pay attention to structure and styling choices so that I can replicate that if it works for my tree.

The pic of my tree in flower is this one. The inner part is usually intense pink which fades into a soft pink and into almost white, with somewhat of a stripy contrast at times. I know there are thousands of varieties which can look very similar. I admit that the pic is not the best either but strangely that's the only one I can find. I might make a point of asking the guy I bought it from next time I visit the shop.
 

Attachments

  • IMG-20230528-WA0004.jpeg
    IMG-20230528-WA0004.jpeg
    159 KB · Views: 21

Shibui

Imperial Masterpiece
Messages
7,682
Reaction score
15,491
Location
Yackandandah, Australia
USDA Zone
9?
Thanks for the much better pics. Now we can see where bends are and where the branches start much better.
The corkbark elm is bushy but not as bushy as it appears in the first pic I posted. I think the background was not helping either

Beginners commonly leave way more branches and much longer shoots than is good long term. Right down the bottom I can see 3 small branches within a cm of each other on the left side. While all 3 of those are sharing the available resources they will thicken and grow very slowly. Down there is the place for the thickest branches to make the tree look good. I would be removing 2 of those for a start, even if it left that section a little bare. you'll be surprised at how quickly remaining branches grow to fill any spaces you create.
I assume there will be other places further up where there are similar issues. Toward the top of the tree we really want the thinner branches but that's normally where the tree puts more effort in and the upper branches tend to become thicker. If you have the choice it can be good to chop out thicker branches closer to the top and thinner ones down low.

The existing branches also seem to have long, thin, unbranched shoots. Shoots and branches will not voluntarily produce side branches. If we want plenty of ramification those long shoots need to be cut short and let the new shoots grow back out. Bonsai development is usually a series of grow and cuts to build branches and twigs.

Initially it can seem like it's important to do everything at once. I now take a longer term view so if you are not comfortable cutting so much yet there's no problem leaving it until next year when you can see the problems and results for yourself. A year or 2 rarely makes much difference in the long term sport of bonsai.
 

Choppychan

Yamadori
Messages
52
Reaction score
16
Location
Glasgow
USDA Zone
8
Thanks for the much better pics. Now we can see where bends are and where the branches start much better.


Beginners commonly leave way more branches and much longer shoots than is good long term. Right down the bottom I can see 3 small branches within a cm of each other on the left side. While all 3 of those are sharing the available resources they will thicken and grow very slowly. Down there is the place for the thickest branches to make the tree look good. I would be removing 2 of those for a start, even if it left that section a little bare. you'll be surprised at how quickly remaining branches grow to fill any spaces you create.
I assume there will be other places further up where there are similar issues. Toward the top of the tree we really want the thinner branches but that's normally where the tree puts more effort in and the upper branches tend to become thicker. If you have the choice it can be good to chop out thicker branches closer to the top and thinner ones down low.

The existing branches also seem to have long, thin, unbranched shoots. Shoots and branches will not voluntarily produce side branches. If we want plenty of ramification those long shoots need to be cut short and let the new shoots grow back out. Bonsai development is usually a series of grow and cuts to build branches and twigs.

Initially it can seem like it's important to do everything at once. I now take a longer term view so if you are not comfortable cutting so much yet there's no problem leaving it until next year when you can see the problems and results for yourself. A year or 2 rarely makes much difference in the long term sport of bonsai.
Thanks. I have tried to open it up and create more of a silhouette. I think it looks much better now.
As for the bottom 3 branches on the left you pointed out I removed one, the most obvious on the inside of a curve. I have left the other 2 as I want to be 100% sure the one I prefer is alive before I cut the other one. I prefer the one I wired as it's placed right on the outside of a curve. The other one has nice movement but it's it's placement is not as nice. On the right hand side there are also 2 nice branches. One is more dominant and placed slightly more towards the front. The other one is placed very nicely but it's not as thick. I prefer the one with the nice placement (wired one) but I left the larger one for balance as the top of the tree is still quite heavy.

The top of the tree is kinda tricky. There is one section in particular with a branch coming in towards the tree. Although it's not correct it rounds off the canopy nicely. I have left it for now but I think that will need to go.

At the apex there is some reverse taper. I am not sure whether to address or leave it. If I leave it, it will only get worse. If I address it I might flatten ot the apex which then I will need to recreate by bringing in the silhouette slightly at the top.

I have wired a couple of points. Probably not the best wiring but it was very tricky to do as the tree is tiny and there are many delicate branches.

How does that look?
 

Attachments

  • 20240219_143323.jpg
    20240219_143323.jpg
    211.7 KB · Views: 9
  • 20240219_143339.jpg
    20240219_143339.jpg
    193.2 KB · Views: 9
  • 20240219_143355.jpg
    20240219_143355.jpg
    223.6 KB · Views: 12
  • 20240219_143410.jpg
    20240219_143410.jpg
    218.2 KB · Views: 12
  • 20240219_145400.jpg
    20240219_145400.jpg
    174 KB · Views: 17

Deep Sea Diver

Masterpiece
Messages
4,534
Reaction score
9,502
Location
Bothell, WA
USDA Zone
8b
Just a couple thoughts from my rookie days.

It’s not something wiring will solve at this point. This is a 3D situational analysis process.

Go back and review what @Shibui wrote.

Step back from the tree. Look at the apex, then each section of the rest of the tree.

Observe the density in the apex and compare this to each part of the tree.

Think how to reduce in the apex and other discrete areas to create similar density through the tree and eliminate crowding throughout the tree.

(Recognize it may not be totally possible to do… yet)

Spend a good amount of time looking vs doing before and after each reduction.

Be intentional. If not sure, wait, come back later. If frustrated do something else.

cheers
DSD sends
 

Choppychan

Yamadori
Messages
52
Reaction score
16
Location
Glasgow
USDA Zone
8
The wiring was minimal, just to slightly rotate bottom branches. I did clean up the silhouette, removed branches going straight up and trimmed back long twiggy branches as advised, paying attention to directional pruning. I still think that the structure is not streamlined as much as it should but I am comfortable leaving it like this for now.

I might make small tweaks but, like you said, it is a process which takes time.

I have other trees I have not even touched yet. So plenty to keep me busy when I get the chance.
 

Attachments

  • Screenshot_20240219_171419_Collage Maker - GridArt.jpg
    Screenshot_20240219_171419_Collage Maker - GridArt.jpg
    149.1 KB · Views: 15

Shibui

Imperial Masterpiece
Messages
7,682
Reaction score
15,491
Location
Yackandandah, Australia
USDA Zone
9?
Great start on this tree.
I recognise that going a bit slower and retaining a few backups is a good strategy. I often do so here too.

With experience we soon discover that it is better to take out a few more branches because that will allow space for those that remain to spread into the spaces and become better branches but I also remember that removing more can be traumatic so I'll just leave you with the advice until you recognise the necessity and develop the confidence to do it.
 

Choppychan

Yamadori
Messages
52
Reaction score
16
Location
Glasgow
USDA Zone
8
Thank you. Did more tweaking. It helps me leaving the tree then going back to it the next day - hopefully it's not too harmful for the tree.
Removed a few ugly knuckles on top, opened it up more from the front.
 

Attachments

  • Screenshot_20240220_085506_Gallery.jpg
    Screenshot_20240220_085506_Gallery.jpg
    131.1 KB · Views: 14
Top Bottom