small twisted shimpaku from nursery stock

jamie11

Yamadori
Messages
82
Reaction score
1
Location
Australia, QLD
USDA Zone
5-6
hey people,

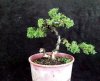
here is a small shimpaku i wired up and done some work on today, basically i am get the main shape in it first then i will be creating shari all the way along the trunk to create a live vein that will hopefully eventually pop out and start twisting the trunk naturally anyways, this will be done once the wire has been removed once the trunk and branching sets.
i used graft tape as a protective wrapping like raffia as i had none available at the time.
it will be going into a grow box soon as i build one or get a styro box, then will be fed quite heavily.

please excuse the picture background as it was a spur of the moment thing and i couldnt get the right light for what i needed.

for those interested the height of the tree comes in at approx 8 inches and the base at the nebari is a bit over an inch (not sure of the conversion but its 3cm and height is approx 19.5cm)


let me know what ya think and if it could be improved in any ways :D

cheers.

jamie :D
 

Attachments

  • front.jpg
    front.jpg
    25.1 KB · Views: 355
  • back.jpg
    back.jpg
    25.2 KB · Views: 304
  • side.jpg
    side.jpg
    23.9 KB · Views: 338
Even though it will probably be smaller, bend and twist the jin now before it dries out completely.
 
Even though it will probably be smaller, bend and twist the jin now before it dries out completely.

thanks for the tip bill, i was trying to get some movement in it but it was just tearing, it will probly end up being a small stub a bit later down the track.

cheers :D
 
Personally I think the back is the better front. The apex moves forward then instead of away and it also presents a better base. From this angle the jin could be reduced only by half and represent the failed second trunk more convincingly.
 
i am agreeing with you there steve, i just labelled the photo that so it wasnt just a number and could find it on my pc, i am hoping oneday that the tree will eventually have no front and be veiwable from all perspectives, this is the goal i would like to acheive, after all it is only the beginning of this young trees life as a bonsai to be :D

cheers.

jamie :D
 
Jamie if you want to move it, protect the foliage and trunk, and add a little heat(ie. micro torch), it'll move once you heat the wood.
 
cool bill, i will give that a go, do you just sand it a little to get the burn marks of the wood or will it come out with lime sulphur???


jamie :D
 
Regardless of which side you pick for the front there is one major flaw that you need to address. If you look at the last picture in your sequence of three you may notice that all of the growth you have till now developed is all along the same horizontal plane. There is nothing to the front or the back just everything to the sides. It reminds me of one of my early efforts and the tendency to respond with two dimensional thinking because everything you have seen has been in a book studying two-dimensional images. No offense is intended here just trying to help you grow with your trees.
 
It reminds me of one of my early efforts and the tendency to respond with two dimensional thinking because everything you have seen has been in a book studying two-dimensional images.

I did the same thing! You could rectify that by continuing to literally twist the trunk another 90 degrees counter-clockwise. It would bring the foliage pads a little closer together, add dynamic movement and bring it into the 3D world!
 
Regardless of which side you pick for the front there is one major flaw that you need to address. If you look at the last picture in your sequence of three you may notice that all of the growth you have till now developed is all along the same horizontal plane. There is nothing to the front or the back just everything to the sides. It reminds me of one of my early efforts and the tendency to respond with two dimensional thinking because everything you have seen has been in a book studying two-dimensional images. No offense is intended here just trying to help you grow with your trees.

no offence taken mate, thats why i put it up to get some different opinions, i hear what ya saying, this one has had its first style and needs a lot more work to it, i intend on letting it grow out again before going at it again, but like you say it is basically a flat tree from the side, something i definately need to rectify, and i think brian has hit the nail on the head to do this, it is something i will have to try but am going to have to be careful with the twisting another 90 degrees as i am trying to be cautious of tearing the cambium of the tree.


i will repost another pic once i get some extra movement into it and getting it more 3 dimensional.

cheers.

jamie :)
 
Jamie, wire brush it off for better effect. That and braek and tear the stub to reduce it, it gives it believability.
Brian has a good idea how to deal with the foliage, as well as new budding helping out. Nice part is that this shimp should be pretty easy to twist about.
 
update, a little tweaking and twisting some more, and some movement added to the jin, i am not overly happy with the pom pom look of the foliage but i am thinknig this will eventually grow out a bit and then i will be able to wire some secondaries into pads, thats what i am hoping anyways.


i am starting to like the side veiw as a preffered front but i think this tree will eventually, hopefully be veiwable from all angles.

cheers.

jamie
 

Attachments

  • twisted shimp.jpg
    twisted shimp.jpg
    39.9 KB · Views: 98
  • twisted side.jpg
    twisted side.jpg
    38.9 KB · Views: 89
Getting there! If possible, add to the twist between the first and second branches. Also, don't be afraid to "acordian" the branches a little back and forth, pushing the foliage back in toward the trunk. It will help eliminate the pom-pom look. Thanks for the update...Enjoy!
 
ok, i have been sitting and looking at this tree for a few hours today, playing with it trying different things, and this is what i have come up with, with some compression bending here and there, and some fine wiring to try and get some secondaries in place even though the tree is young this is what i have come up with, i think its an improvement overall and i will probably let it rest for a while, feed it up nicely and let it fill out, it still needs some spots to fill out a lot but the basic structure is nearly there i think :)


the other thing that has changed in the tree is the overall height is now 200mm or 8 inchs. a little bit smaller than originally :)

and i cant remember if i tweaked the jin at the early pics this morning, it has now been done using a small jet lighter to add heat to the wood and then bending when hot and held until it has cooled down.


cheers.

jamie :)
 

Attachments

  • Twisted shimpaku new style.jpg
    Twisted shimpaku new style.jpg
    34.9 KB · Views: 85
  • T.s other side.jpg
    T.s other side.jpg
    59.2 KB · Views: 75
another twisted shimp, less refined

heres another i wired up similar to this but more wild like, i even wired around some deadwood that seemed perfect for it :)

its still got a long way to go with lots more twisting and turning but it will get there :)

i know it looks like it has three leaders going up from the top, these will be twisted and turned and bent once the get a bit longer and i can rewire :)

jamie :)
 

Attachments

  • Tsnew.jpg
    Tsnew.jpg
    54.8 KB · Views: 90
  • Tsnew..jpg
    Tsnew..jpg
    41.2 KB · Views: 102
Back
Top Bottom