You are using an out of date browser. It may not display this or other websites correctly.
You should upgrade or use an alternative browser.
You should upgrade or use an alternative browser.
Blue Atlas Help
- Thread starter AZbonsai
- Start date
KiwiPlantGuy
Omono
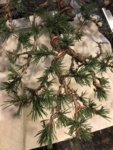
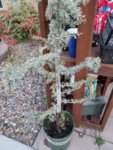
Rebudding nicely! Do I remove older needles? I am going to slip pot it. To close to heat to do more. Am I wrong? Will eventually trunk chop it. And start root training. New purchase. Any and all help appreciated! View attachment 183203
View attachment 183205
Hi AZbonsai,
Pleased you are slip potting this tree. I hope the root ball is healthy as from the photos I am concerned that it is either very very hungry or (I hope not) a root issue. Maybe your previous hot summer was when it struggled.
You probably already know the answer to the needle browning - yep either pull them off, shake the tree lol, or wait and they will fall off in time.
Feed lots would be my thoughts.
Nice purchase and good luck
Charles
You can pull off browning needles, and downward needles, that will clean it up a bit.
But you should cut back to encourage the existing buds closer to the trunk to grow. Atlas Cedar back bud extremely well! Don’t pinch the new growth, let it grow. It will form buds you can cut back to.
But, those inner buds will only grow a small amount of the terminal bud is allowed to grow. You need some secondary branching. So, shorten the branches a bit, and cut back to a pair of buds ( new growth).
Tommorrow, I’ll take some pictures of one I’m working on to illustrate.
Slip potting is merely taking the tree out of the current pot and replacing the pot with a different one of the same shape and size with no root work or adding soil.
I bet that’s not what you’re planning.
DON’T just stick the root ball into a bigger pot with a little new soil all around. Do a proper repot to begin the process of getting it in good soil.
I bet that’s not what you’re planning.
DON’T just stick the root ball into a bigger pot with a little new soil all around. Do a proper repot to begin the process of getting it in good soil.
KiwiPlantGuy
Omono
Slip potting is merely taking the tree out of the current pot and replacing the pot with a different one of the same shape and size with no root work or adding soil.
I bet that’s not what you’re planning.
DON’T just stick the root ball into a bigger pot with a little new soil all around. Do a proper repot to begin the process of getting it in good soil.
Hi AdairM,
Really? I guess you read my comments and didn’t like them. Growing this tree into a healthy specimen in a larger pot for a year or more surely gives the tree enough time to recover from the start it has had, then you have healthy tree, healthy roots and the ability to do root work without the fear of killing it straight away.
Why the hurry to do root work and pruning? ( on a not very healthy tree)
My 0.02 anyway.
Trying to be constructive and not trying to belittle or be rude.
Charles
sorce
Nonsense Rascal
Why the hurry to do root work and pruning? ( on a not very healthy tree)
It's not that he is suggesting to move faster.
Just more appropriately.
Last time I said slip potting was useless someone had like one good reason to use it.
That reason must not for into my "chain of correct" cuz I still feel its useless!
For me...its about entering the scenario into the old mental risk calculator...
Of course. The more you know your trees the better your calculator works....
1.
Slip potting is a -5 move for 0 benefit, with possible detriment. = -5 or less
2.
Repotting is a -10 move but stands a +20 benefit or more.
+10 or more.
Again...these numbers become more accurate with your health gauge.
With time, an artist gauges health so well repotting becomes this equation.
3.
0 Move...Always Beneficial.
This is when slip potting becomes ludacris in an artist mind because he know next year, or the year after, he stands to only benefit with appropriate moves.
Add HBR and all of a sudden we have many useful tools at our disposal, and as Bonsai artists....we realize Grandma slip potted her houseplants cuz SHE WASNT A BONSAI ARTIST!
Sorce
What I’m afraid of, is “up potting”. Where the roots are not touched, but the whole thing is merely put into larger container, with new soil on the bottom, and new soil on the sides.
When you do this with proper bonsai soil, which is very open wirh excellent drainage, you have set yourself up for disaster.
The old part of the rootball is likely a peat/bark/sand mixture, heavy in organics, and rather dense and tends to hold water. The new soil is very open with lots of air space, and tends to dry quickly.
At the margins where the two different souls meet, there is so much air the roots won’t leave the old rootball to populate the new soil. So they stay in the old part and draw water from it.
When you water, water seeks the path of least resistance. So, water on top doesn’t slowly soak it’s way down thru the dense rootball, no, the water finds it is much easier to drain thru the new soil, down the sides, thru the layer on the bottom, and out of the pot. Bypassing the solid center. Where the roots are.
Over time, the roots, which stubbornly refuse to grow into the “air”, slowly suck more and more of the water out of the old rootball. Which as it dried out actually becomes hydrophobic., that is, it repels water! (Have you ever seen a kitchen sponge that is really, really dry? Pour some water on it, and the water just beads up on it? That’s what’s happening.)
So, our well meaning “slip pot” has turned into a slow death trap. The center of the old root ball becomes drier and drier, The roots won’t grow into the new mix where the water passes thru. And because there’s no roots in the new mix, subsequent waterings have no effect.
Eventually, the tree can die due to “lack of water”!
Lol!! These are not MY ideas! I will share some of my experience:I appreciate all the feedback! And will start implementing your ideas. Everyone presented something I can use and that is what I wanted, so thanks.
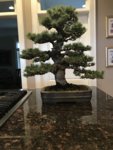
This is a green Atlas Cedar. It back buds easier that your Blue, so you have to be even MORE vigilant!

I took all the old wire off about a year ago, and did a hard cut back. To shorten limbs and induce back budding. At the point where this picture was taken, I’ve now further refined by cutting back and wiring the bottom half of the tree. I’ve actually completed 2/3 of the work as the top “half” is smaller that the bottom. I always start at the bottom and work up.
Long ago, this tree was as straight as yours! Wire was applied (the scars still show) to induce curves in the trunk. The scars will show until it started to develop rough bark. It should start doing that in about 5 years or so. If you want any curves in your trunk, do it NOW! It will take very heavy copper wire (don’t even THINK about using aluminum with Atlas Cedar) and some blocks of wood and rebar. Maybe a jack.
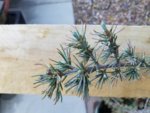
Now take a look at one of my branches. This is the start of a pretty well developed pad:

Some things to notice: my trunk is curved. So, the center line of my branches should be curved, too. Too often, I see curved trunks on trees with straight branches. Straight trunk, then you can have straight branches!
Next, you see taper in the center line of the branch. This was achieved by letting the branch grow long, then cut back. Grow long, cut back.
And then you see longer sub branches closer to the trunk, and shorter ones out near the end of the branch. This gives the pad a triangular shape when seen from above.
And finally, all along the main branch, there is the occasional “top branch”. As these grow, they get wired to follow along the same path as the main branch. One day in the future, the main branch will just get too long. I will be able to cut back to one of these “top branches” and it will replace the old main branch.
So, to get a nice sustainable pad working, I choose sub-branches carefully, making a left-right-left-right pattern, putting branches on the outside of curves, developing taper. Occasionally allow a top branch . Remove branches that try to grow down, or come from the bottom of a branch.
Wire is essential! And choose a heavier gauge when wiring these than normal because they are very springy, and it takes a very long time for the curves to set.
On the picture of the branch you posted, the tree showed you that it wants to make a pad of baranchlets. Problem is, that pad is happening out at the end of a long branch, and there is no taper in that branch! The good news is that branch still has small little buds and tufts of foliage back there. Those buds and tufts will form pads if you cut back the leader(s) on the end of the branch. But they won’t if you don’t.
So, the point of all this is you have to start cutting back to develop taper. And induce back budding. You can’t just let it grow, and think you can style it once the trunk gets fat. If you do, you’ll have a telephone pole trunk, with long taperless branches with no foliage until the ends of the branches!
No, these have to be cut back rather hard. But they are very responsive! They will backbud very well!
Rather, I should actually say they will grow from their backbuds very well! As they grow, send out new spring shoots, every half inch or so, they’ll develop a pair of buds. And the Center shoot just keeps growing. Another 1/2 inch, another pair of buds. And so on. Sometime around early to mud summer, you can cut back to one of those pair of buds. If you want a longer branch, choose a pair further from the trunk. If you want to keep the branch short, you can cut back to a pair closer to the trunk. That bud(s) will then take over and start to grow to be the new leader. Don’t cut back to bare wood. That branch will die. You can only cut back to buds.
Similar threads
- Replies
- 5
- Views
- 550
- Replies
- 32
- Views
- 763


