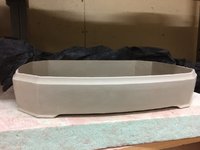
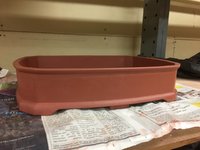
Building a wet slab bonsai pot

ABCarve

Masterpiece
Messages
2,686
Reaction score
11,552
Location
Girard, PA
USDA Zone
5a
This would make great educational material for both this thread and The Rosemary Thread if you're up to it. I don't think I've ever seen a "step-by-step" repot with photos on Rosemary. Most people are unnecessarily scared of Rosemary because there just isn't a lot of information out there to help.
Really good idea. Just hope I can remember to do it.
 
  • Haha
Reactions: Vin

ABCarve

Masterpiece
Messages
2,686
Reaction score
11,552
Location
Girard, PA
USDA Zone
5a
This is a style I call a "stadium pot" as it resembles such. So what's the point of making the bottom turn under? My purpose was to try and design a pot that looks shallower than it really is while giving it a lighter feel by its seemingly elevated sides. I've done this one before but never this big. Its a challenge to keep the lip from sagging while firing since the sides are unsupported. The intermediate clay supports the sides firming up and shrinks/dries as the rest of the pot. I think this one will be fired on its rim with wading to support the bottom. Hopefully it will sag to a flat and level lip.
Accompanying photos show the plug, related ribs and template.


Attachments

  • IMG_3320.jpeg
    IMG_3320.jpeg
    171.5 KB · Views: 26
  • IMG_3316.jpeg
    IMG_3316.jpeg
    326.9 KB · Views: 24

Leo in N E Illinois

The Professor
Messages
11,341
Reaction score
23,293
Location
on the IL-WI border, a mile from ''da Lake''
USDA Zone
5b
The double legs, are a design figure that reminds me of ornaments used by Frank Lloyd Wright, I think I saw them at the Oak Park Studio. I would have to dig to find photos, it might have been one of his other projects. But point being, the double legs are a nice, refined, and clean design. Pleasing. I like them. Hopefully it will survive firing without problems.
 

ABCarve

Masterpiece
Messages
2,686
Reaction score
11,552
Location
Girard, PA
USDA Zone
5a
Very nice. You plans on glazing this one?
Good question!! It’s problematic in that a glaze would cover up the carving. It may end up being a hybrid of glaze and oxides. Gotta try some test tiles.
 

Pitoon

Imperial Masterpiece
Messages
5,055
Reaction score
11,467
Location
Southern Maryland
USDA Zone
7b
Good question!! It’s problematic in that a glaze would cover up the carving. It may end up being a hybrid of glaze and oxides. Gotta try some test tiles.
Couldn't you wax resist the carving section to preserve it? Or you think the glaze would drip over it regardless?
 

ABCarve

Masterpiece
Messages
2,686
Reaction score
11,552
Location
Girard, PA
USDA Zone
5a
Couldn't you wax resist the carving section to preserve it? Or you think the glaze would drip over it regardless?
Those scenarios are both possible. I try not to think too far ahead as it may stop me from trying a new idea. I have quite a bit of time to ponder all the the options. How about oxide, wax more oxide, sig. That’s what I like about ceramics, the permutations are endless.
 

vancehanna

Chumono
Messages
743
Reaction score
2,134
Location
Stockton, CA
USDA Zone
9A
Once fired maybe consider a slip mold for a limited production...
You appear to be a master craftsman so why not?
 

ABCarve

Masterpiece
Messages
2,686
Reaction score
11,552
Location
Girard, PA
USDA Zone
5a
Once fired maybe consider a slip mold for a limited production...
You appear to be a master craftsman so why not?
Thanks for the kind words....... but that would be like working. I’m retired and doing this brings me a lot of joy and I don’t want to ruin it.
 

ABCarve

Masterpiece
Messages
2,686
Reaction score
11,552
Location
Girard, PA
USDA Zone
5a
How do you decide what angles to cut the walls at when you are cutting corners?
Imagine the corresponding sides laying flat on the clay instead of being vertical and you could trace those angles. Once you have the angles where the two sides will join you need to add a tab to one of them to account for the thickness of the clay.
 

ABCarve

Masterpiece
Messages
2,686
Reaction score
11,552
Location
Girard, PA
USDA Zone
5a
So this is my pal Harry..... (Harry the Potter ;) ).... and this is about the 4th serious pot he has ever made. And this is the first time he's ever used this method. The technique shows how the foam form and the rib control the outside shape of the pot including an even and controllable thickness. The photos show trimming the feet after the pot was flipped, feet and spacer were added. The form allows you to apply downward force to compress the foot joints and even the spacing. Once the slabs were rolled out this all took place in about 3-1/2 hours.


IMG_3373.jpegIMG_3377.jpeg
 

ABCarve

Masterpiece
Messages
2,686
Reaction score
11,552
Location
Girard, PA
USDA Zone
5a
Pulling the plug!! The pot will be wrapped on the outside to slow the drying overnight. Once firm enough, ragged edges will be removed and general smoothing will be done with a red Mudd tools rib.


IMG_3379.jpegIMG_3380.jpeg
 

dsvarney99

Seedling
Messages
6
Reaction score
4
As you can see a male form has been made from 2" insulation foam. A 1" and 2" sheet have been laminated for a depth of 3". I guess another lesson could be showing how to make this. Next time. Suffice to say it has been cut into quadrants and lightly taped back together with 2" packing tape.
How do you laminate the foam layers together?
 
Top Bottom