You are using an out of date browser. It may not display this or other websites correctly.
You should upgrade or use an alternative browser.
You should upgrade or use an alternative browser.
Building a wet slab bonsai pot
- Thread starter ABCarve
- Start date


ABCarve
Masterpiece


ABCarve
Masterpiece


ABCarve
Masterpiece


ABCarve
Masterpiece
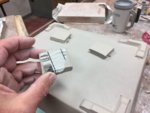
To prepare the final surface and to add the feet its flipped over again. The hard corners are slightly round to avoid chipping after it fired. The area where the feet will go is scored to adhere the feet to the leather-hard clay. The joint has a slip applied to the scored surface before the foot is added. Once all the feet have been put on and shaped, temporary spacers (same thickness as feet) are laid in place to support the bottom as it dries as well as the firing process. The newspaper keeps them from sticking to the bottom.
Attachments


ABCarve
Masterpiece
barrosinc
Masterpiece
Amazing walkthrough! Thanks
ABCarve
Masterpiece
I hope you give it another try!!Amazing walkthrough! Thanks
barrosinc
Masterpiece
Probably today!! I had made the mold last week.I hope you give it another try!!
Lionheart
Yamadori
Thank you for this and the other one. Extremely good information and photos.
ABCarve
Masterpiece
This is a commission I'm working on now. Similar technique but in a different order to accommodate the inset panels. Takes two people to flip it over. As it is now it won't fit in the kiln. The width will shrink over 3" after firing and 1.5" in curing to greenware.
Attachments

Soldano666
Omono
Dannnng thats a beast. Awesome tutorial you have put together here.
Vinnie Charity
Shohin
This is a very interesting thread, and one of these days I'll snag one of the many free kilns that are posted here in Richmond so I can start making my own pots!!!
barrosinc
Masterpiece
Wow!!!
ABCarve
Masterpiece
Are you making progress?Wow!!!
barrosinc
Masterpiece
Yep! Went to the kiln last week. We should see!! I want to make a new pot with the one piece technique and see how it goes. The one I sent is 50cm so quite large hope it doesn't warp.
ABCarve
Masterpiece
So happy that’s working for you. It keeps getting easier and the pots get better!!Yep! Went to the kiln last week. We should see!! I want to make a new pot with the one piece technique and see how it goes. The one I sent is 50cm so quite large hope it doesn't warp.
ABCarve
Masterpiece
@Vlad Cruceanu I was thinking of your question so I thought I’d give it a try. I made four of these panels and they took me about four hours. Not a very commercial time frame. It would be ok if you were doing it to make a mold. Someone has to make an original. You can see the wooden rib which is carved to a knife edge and small strips of clay attached to the slab. A piece of matte board has been cut as a template to guide the rib. I’ve covered it with packing tape so it doesn’t slide around on the surface.
Attachments


ABCarve
Masterpiece
I slowly scraped away the excess clay in multiple passes. A problem is the corners need to be modeled by hand. Once you have it all modeled you can remove the template and smooth the adjoining surfaces with a soft rib.
Attachments
-
 2B2B3EB3-EEBF-4CC2-B6F9-20149D17BB00.jpeg139.5 KB · Views: 141
 -
 1FC0CFED-41CE-428B-8239-CF461BA0D020.jpeg109.6 KB · Views: 130
 -
 366F1425-3DAE-409E-811C-D6D21768569D.jpeg121.8 KB · Views: 128
 -
 15A1B1C6-B77C-44E3-84C1-1C80963D9686.jpeg167.5 KB · Views: 123
 -
 05A15682-7899-4160-9E29-7492EC0A98F0.jpeg97.7 KB · Views: 127
ABCarve
Masterpiece


Similar threads
- Replies
- 2
- Views
- 532