Making a slab-built bonsai pot in a demo

Dale Cochoy

Shohin
Messages
268
Reaction score
54
Location
Hartville, Ohio
USDA Zone
5
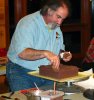
Two of the types of workshops and demos I do are pottery related. I love doing club pottery making workshops where the members all receive some pottery making instructions and then they 'dive in' and make their own pots. I return home with their pots for drying and refinement and firing and then return their finished pots to the club. Everyone always seems to have a good time and I am always amazed at the quality of some pots produced in these workshops, especially considering the limitations in what the members can get accomplished in that type of setting.

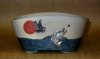
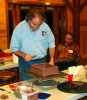
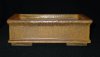
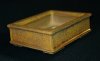
The second type of program I do is to build a slab pot the same as a finished one I bring for the club to auction off to the demo's attending members.

Last January 2007 I did a workshop and demo at the Rochester, NY club and brought this pot as the pot they would auction off.
I then built the same style/size pot using the same methods. I return home with the finished pot and dry and glaze it at a later time.
 

Attachments

  • Rect.jpg
    Rect.jpg
    51.4 KB · Views: 68
  • rect3.jpg
    rect3.jpg
    48.9 KB · Views: 61

Dale Cochoy

Shohin
Messages
268
Reaction score
54
Location
Hartville, Ohio
USDA Zone
5
The logistics of doing this demo can be a bit tricky.

First I have to roll out all the sheets of clay I am going to need beforehand ( usually the day before) and carefully cover/uncover them so that they are the perfect state of 'leather hard' at the time of the demo.
Once the demo starts I will score the sheets of clay using the templates for the sides and feet. I then cut out all the pieces I will need. You will see this in the first two photos.

BTW, these shots were taken by Bill Valavanis as I was working during the demo.
 

Attachments

  • demo1.jpg
    demo1.jpg
    62.1 KB · Views: 91
  • demo2.jpg
    demo2.jpg
    61.8 KB · Views: 91

Dale Cochoy

Shohin
Messages
268
Reaction score
54
Location
Hartville, Ohio
USDA Zone
5
In the next three photos you will see how I have cut out the bottom for this pot. I then lay-out and cut drain/wiring holes. Then the bottom is attached to the box side which has been 'squared up' during assembly. I use slip to attach the sides and bottom during assembly. 'Slip' is basically a 'cement' made from the same type of clay being used. It is soft and more liquid than the clay as supplied or that is used on the pieces being assembled. It is about the same consistancy as tooth paste. Basically, you can consider it's function the same as mortar used in brick laying.
 

Attachments

  • demo3.jpg
    demo3.jpg
    63.4 KB · Views: 69
  • demo3a.jpg
    demo3a.jpg
    53.3 KB · Views: 67
  • demo4.jpg
    demo4.jpg
    53.2 KB · Views: 76

Dale Cochoy

Shohin
Messages
268
Reaction score
54
Location
Hartville, Ohio
USDA Zone
5
In the next two shots I am smoothing my seams, removing excess slip and have reinforced the sides and joints to the bottom using rolled out 'snakes' of soft clay which are layed onto the joint and then smoothed out.
 

Attachments

  • demo5.jpg
    demo5.jpg
    61.6 KB · Views: 59
  • demo6.jpg
    demo6.jpg
    59.6 KB · Views: 60

Dale Cochoy

Shohin
Messages
268
Reaction score
54
Location
Hartville, Ohio
USDA Zone
5
In this next shot you will see I have installed the feet ( which I was cutting out in the second photo shown). feet are attached with slip and then cleaned-up around the joints.
 

Attachments

  • demo7.jpg
    demo7.jpg
    55.9 KB · Views: 72

Dale Cochoy

Shohin
Messages
268
Reaction score
54
Location
Hartville, Ohio
USDA Zone
5
If you look back to the pictures of the pot I brought as the auction pot you will see that it has a rail around the top which nicely matches the rail at the bottom ( created by the bottom piece). One of the most time consuming parts of this build is to lay-out, cut and attach this rail. It has to be fairly precise! As the weather was very bad, and time running short, I improvised with a different type of top rail. I rolled out some 'snakes' of soft clay and attached them to the top of the pot walls. Then I used a tool to introduced a texture ( or design) into them . I also reproduced this texturing on the bottom rail. This method of doing the top reduced the construction time by about 45 mins-one hour.
 

Attachments

  • demo8.jpg
    demo8.jpg
    59.4 KB · Views: 60
  • demo9.jpg
    demo9.jpg
    56.2 KB · Views: 67

Dale Cochoy

Shohin
Messages
268
Reaction score
54
Location
Hartville, Ohio
USDA Zone
5
Below you'll see some photos of the dry and ready to bisque pot. You'l notice I also carved a design into the sides after I got the pot home.
 

Attachments

  • demo pot dry.jpg
    demo pot dry.jpg
    33.6 KB · Views: 78
  • demo pot dry top.jpg
    demo pot dry top.jpg
    39 KB · Views: 61

Dale Cochoy

Shohin
Messages
268
Reaction score
54
Location
Hartville, Ohio
USDA Zone
5
Lastly, you see a photo of the finished high-fired pot that was glazed with one of my own ash glazes.
I hope you enjoyed this little demo photo essay.
Regards,
Dale
 

Attachments

  • Demo pot FINAL.jpg
    Demo pot FINAL.jpg
    58.3 KB · Views: 85

agraham

Shohin
Messages
276
Reaction score
51
Location
South Texas
USDA Zone
9
Lastly, you see a photo of the finished high-fired pot that was glazed with one of my own ash glazes.
I hope you enjoyed this little demo photo essay.
Regards,
Dale

I did ,Dale.Thanks for an informative post.

andy
 

Jay Wilson

Shohin
Messages
436
Reaction score
14
Location
Polk City, Fl.
Nice demo Dale.
One day, if I ever have any trees that are worthy, I'll have some of your pots.

Thanks for the post.
 

Dale Cochoy

Shohin
Messages
268
Reaction score
54
Location
Hartville, Ohio
USDA Zone
5
I'm Still making pots!
You can follow me on FACEBOOK at pages DALE COCHOY or WILD THINGS BONSAI STUDIO, also on The Internet Bonsai Club "Pottery" forum.

D.
 

Attachments

  • circle of life.jpg
    circle of life.jpg
    115.3 KB · Views: 16
Last edited:
Top Bottom