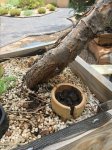
Ponderosa Pine first structural setting

PiñonJ

Omono
Messages
1,402
Reaction score
3,344
Location
New Mexico, AHS heat zone 5
USDA Zone
6b
I collected this Ponderosa in the mountains last year, did its first structural setting yesterday.

Last year, end of may:
IMG_2816.JPG
IMG_2817.JPG IMG_2817.JPG
Yesterday:
IMG_4526.JPG
I wanted to do a big trunk bend, so I did a wedge cut and placed a guy wire. I should have placed the cut a little higher, so I could get the saw in at a better angle to make the two sides exactly the same length, but it worked out pretty well.
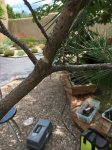
IMG_4502.JPG
Screw to attach the guy wire:
IMG_4500.JPG
Guy wire in place:
IMG_4532.JPG
 
After the big bend, prior to wiring (couldn't go any more than this for now, as the bark on the outside of the bend developed some mild splits):
IMG_4527.JPG
IMG_4530.JPG
Cut paste on the wound:
IMG_4534.JPG
Guy wire attached to screw:
IMG_4535.JPG
After wiring branches:
IMG_4536.JPG
Right side view:
IMG_4516.JPG
Top view:
IMG_4515.JPG
Don't worry, it won't end up looking like a flat-top tropical! Right now, it's just wired for even distribution of light. Future plans include chasing the foliage back (there is some back-budding now), bending the trunk down more, and reducing needle length.
 
Good luck with healing since late in season. Even if does not take still branches below cut. Interesting to see what development brings;).
 
Reckon this period of most thickening oughta do you good....

And something...something very very particular....
Tells me you are already more than 80% sure it's going to work fine....
And you have already balanced well..

Health...

And taking it to the best place it can be.....
Since you touched it!

Osa Been Pondered!

Nice!

Sorce
Thanks, Sorce. This is supposed to be the second best time of year to work on pines, so we'll see. They say go big or go home. If nothing else, I'll have a good post on total re-style next year!
 
As you can imagine, when I bent the trunk over backwards, it flipped many of the needle clusters upside down. I asked my teacher if the needles would adapt to the new position and he said no, if they're not positioned right side up, they will get sun damage. So, I broke out the 4 gauge copper and did some major twisting. A nice side benefit is that I was able to put more downward bend in the trunk and wire out the needle clusters (one of which was in a group of 4) into something more closely resembling pads.
IMG_4540.JPG IMG_4542.JPG
Adding to the previous day's work, some wire crossings were unavoidable.
IMG_4544.JPG
I re-positioned the guy wire to add to the necessary twisting force on the trunk to help reorient the needles (got them about two thirds of the way there prior to wiring the tips). I also bent that back branch down more, which resulted in some unsightly gaps in the previously placed 6 gauge (the position it demanded didn't result in a twist which would close the gaps).
IMG_4545.JPG
 
Before and after. Look at the change in angle of the two trunk sections.
IMG_4549.JPG
IMG_4539.JPG
Wired pad - that's a lot of needles all on the same plane!
IMG_4547.JPG
Here's an epicormic bud that has been growing beautifully all season. I was terrified I was going to rub it off at some stage during all the work!
IMG_4567.JPG
iPhone image showing the curves:
IMG_4570.JPG
 
Good documentation!

Can I twist your arm?

Deja Vu moment! (in real life for me, odd.)

Anyway....

You know this .....

(the position it demanded didn't result in a twist which would close the gaps).

Is really....

"I applied this wire before thinking about what direction the branch had to move."

I still eff up here and there but I've been trying to pay more attention, and not apply a wire till I know for sure which direction it needs to go.

I understand this was probly wired before having to turn the branch that way....

Which just says you should have ran consultation earlier and planned for this branch direction which technically always had to be wired the other way.

IMO...
When is this going to matter?
Not now!

But you ARE better than to allow this to happen again!
Of that I'm certain!

Love this work!

Sorce
 
Good documentation!

Can I twist your arm?

Deja Vu moment! (in real life for me, odd.)

Anyway....

You know this .....


Is really....

"I applied this wire before thinking about what direction the branch had to move."

I still eff up here and there but I've been trying to pay more attention, and not apply a wire till I know for sure which direction it needs to go.

I understand this was probly wired before having to turn the branch that way....

Which just says you should have ran consultation earlier and planned for this branch direction which technically always had to be wired the other way.

IMO...
When is this going to matter?
Not now!

But you ARE better than to allow this to happen again!
Of that I'm certain!

Love this work!

Sorce
There were a couple of factors at play. One, I didn't anticipate how the downward bend was going to leave that stiff 6 gauge behind, and two, this tree is full of widely spaced bar branches which pretty much demand wiring them to each other. If both branches require the same clock sense direction of twist, it's a problem. But you're right, I'll learn from it! In the future, those bar branch pairs will be pruned down to one branch, so that will help. Structurally, it's not a problem, it just doesn't look as high-quality as I'd like it to. Thanks for the vote of confidence!
 
Wiring two bar branches together isn't an appearance problem, it's an effectiveness problem. Usually, wiring them together makes them not have an effective anchor. If you push down on one of them, the one on the opposite side goes up. Not good. It should be wired so that when you move a branch, no other branches move.

In an ideal world, you wouldn't have bar branches. With yamadori, sometimes you have no choice and you just have to work with what you got!

So, wire one side bar branch together with the main branch (or trunk), and then run the wire out to wire one branch of the next set of bar branches. If you have already wired the main line, this means you will have two parallel wires on the main line. Now you can wire the the bar branches together if you like, you only have to go 1 1/2 turns on the bar branch previously wired. Repeat for the other bar branch pair farther along the trunk.
Thanks, I appreciate the input! It's actually not a problem wiring opposing branches, as long as you start the wire on the side of the branch opposite to the initial direction in which you intend to bend the branch and as long as you apply it in the desired ram's horn configuration, i.e. you wrap around the trunk, then wire clockwise on one of the branches, then counterclockwise on the other. Then, when you make the bends, the wire just snugs itself to the trunk and the branch. If you cross the trunk at an angle and wire both branches in the same clock sense, then you have a continuous, stable helix from the tip of one branch to the tip of the other. When you try to bend one of the branches, it just moves the other branch in the opposite direction, just like a see-saw. In the case of the branch I mentioned in my previous post, the wire is quite functional, it just doesn't look good. I probably just didn't get that 6 gauge on tight enough in the first place. If I couldn't meet the above criteria for applying the wire, I'd certainly consider the technique you explained.
 
Thanks, I appreciate the input! It's actually not a problem wiring opposing branches, as long as you start the wire on the side of the branch opposite to the initial direction in which you intend to bend the branch and as long as you apply it in the desired ram's horn configuration, i.e. you wrap around the trunk, then wire clockwise on one of the branches, then counterclockwise on the other. Then, when you make the bends, the wire just snugs itself to the trunk and the branch. If you cross the trunk at an angle and wire both branches in the same clock sense, then you have a continuous, stable helix from the tip of one branch to the tip of the other. When you try to bend one of the branches, it just moves the other branch in the opposite direction, just like a see-saw. In the case of the branch I mentioned in my previous post, the wire is quite functional, it just doesn't look good. I probably just didn't get that 6 gauge on tight enough in the first place. If I couldn't meet the above criteria for applying the wire, I'd certainly consider the technique you explained.
I don't want to get into a "I'm right and you're wrong" pissing match. Good wiring does require a bit of planning ahead. Apply the large wires first, then work consecutively to smaller and smaller branches. I start at the bottom and work up, on the branches closest to the trunk first, and work out. I rarely find I have to cross a wire. I may have to double up, but I want good anchors.

Sometimes I find it beneficial to use a thin piece of aluminum to find the path for the wire. I can run a test wire to see if I'm running into a trouble spot, and make adjustments. Sometimes I find I may have to remove a piece I put on earlier so I can route the wire differently.

Here is an example of some of my wiring:

IMG_0560.JPG
 
I don't want to get into a "I'm right and you're wrong" pissing match. Good wiring does require a bit of planning ahead. Apply the large wires first, then work consecutively to smaller and smaller branches. I start at the bottom and work up, on the branches closest to the trunk first, and work out. I rarely find I have to cross a wire. I may have to double up, but I want good anchors.

Sometimes I find it beneficial to use a thin piece of aluminum to find the path for the wire. I can run a test wire to see if I'm running into a trouble spot, and make adjustments. Sometimes I find I may have to remove a piece I put on earlier so I can route the wire differently.

Here is an example of some of my wiring:

View attachment 158545

man, Wiring is a love hate thing with me. I have some tree's that take a few days to wire, this has what 6-8 hours of work into it?
 
Probably 12 or more.

That's the thing when you get advanced trees, they're lot of work to maintain! More twigs to wire, more needles to pull, etc.

Then again, they shouldn't be in the rapid growth phase anymore, so wire doesn't cut in as fast.
 
Back
Top Bottom