Root-Over-Ruin

pjkatich

Chumono
Messages
826
Reaction score
38
Location
Northeast Florida
USDA Zone
9
Once you have collected the required materials you can proceed with step one. At this point, you will need to prepare the roots of your plant material before you insert it into the PVC tube.

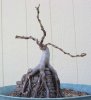
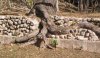
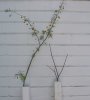
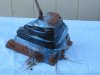
Photo 1 shows the test subject removed from its pot and the roots washed clean of soil. I normally comb out the roots and remove any that are growing too high on the trunk. I then cut back any dominant roots and trim the rest to an even length.

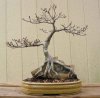
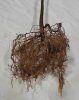
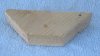
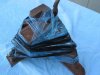
Photo 2 shows the same test subject after the roots have been trimmed.

At this point, you can plant the tree into the PVC tube. I start by putting some of the coarser soil (larger than 1/8" into the bottom of the tube) this will ensure that the smaller size soil does not run out of the bottom of the tube. This is followed by filling the tube with the smaller size soil up to between 6 to 8 inches from the top of the tube. I then lightly tamp the PVC tube a few times in the bottom of a bucket to settle the coarse soil and test the integrety of the bottom screen. If the screen is properly inserted no problems. If is is not, the screen will pop-out and the soil will wind up in the bottom of the bucket and you will have to start over.

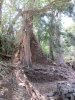
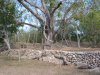
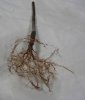
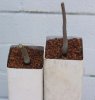
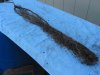
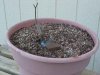
Now you can position the tree in the remaining void and continue filling with the soil mixture using a chop stick to fill in around the roots. I normally plant the tree a bit on the deep side. Usually 1" or more of the trunk is covered with soil to help stablilzed the tree. Once this phase is complete I water in well and top off the tube opening with some wet spagnum moss to retain moisture. The third photo shows the first two root-over-ruin test subjects planted in their PVC tubes.

Next, I place the PVC tubes into a 5 gallon bucket equipped with a metal or wire grid at the top to help the tubes stand up. From this point, the trees are allowed to grow unchecked for the rest of the season. The buckets are placed in an area that receives morning sun where they remain for the first year of growth. They are watered daily at first, but as the growing season progresses I cut back on the watering to encourage the roots to chase the moisture down the length of the PVC tube. I will normally remove the spagnum moss from the top of the tube after the trees have been actively growing for a month or more.

Once the trees show new growth I start to fertilize them on a weekly basis. I use a variety of fertilizers mostly the liquid products, some are organic and some inorganic. The timed release pellet types work well also. During the peak growing periods I will use a high nitrogen product to encourge as much growth as possible the first growing season.

If you follow these procedures you should have a nice fiberous root system growing out of the bottom of the tube by the end of the first growing season.

This concludes the first installment of this tutorial.

Are there any questions at this point?

Installment two to follow.

Paul
 

Attachments

  • IMG_0007.jpg
    IMG_0007.jpg
    85.7 KB · Views: 202
  • IMG_0009.jpg
    IMG_0009.jpg
    68.3 KB · Views: 213
  • IMG_0010.jpg
    IMG_0010.jpg
    73.6 KB · Views: 240
Last edited:

pjkatich

Chumono
Messages
826
Reaction score
38
Location
Northeast Florida
USDA Zone
9
Step Two

No questions, I must have done a good job on installment one.

For the next phase, you will need the following materials:

1. Seedlings grown in the PVC tubes for at least one year. The first photo shows two test subjects from February of last year. The one on the right, a two year old Acer rubrum seedling will be the focus of this demonstration.

2. A large, deep container to plant the compostion in when you are done. I normally use 3 to 5 gallon, plastic nursery pots for this. Cover the drainage holes with some mesh to keep the soil from falling out.

3. Enough coarse soil mix to fill the pot you have chosen. I have used bonsai soil, calcined clay, and coarse sand for this phase. I would recommend you stick to a coarse bonsai soil mixture, that seems to do a good job and you don't have to be as diligent with the watering.

4. Stretch Wrap (second photo). This is what I use to wrap around the roots to hold them firmly to the particular object you plan on planting your tree over. This is the same material that is used to wrap palletized goods. It only sticks to itself, it is strong, flexible, will not damage the roots, and will last for at least two years before it begins to break down. Your can buy it at most big box office supply stores in 5" or 6" rolls for a reasonable price. I then cut the larger roll into smaller 1.5" to 2" rolls for conveniece (photo 3). You will also need some vinyl electrical tape (photo 4) and some wet spaghnum moss.

Stay tuned, more on step two to follow.
 

Attachments

  • IMG_0024.jpg
    IMG_0024.jpg
    72.3 KB · Views: 184
  • IMG_0008.jpg
    IMG_0008.jpg
    90.2 KB · Views: 179
  • IMG_0009.jpg
    IMG_0009.jpg
    75.2 KB · Views: 149
  • IMG_0010.jpg
    IMG_0010.jpg
    75.2 KB · Views: 130
Last edited:

pjkatich

Chumono
Messages
826
Reaction score
38
Location
Northeast Florida
USDA Zone
9
Step Two

Continuing on with step two:

Additional materials needed for this phase:

5: A suitable object to plant your tree over. I originally developed these procedures for root-over-rock style plantings. However, since this thread started out as a discussion of root-over-ruin style, I picked a ceramic mini-ruin as my object (first photo). If you chose this approach, you will need one more item to complete your first planting - a wedge (or two) for the back side of the ruin. This helps keep the roots pressed tight againts the back of the wall during the first few growing seasons. Anything that will fit in the angle will work. I have tried a number of objects and have standardized on a wooden wedge made from a non-treated 2x4 as shown in the second photo.

Once you have gathered all your materials you are ready to put your first root-over-? planting together.

I start by first selecting one of the trees that I planted in the PVC pipe last year. I then remove the tree from the pipe for inspection. In this case, it is the Red Maple seedling shown earlier in this thread. I have found that banging on the sides of the pipe with a rubber mallet will loosen up the tree allowing it to slide right out of the pipe. If you follow my directions, you will be rewarded with a root system that looks something like the one shown in photo 3.

I have used this method of developing the roots with a number of tree species: Acer rubrum, Acer buergeranum, Acer barbatum, Acacia farnesiana, Juniperus chinensis Sargentii (shimpaku), Juniperus chinensis procumbens nana, Prunus angustifolia, Punica granatum nana, and Sageretia thea all with good results.

I have also tried this method with a number of Ulmus parvifolia varieties. Unfortunately, the elms do not produce the desired results. No matter how hard I would cut the roots back, they tended toward producing one or two dominent roots when grown in the tubes.

Stay tuned, more to follow on step two.

Any questions????

Regards,
Paul
 

Attachments

  • IMG_0030.jpg
    IMG_0030.jpg
    89.1 KB · Views: 139
  • IMG_0032.jpg
    IMG_0032.jpg
    80.6 KB · Views: 142
  • IMG_0103.jpg
    IMG_0103.jpg
    85.8 KB · Views: 232

pjkatich

Chumono
Messages
826
Reaction score
38
Location
Northeast Florida
USDA Zone
9
Step two

Continuing on with step two:

Now it is time to put your root-over-? composition together.

I start first by removing the tree from the tube as shown in the previous post. I will then clean the roots of all potting medium and detangle them as much as possible. Next cut back hard any heavy or dominent roots that formed during the previous growing season. I then remove any roots that have formed high on the trunk. I would suggest that you keep a spray bottle handy during this part of the process to keep the roots from drying out.

Once you have trimmed and detangled the roots, it is time to position the tree over your chosen object. The positioning of the tree will be a personal choice depending on what you have chosen to plant your tree over and the final results you are working towards. I would suggest that you take your time and explore all your options at this point. Once you have selected a planting position you will be hard pressed to make any major changes in subsequent years.

I usually start by draping the root system over the chosen object, spreading the roots to create as natural a look as possible. I normally look at a number of planting options before settling on what I feel is the best position for the tree. Once you have established the planting postion of your tree, it is time to wrap it up. An extra set of hands can be very helpful at this point.

I like to place a thin layer of wet spaghnum moss over the root system before I apply the plastic wrap. This layer of spaghnum moss will extend down to the bottom of the chosen object. I have found that this accomplishes two things at this point. First, it encourages healthy root growth over the surface of the chosen object. Second, it provides a path for the new roots that grow from the ends of the heavy roots that were removed earlier.

Now it is time to wrap up your composition. Using the heavy duty plastic wrap, begin binding the roots and wet moss to your object. Make as many passes around and over the object as is necessary to firmly secure the tree to the object. Make sure you leave spaces for the roots to grow out at the bottom. Finally, I use some of the electrical tape to make sure that the plastic wrap stays in place once the wrapping is done. The first three photos below illustrates what this looks like when finished.

At this point, the composition is planted in a deep pot of coarse bonsai soil and allowed to grow unchecked during the next growing season. This is illustrated below in the last photo.

This ends step two of the process.

Please refer to the earlier part of this post for the next couple of steps.

I hope this has been helpful and would llike to see your root-over-? project posted here soon.

I will be happy to answer any questions.

Cheers,
Paul
 

Attachments

  • IMG_0106.jpg
    IMG_0106.jpg
    69.1 KB · Views: 218
  • IMG_0107.jpg
    IMG_0107.jpg
    78.4 KB · Views: 186
  • IMG_0108.jpg
    IMG_0108.jpg
    79.5 KB · Views: 197
  • IMG_0109.jpg
    IMG_0109.jpg
    78.5 KB · Views: 223

BUBBAFRGA

Mame
Messages
203
Reaction score
5
Location
Darien, GA
Paul,

Thanks for the article / process. I been wanting to do something like this and this has given me the direction I needed to start.

I belive we meet at Kawa Bonsai Joy of Bonsai this year. I belive you donate two of your pots for our Raffle.

Again Great thread and thank you for sharing your experience with us.

Bubbafrga
 
Last edited:
Messages
130
Reaction score
9
Location
florida
USDA Zone
9
Great thread Paul!

I like your attention to detail. From what I remember of our meeting in J.O.B. you are a treasure trove of information;)

I would like to try this on some of my Bucida seedlings that I will be cultivating this spring.

Thanks for the inspiration!


Rob

PS Did you try water smoking yet?
 

pjkatich

Chumono
Messages
826
Reaction score
38
Location
Northeast Florida
USDA Zone
9
Bubbafrga,

I'm glad you found this thread helpful and I hope you move forward with a few projects of your own. Feel free to PM me if you have any questions.

Yes, I did attend J.O.B. this year so there is a very good chance that we met.

Rob,

Thanks for the kind words.

It's good to see you posting here at B-nut. In regards to your question, no, I haven't tried the water smoking technique yet. I have not had the need to expedite the drying process to that extent.

When are we going to see some of your pots?

Regards,
Paul
 
Messages
130
Reaction score
9
Location
florida
USDA Zone
9
Paul,
I will be posting some new pots as soon as I get them done. I am currently working on some shohin sized slab constructed rectangles, and a series of ovals (small and medium) and a commission for 2 small cascades.

I have posted to the gallery here and at BT. BTW, do you like the new IBC? Check it out if you haven't yet.

Peace,

Rob
 

pjkatich

Chumono
Messages
826
Reaction score
38
Location
Northeast Florida
USDA Zone
9
Root-over-ruin update.

Since winter has finally released it's grip on North Florida, the trees are responding and it's time for an update on this project.

The first photo shows what test subject #1 looked like prior to any work.

The second photo shows the nebari from the front of the ruin.

The third photo shows the nebari from the back of the ruin.

The forth photo shows how the roots are spreading over the top of the wall.
 

Attachments

  • IMG_0062a.jpg
    IMG_0062a.jpg
    84.3 KB · Views: 413
  • IMG_0063a.jpg
    IMG_0063a.jpg
    88.3 KB · Views: 388
  • IMG_0065a.jpg
    IMG_0065a.jpg
    82.4 KB · Views: 338
  • IMG_0066a.jpg
    IMG_0066a.jpg
    90.6 KB · Views: 333

pjkatich

Chumono
Messages
826
Reaction score
38
Location
Northeast Florida
USDA Zone
9
The first photo below shows the tree after it was pruned and wired.

The second photo shows the composition after is was removed from the pot and some of the roots were trimmed.

I was a bit disappointed with the root development so I trimmed a few of the heavier roots that did not ramify back a bit. I applied some root hormone to the cut roots, placed some sphagnum moss under them and wrapped them with the plastic wrap. Hopefully, next year they will have developed some addition ramification.

The tree was then planted in a grow box as shown in the third photo. I planted it deeper then I would have liked to accommodate the heavy roots that were cut back.

This is the third replanting for this particular tree.

As always, your comments are welcome.

Regards.
Paul
 

Attachments

  • IMG_0069a.jpg
    IMG_0069a.jpg
    88.5 KB · Views: 306
  • IMG_0072a.jpg
    IMG_0072a.jpg
    68.5 KB · Views: 338
  • IMG_0073a.jpg
    IMG_0073a.jpg
    85.1 KB · Views: 314
Last edited:

HotAction

Chumono
Messages
674
Reaction score
21
Location
Syracuse, NY
USDA Zone
5
Awesome!!! and I thought I heard A. rubrum and bonsai don't mix. ;)

Dave
 

pjkatich

Chumono
Messages
826
Reaction score
38
Location
Northeast Florida
USDA Zone
9
Awesome!!! and I thought I heard A. rubrum and bonsai don't mix. ;)

Dave

Thanks for your feedback Dave.

In regards to your comment on A. rubrum and bonsai not mixing, I heard that rumor too. From my point of view, that's all it is, a rumor. They are not the easiest species of tree to work with. But, if you apply the proper techniques, a respectable bonsai can be achieved.

Below is a recent photo of one of my other red maple bonsai. Please excuse the crappy background. This was taken as an archive photo after I re-potted the tree last week.

Regards,
Paul
 

Attachments

  • IMG_0008a.jpg
    IMG_0008a.jpg
    73.1 KB · Views: 446

BUBBAFRGA

Mame
Messages
203
Reaction score
5
Location
Darien, GA
Here is an oak on the wall of Warehouse that was on Bluff that held Cotton before the War Between the States, in my Home town of Darien GA. The Tree is older than the warehouse wall but its funny how it grew on top of wall once it was burnt down in the war.
 

Attachments

  • darien oak.jpg
    darien oak.jpg
    52.4 KB · Views: 264

rockm

Spuds Moyogi
Messages
14,300
Reaction score
22,520
Location
Fairfax Va.
USDA Zone
7
"They are not the easiest species of tree to work with. But, if you apply the proper techniques, a respectable bonsai can be achieved."

With respect, this is the crux of why A. rubrum mostly makes bad bonsai. Additionally, the subspecies you're working with looks to be "drummondii."

The biggest problem with A. Rubrum is the main species tends to be extremely leggy in internode and extension growth. For the most part, A rubrum dug from the woods typically produce internodes between two and four inches. Reducing those requires constant aggressive pruning over time, that pushes down internode length. By over time, I mean years.

The species in these photos looks to me to be A. rubrum "drummondii." The internodes on this cultivar tend to be very short and it's more amenable to bonsai techniques overall (containerization, root pruning, etc.) overall. It's common to wetter areas and not all that available --or its not nearly as common as the lanky main species--unless you live near a swamp, or buy from someone that knows where to get it, or who is growing seedlings. It's also not as cold hardy as the main species North of Zone 7 or so.
 

pjkatich

Chumono
Messages
826
Reaction score
38
Location
Northeast Florida
USDA Zone
9
Here is an oak on the wall of Warehouse that was on Bluff that held Cotton before the War Between the States, in my Home town of Darien GA. The Tree is older than the warehouse wall but its funny how it grew on top of wall once it was burnt down in the war.

Thanks for sharing the photo Francis.

That is an awesome oak tree, I would like to see that one in person some day.

Regards,
Paul
 
Last edited:

pjkatich

Chumono
Messages
826
Reaction score
38
Location
Northeast Florida
USDA Zone
9
With respect, this is the crux of why A. rubrum mostly makes bad bonsai.
The biggest problem with A. Rubrum is the main species tends to be extremely leggy in internode and extension growth. For the most part, A rubrum dug from the woods typically produce internodes between two and four inches. Reducing those requires constant aggressive pruning over time, that pushes down internode length. By over time, I mean years.

Rock,

Sounds like you may have had a bad experience with the red maple in your younger years.

In general, I don't disagree with your statements. There are many varieties of A. rubrum (mainly the northern ones) that are not particularly suitable for bonsai.

Even your standard, garden variety, green, Japanese maple suffers (to a lesser degree) from some of the same negative attributes that you point out. But people still continue to grow them as bonsai.

The species in these photos looks to me to be A. rubrum "drummondii." The internodes on this cultivar tend to be very short and it's more amenable to bonsai techniques overall (containerization, root pruning, etc.) overall. It's common to wetter areas and not all that available --or its not nearly as common as the lanky main species--unless you live near a swamp, or buy from someone that knows where to get it, or who is growing seedlings. It's also not as cold hardy as the main species North of Zone 7 or so.

According to the literature available to me, (Trees, shrubs, and woody vines of Northern Florida and Adjacent Georgia and Alabama by Robert K. Godfrey) I have identified this particular variety of red maple as A. rubrum trilobum also called the trident red maple. In fact, I believe I have identified two variations of this variety. I am currently focusing on the one that consistently produces the smallest leaves and the shortest internodes.

As far as availability goes, they are pretty easy to come by in my neck of the woods. In fact, at this time of year they are somewhat of a nuisance. The bloody seeds are everywhere.

Thanks for your input.

Regards,
Paul
 

pjkatich

Chumono
Messages
826
Reaction score
38
Location
Northeast Florida
USDA Zone
9
Here are a few inspirational photos for those of you that are interested.

Mother nature never fails to amaze me.

These photos are courtesy of my youngest daughter who is currently on assignment in south-east Asia.

The photos are from several different archeological sites in Cambodia.

Enjoy,
Paul
 

Attachments

  • IMG_087.jpg
    IMG_087.jpg
    76.5 KB · Views: 249
  • IMG_121.jpg
    IMG_121.jpg
    83 KB · Views: 234
  • IMG_140.jpg
    IMG_140.jpg
    68.4 KB · Views: 230
  • IMG_141.jpg
    IMG_141.jpg
    89.6 KB · Views: 223
  • IMG_146.jpg
    IMG_146.jpg
    92.5 KB · Views: 218

pjkatich

Chumono
Messages
826
Reaction score
38
Location
Northeast Florida
USDA Zone
9
Here are a couple more.

Not quite as dramatic as the Cambodian photos but still provides food for thought.

These photos were taken at Uxmal (a Mayan archeological site) last February.

How about sharing you favorite root-over photo?

Cheers,
Paul
 

Attachments

  • IMG_0055a.jpg
    IMG_0055a.jpg
    81.3 KB · Views: 189
  • IMG_0056a.jpg
    IMG_0056a.jpg
    74.9 KB · Views: 207
Top Bottom