MrFancyPlants
Masterpiece
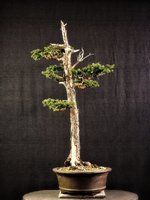
Hey, it looks great. And I think the dynamics of the two trunks will only improve with time. I’m interested to see how the repotting goes as well.Update for Mountain Hemlock initial styling! This morning I finished the basics for the first styling of this tree! I have selected and positioned branches, placed wire on most of the foliage and prepared it for the coming growing season. I will let it recover prior to repotting to improve the planting angle and work on the roots. If all goes well that will be planned for the early fall 2021. if recovery and foliage is slower than will wait till spring 2022 for the repot and planting angle change. My direction at this point will be tilting back approximately 5 to 10 degrees. If foliage growth is very healthy, a lot of wire will need to be checked by mid summer to prevent cutting in to much. Four pictures to show all sides. Remember this is the first styling and not expected to look anything but rough.View attachment 354922View attachment 354923View attachment 354924View attachment 354925
I am mentally prepping for my upcoming repot of my collected Tsuga. I think I’ll have to dig in from the top to see if there is another base hiding in the roots; without being too destructive in case there isn’t. I’m planning on moving to a much shallower pot, but I’ll back off for the health of my one yamadori.