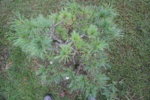
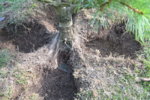
WP in ground "style" too far gone ?

0soyoung

Imperial Masterpiece
Messages
7,496
Reaction score
12,832
Location
Anacortes, WA (AHS heat zone 1)
USDA Zone
8b
It does indeed look a little yellower than the rest of the tree and the old needles certainly don't account for all of it.

Yellowing can be because of very bright sun
xanthophylls (which are yellow pigments) protect PhotoSystem 2 from sun-light induced damage.​
Yellowing can be because of root problems
over watering, or root anoxia IOW, can cause needle tips to yellow just like it was the dead of winter​
Do the yellow-ish foliated branches converge to a common stem that = all yellow needles? Is there any damage of suspicious condition on that common stem?

Else, as I mentioned with my 'minima', I have no clue.
Hoping to learn from you.
 

0soyoung

Imperial Masterpiece
Messages
7,496
Reaction score
12,832
Location
Anacortes, WA (AHS heat zone 1)
USDA Zone
8b
Not meaning to thread bomb,

I repotted my minima today and found nothing but healthy roots.
I'm not convinced there was any cause-and-effect connection between greener needles this year and the NEEM root drench early this spring - could have happened had I done nothing or if I had sung i pagliacci to it. IOW, beats me why it turned so yellow last year.

Interestingly, this year's needles are about one-third shorter than last year's.
 

Japonicus

Masterpiece
Messages
4,863
Reaction score
7,413
Location
Western West Virginia AHS heat zone 6
USDA Zone
6b
It does indeed look a little yellower than the rest of the tree and the old needles certainly don't account for all of it.

Yellowing can be because of very bright sun
xanthophylls (which are yellow pigments) protect PhotoSystem 2 from sun-light induced damage.​
Yellowing can be because of root problems
over watering, or root anoxia IOW, can cause needle tips to yellow just like it was the dead of winter​
Do the yellow-ish foliated branches converge to a common stem that = all yellow needles? Is there any damage of suspicious condition on that common stem?

Else, as I mentioned with my 'minima', I have no clue.
Hoping to learn from you.
It is in very bright Sun, as well as the potted one. The potted one looks fine.
Going back to post 1 here, this yellowing was evident then, but has crept up into the newer needles now, some.

I see no branch issues to try and isolate the problem, but from the last prune, the growth is more dense.
Eager to prune hard on this one. Just hate the heavy upper branch that crosses the trunk, yet provides uniform shape
unfortunately, (pointing to a shorter tree I fear).

I just mentioned the yellowing needles because of the recent root work, assuming that may've contributed.
The landscape there is on a good slope and drains well, in 2 directions, meaning it is planted on the edge of another
slope 90º to the 1st slope if that makes sense (perpendicular). There is heavy clay and rock a few inches down though.
 

Japonicus

Masterpiece
Messages
4,863
Reaction score
7,413
Location
Western West Virginia AHS heat zone 6
USDA Zone
6b
Your bonsai lies in that lower left branch, IMHO.
I'm cleaning out old needles and pruning. Is this a time of year to trunk chop?
I'm looking at that bottom left branch, and though the alternating branches are well placed,
the bottom right branch has fantastic character.
DSC_2436.JPG
This was taken day before yesterday as I began thinning and pruning.
DSC_2441.JPG
This is today at current state.
DSC_2442.JPG
Top downDSC_2443.JPG
Bottom left branch
DSC_2444.JPG
and finally bottom right branch. Am cleaning the moss off, just snapped a quick pic.
You know, this branch is lower than the one you suggested. Perhaps, I should trunk chop just above
your selection, keeping both and revisiting this when I do that.

What amount of trunk should remain above the branch kept?
I find it interesting to incorporate a jin there for now.
 

Japonicus

Masterpiece
Messages
4,863
Reaction score
7,413
Location
Western West Virginia AHS heat zone 6
USDA Zone
6b
The moss is located at an elbow on the right branch, and that limb makes a 90º upwards turn
there. 2D makes it difficult to portray the character ATM.
This would require a fantastic trunk angle planting, burying the fine roots
DSC_2322.JPG
Current front 8/5/2018
DSC_2318.JPG
Left of front downhill side. Root work done this August 5th, 2018.
DSC_2317.JPG
Back side would be planted deep and sharp angle, to upright the bottom right branch into position.
Any thoughts along these lines?
 

0soyoung

Imperial Masterpiece
Messages
7,496
Reaction score
12,832
Location
Anacortes, WA (AHS heat zone 1)
USDA Zone
8b
I liked the lower left because
  • it comes off the trunk a a nice angle (given the present planting angle)
  • is thinner, hence easier to bend into a nice curve
  • the right branch is heavier and is nearly perpendicular to the trunk and parallel to the ground, presently
  • I favor curvy, feminine forms.
BUT, the right branch
  • fits with making a masculine, sharp angle, zig zag trunk with it as the second trunk segment
  • it already has a branch that might be the third
    • the taper that exists would be all there would ever be - its 'pre-made' (and maybe 2D?)
    • there needs to be a small branch near these elbows for it to work in the conventional zig-zag trunk way
  • will require adapting roots to a new planting angle (tilted left so the right branch slants upwards)
    • the lowest trunk then won't be a peg coming straight out of the ground.
    • routine bonsai stuff - no big deal
You like the bottom right.
You understand/envision what you need to do.
It is your tree.
We have ignition!! :D


It seems to pay to 'leave a stub' and wait for the cambium and bark to die back to match the new phloem sap lines. It will then be easy to know where to whittle it back, to match (a little Dremmel/die-grinder and knife work). For a jin, just keep a 'stub' that is longer than you want the final jin to be. It will get shortened when you peel off strands of wood to eliminate the flat cut (later, after it had dried a bit). It is easier to remove the bark from a jin-to-be's straight away than it will be after the cambium and bark have desiccated and died, but it makes little difference in the end.
 

Japonicus

Masterpiece
Messages
4,863
Reaction score
7,413
Location
Western West Virginia AHS heat zone 6
USDA Zone
6b
@osoyoung you're right I noticed the angle was better and less compensated for by planting.
Then yes too, the feminine WP it is, entering a more wild styling, that too was/is considered.
Taper, now that was not on my radar, in my less trained envision here.
It's a big decision, and your insight is inspirational. Thank you!
 

TrunkTickler

Yamadori
Messages
50
Reaction score
26
Location
Ontario, Canada
USDA Zone
5b
Yes, kind of obvious isn't it? I prefer Aug/Sep (after the summer solstice) for most all conifers, quince, and waxy leafed angiosperms. Hardened foliage producing lots of auxin and carbohydrate powers root growth. If you are more comfortable with spring 'as buds swell', do it then.

Would you do a hinoki at this time too?
 

0soyoung

Imperial Masterpiece
Messages
7,496
Reaction score
12,832
Location
Anacortes, WA (AHS heat zone 1)
USDA Zone
8b
Have you found this substantially better than spring repots? You're right spring feels much more comfortable
I do not see any difference, though the window for spring repotting is narrower in spring than the 3 or 4 months after the summer solstice. I have well over 100 trees spread across 50-some species, so I tend to repot deciduous in spring and conifers in summer. It is just a matter of convenience, really.

Also, I grow lots of garden center nursery stuff for which is is safest to go through a half bare root process as opposed to full bare rooting to get rid of the organic nursery soil/dirt. One half bare root can be done in spring/summer and the second the following summer/spring instead of taking two years to get the deed done (i.e., spring-spring or summer-summer)
 
Last edited:

Japonicus

Masterpiece
Messages
4,863
Reaction score
7,413
Location
Western West Virginia AHS heat zone 6
USDA Zone
6b
October 13th Trunk chop

I've been really busy the last couple months beginning with the primaries in the Fall
then family, work and the Christmas rush/work. Been trying to get a day off since Nov.1
but we are so short handed because folks don't want to work, my leave just continues
to be denied. My wife really wanted to visit the Biltmore for her birthday/Christmastime...

That said, I've failed to post up any of the progress of my dwarf EWP since.
With the gracious help and insight of @0soyoung I went against my "religious beliefs"
and did a trunk chop :eek:
Actually as difficult as it was to persuade me to do so, the task of convincing me to
do the trunk chop was easier, than it would have been, had the branches been kept
properly whilst growing in ground over the last decade.
Now, with such heavy branches in the top 1/3 of the tree, one of which crossed the trunk
badly the decision was based on "it can't hurt any more than it does already" so if it
increases its' potential, let's do it.
1546555025966.png

So just below these forging tongs I believe they are, you can branch removed, how heavy a branch I'm talking about.
It went completely across the front of the tree. Impossible to bend/break back, and too
far out of proportion to do anything with at all. This may've been why I decided the trunk chop
wasn't a bad idea after all. Other than that, there were fairly good opportunities for great
branch placement all the way up for an informal upright.

1546555628046.png

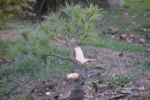
The trunk here was surprisingly difficult to snap off. I had to undercut it a good deal to break it off.
I knew I was going lower, but wanted to practice here 1st to see how the tree worked with what I had.

1546555813941.png

1546555940721.png

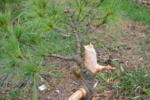
Not what I was shooting for and I think I undercut at the wrong or opposite angle, still not a good
representation of the desired outcome for the final chop, but gained some familiarity with the wood.
I think I had to undercut too much to get the broken effect I was shooting for too. 1st timer.
More to come.
 

Japonicus

Masterpiece
Messages
4,863
Reaction score
7,413
Location
Western West Virginia AHS heat zone 6
USDA Zone
6b
1546556231149.png

Ok, now we're getting down to the nitty gritty of the bonsai within the tree that 0soyoung had envisioned...I hope...
1546556314978.png
Had an accident rolling fibers down ^ and got a slab of bark too. Will be character.

1546556442024.png

1546556529184.png

1546556859403.png
This #8 Cu wire was removed, and reused after wrapping the trunk

1546557011280.png
Then wrapped the trunk in silicone tape like raffia prior to bending.

1546556960668.png

1546557164229.png
anchoring lower left branch to a root
1546557225308.png
anchored new trunk to old trunk. The old trunk will probably be carved out entirely back, flush.
In the meantime it's a jin to play with and practice some carving on perhaps.

1546557455419.png
I think this is all the damage I can get away with till next season.

For those who crashed in on this page, this is a dwarf EWP perhaps EWP minima or similar.
It is in fact upon its' own roots, not grafted. The smooth band about the trunk between barking,
is damage from leaving the plastic nursery tag on too long, probably crushing the fibers beneath.
0soyoung eluded to possibly scraping off the bark IIRC, then letting the tree play catch up to blend.
I think I'll just live with the "burn" scar, and reminder of things done wrong.
Again many thanks to @0soyoung and the nearly 4 pages of grinding it out with a newbie
on what to do and expect, in detail, with a trunk chop. Wish this misfit good health recovery and luck.
Namaste
 
Last edited:

Japonicus

Masterpiece
Messages
4,863
Reaction score
7,413
Location
Western West Virginia AHS heat zone 6
USDA Zone
6b
You are a pioneer.
I have a regular EWP.....dunno what it'll turn into one day.....much smaller than yours....
This is an awesome tree!
Thanks for the kind words Mike! I don't know about all that, being an awesome tree,
but it certainly is one for the projects.

I didn't clean up the single branch I kept so to keep strength there, but did remove dead needles.
Let's hope for good root development where I began removing pie slices earlier in this thread.
I don't plan to lift this tree for at least 3 years. Probably more.

That Acer shirasawanum Autumn Moon beside it...now that's hopefully going to be an awesome tree.
I suck at maples, and the tree is a slow grower which is working in my favour for now
while I start smaller ones and research, and ask a lot of stupid questions.
 

Japonicus

Masterpiece
Messages
4,863
Reaction score
7,413
Location
Western West Virginia AHS heat zone 6
USDA Zone
6b
Ok, I need some ideas for both the front and pitch (angle)
as well as gentle bends. Probably a premature question.
I've got the trunk pretty straight from the current front (chopped old trunk in front)
above the chop, and it would be stupid to bend it one direction, then the roots tell me
I need to change that direction 2 years from now. For the time being I just wired it and
bent the new trunk more towards the front of the tree, lifting it from ~45º angle.

Looking at the last pic from the current back of the tree, I may be doing another chop
just above the 4th branch, or the 2nd one on the left if I'm going to be doing anything
other than a straight trunk there, as well as any compacting. It feels right, but will allow the tree to
recover from the other tasks to follow firstly, and keep the top as is for a sacrifice, keeping
as much juice flowing as it will.
 

Potawatomi13

Imperial Masterpiece
Messages
6,168
Reaction score
4,403
Location
Eugene, OR
USDA Zone
8
Lots of effort in wiring/wrapping but where is bending/movement from wire:confused:? Why else wire?
 

Japonicus

Masterpiece
Messages
4,863
Reaction score
7,413
Location
Western West Virginia AHS heat zone 6
USDA Zone
6b
Lots of effort in wiring/wrapping but where is bending/movement from wire:confused:? Why else wire?
You'll have to read the my post just prior to yours to get an idea as to the why no movement.
Actually there's a lot of forwards movement raising the branch.

There will be yet another trunk chop, and the roots might dictate the 1st bend.
I'm still pathetic when it comes to the nebari. I always get the cart before the horse.

That said, perhaps I should be asking, if I know which face I want for the front,
do I keep that as the front face of the tree regardless of how the roots develop
where I am cutting pie slices, leaving alternate slices for the next phase of alternate pie slicing
be it 2019 or 2020, with no plans on lifting the tree before 2021 or later TBD based solely on recovery from
this training...now where was I going with that?...oh, do I still keep with MY personal idea of what I
want and where I want the 1st bend/branch to be regardless of how the nebari develops?
I'm shortening 10 years of free root growth, and where I removed the slices, the roots are minimal
per the pictures on the previous page. Bends will be gentle and feminine.
So like a circus lady with one eye and snagly toothed.
 

Japonicus

Masterpiece
Messages
4,863
Reaction score
7,413
Location
Western West Virginia AHS heat zone 6
USDA Zone
6b
I'll be curious as to how this tree responds. Nice
I also am curious. Hats off to 0soyoung for the hours of tutoring me on this.
The anchors were my idea, as the #8 wire is insufficient to lift and hold the branch into place for
the new trunkline, but the timing and many pointers including branch choice for EWP, were product of
@0soyoung
As you can see in the pic below, I'm not a big chopper. Pretty sure that's a Black oak
and the bar is 32 or 34" on a 5HP Homelite with no compression release. It's a bear to start.
The hemlock beside me is one of about 50 my Dad and his dad dug up and planted from a farm
in Ohio nearby in the early-mid 50's. What was odd about this property where I grew up
is the American Beech trees would not grow on one side of the ridge we lived on.
They grew on top and on the N side which had more Sun exposure than the S side due to
the tree canopy and ravine. But why, we never knew. The hemlocks were planted for wind breaks.
I have pics of another Oak, a Red Oak that about dwarfed this one.
Black Oak Rugby.jpg
Cutting down the lightening rod.

DSC01013.JPG
The Red Oak is down on the left side of this pic. In laws bulldozer couldn't get it to budge.
To the right is a grouping of conifers my Dad planted. While Fir, Red Fir, behind those taller on the left
is a columnar Hinoki Cypress, unknown, and a Norway Spruce. In front of the green photo lab are a couple
Chinkapin trees dug up in Wythville, Va when I was in trucking school. House has cypress siding.

Red Oak down.JPG
Red Oak down. Fell about 9am one still morning.
 
Top Bottom