A few pine seeds, 6 years later.

markyscott

Imperial Masterpiece
Messages
6,112
Reaction score
21,382
Location
Delaplane VA
USDA Zone
6B
Eric -

If you're going to make seedling cuttings, how do you decide when to cut? I know if you're too early or late, the seedlings don't tolerate it well. And the stems on my seedlings really never turn purple - the indication referenced in the Bonsai Today article.

- Scott
 

Eric Schrader

Chumono
Messages
638
Reaction score
1,422
Location
San Francisco, CA
USDA Zone
10a
I wait until the growth starts to come out of the center of the cotyledons, about like the first photo of the seedlings on the previous page. I didn't do the cutting technique on the most recent batch though. I don't know for sure, but I suspect that in the long run, with the proper root work that the cutting technique makes no real difference in the quality of the nebari. (The baskets do though, as does the proper root trimming.)

There's an ongoing selection and training that has to happen with the roots to make them really good. It's just like training branches in some way. You get them all laid out and evened out and that's what makes the base of your tree look really good. The most recent batch was transplanted from the flat into 4" containers at the end of the first growing season, with significant removal of long roots to encourage more branching in the same area. They will be transplanted again into colanders next winter, again with root trimming to further get it branched.
 

JoeR

Masterpiece
Messages
3,948
Reaction score
3,451
Location
Sandhills of North Carolina
USDA Zone
8a
With the exposed root pines,

How did you train the roots? I know the whole thing where you plant it higher each year, but specifically did you place them there and sort of entangle them in a pleasing manner?
 
Messages
150
Reaction score
48
Location
NW England
a few more.

Another exposed root:
Sept 2014 Edit - This tree is discussed in a post on my blog here:
http://www.phutu.com/?p=79

6820731139_6ee60daa1e_z.jpg


Another, this one might end up being one of the best, the roots are already nice and fat and they twist around each other neatly
6820731715_f9d6798b10_z.jpg


A fat little informal upright, trunk is only about 1.5" now but the sacrifice is growing nice and low and the finished branches are developing well also. The top will have to be grown up in the next few years.
6820732263_57ac40a9e3_z.jpg


Root over rock - the other side might be better, only the next few years will tell. The finished branches are wired but the sacrifice branch is still growing up. I cut most of the sacrifice branches back on these this past fall because the wind kept knocking them over but I only cut off one years growth so there's still plenty up there to fatten the trunk:
6820730699_5885c26112_z.jpg


Informal upright - this one had the roots buried so I had to remove some of the soil so they'll start to form bark. This will be one of the larger trees and likely ends up at 16-20" finished height so the trunk will have to fatten for at least 4-5 more years before the lead is removed.
6820729607_9edbf4aaa0_z.jpg


Formal upright - the only one out of the entire batch that I'm trying to make formal. The front is probably about 20 or 30 degrees to the right of where the photo was taken. To get the taper without the chop interfering you bend the leader over to the back and promote a small side bud upward. The bend here was made three years ago and the leader has grown quickly while the small but has grown quite slowly. When the leader is removed the nodes on the new trunk will be nice and close together allowing form more branches without grafting.
6820730147_eee25c1969_z.jpg


Root over rock shohin - the roots have gripped the rock well and I'm hoping that they start to go flat over it before I remove the leader.
6820729091_7ba7ba8213_z.jpg


The largest trunk that I have is about 2 inches across with about a 6-inch root spread, this will probably end up a slant style but it needs a few years yet. The first chop will be just beyond the visible foliage. Coincidentally - I think this is the largest because it was the first that I put into the larger baskets by a year.
6820727635_d00c192902_z.jpg

Wow I am very impressed !Nice work, I must ask as I need help, what time of year do you plant your pine seeds please for best results ? Thank you :) kim.
 

Eric Schrader

Chumono
Messages
638
Reaction score
1,422
Location
San Francisco, CA
USDA Zone
10a
I generally try to plant the seeds in early spring. But you can plant them anytime during spring or summer. The later you plant them the smaller they will be in the fall. But you'll still be ahead of waiting until the following spring to plant them. The ones that I posted photos of from last year were planted in May because the batch of seeds that I planting in spring was old and I only got a few to sprout.

Joe - As for making exposed root - I'd encourage you to go back through this thread and re-read everything. There is some explanation in some of my blog posts, like this one:

http://www.phutu.com/exposed-root-pine-2/

I've had a couple requests for more detail regarding the process for exposed root and root-over-rock. The two processes are very similar, I'll write up something but it might take me a little while to get it done.
 
Messages
150
Reaction score
48
Location
NW England
Many thanks for the info :) I shall have an attempt and see where it gets me. I really like the pines, they seem to make some stunning bonsai, in the right hands!
 

JoeR

Masterpiece
Messages
3,948
Reaction score
3,451
Location
Sandhills of North Carolina
USDA Zone
8a
I generally try to plant the seeds in early spring. But you can plant them anytime during spring or summer. The later you plant them the smaller they will be in the fall. But you'll still be ahead of waiting until the following spring to plant them. The ones that I posted photos of from last year were planted in May because the batch of seeds that I planting in spring was old and I only got a few to sprout.

Joe - As for making exposed root - I'd encourage you to go back through this thread and re-read everything. There is some explanation in some of my blog posts, like this one:

http://www.phutu.com/exposed-root-pine-2/

I've had a couple requests for more detail regarding the process for exposed root and root-over-rock. The two processes are very similar, I'll write up something but it might take me a little while to get it done.
Okay thanks, please do.
Well me and my seeds have time! I haven't had enough time to go through the entire thread yet, there's a lot of content.
 

JoeR

Masterpiece
Messages
3,948
Reaction score
3,451
Location
Sandhills of North Carolina
USDA Zone
8a
Could I use rocks like these for my future root over rock pines?

http://m.ebay.com/itm/281641557460

How long after you put them in the soil did it take to sprout? Aka how long can I expect to wait until I see them above soil?

Also, even though this is a black pine thread, I was looking to start other seeds and I wanted to buy seeds of the fastest growing tree species.
The ones suitable for bonsai were willow and the giant sequoia. I don't really see starting willows but am interested in starting some sequoia giganteum seeds and wanted to know If anybody else has started some and if so, are they really that fast of growers?
 
Last edited:

Eric Schrader

Chumono
Messages
638
Reaction score
1,422
Location
San Francisco, CA
USDA Zone
10a
You could use them, but I don't think they're worth it. The thing you have to remember is you can't change the rock, or make it better. So if you start with a sucky rock then you're stuck with it no matter how good you can make the tree. You should start with a great rock, not just a good one. That way, if you manage to make a great tree they'll compliment each other nicely.

I posted a couple things on my blog last fall about stones:

http://www.phutu.com/rocks-for-bonsai/
http://www.phutu.com/stones-from-the-river/

Check people in your area who do Suiseki and ask them if they have any stones that aren't good enough to make the cut. Then ask them where to collect stones. You need something with some texture, some variation in color and some interesting shape. If you're missing any of those then the stone is probably not very good. Look for stones that have a depth of color to them - like a good oil painting. Not garish, not monotone, but subtle and interesting.

I've checked stone yards before and I find them to be lackluster around here. That's why I spent an entire weekend last fall walking around in a dry river bed looking for rocks to plant trees on.
 

BunjaeKorea

Omono
Messages
1,214
Reaction score
1,909
Location
Korea
USDA Zone
7a
Really great thread, exposed root style is very popular in Korea maybe due to many trees growing in this way on the rugged mountain tops.
 

JoeR

Masterpiece
Messages
3,948
Reaction score
3,451
Location
Sandhills of North Carolina
USDA Zone
8a
So I noticed my seeds are sprouting today! About six of them so far.

I have a few questions though.

When do I actually perform the seedling cutting method? I know when they turn violet but that doesn't really help. I also have some rooting hormone but it's not strong, is that okay to use or do I need to order stronger?

Some are pretty good sized so should I scoop them up and set the ball of sand/seedlings on top of my new soil in a new container (3in seed trays)? I think they should be fine being in the inch or so of sand since I'm cutting all their roots off anyway.

I've been keeping them in the same light they have been in since I planted them. Two cheap grow lights under a desk in the window I start my tomatoes in. They get a bit of light from the window, and The ones that get that light are the ones sprouting so should I move them to on top of the table?
 

jeanluc83

Omono
Messages
1,452
Reaction score
1,623
Location
Eastern Connecticut
USDA Zone
6a
When do I actually perform the seedling cutting method?

When the time is right. Did that help.:) Jonas probably has the best overview of the process. I've used the technique once and it was with pitch pine. I waited until the stems had just started to lignify. I believe you need to strike a balance between enough foliage to support the tree but not too much that it over taxes it when the roots are removed.

It sounds like you started your seeds inside. I would get them outside as soon as you can. Nothing beats real sunlight. If there is a threat of frost bring them in or cover them but other than find a spot that is full sun and out of the wind. This will also help prevent fungal problems.
 

JoeR

Masterpiece
Messages
3,948
Reaction score
3,451
Location
Sandhills of North Carolina
USDA Zone
8a
I started the 2006 batch with 125 seeds, about 110 of which sprouted. But after potting them into containers I whittled it down to about 50 relatively quickly. The problem is that the volume of soil you need once you start going into the baskets gets really expensive and I don't really have the space in my yard either.

At the moment from the 2006 batch, I have 9 in my yard plus 1 at my friend Bernard's place and 9 more at Boon's place. The rest I sold prior to moving back to San Francisco in late 2012....just not enough space for everything! That's just the 2006 batch though, I did a batch in 2009 as well, and I have about 10 of those. My friends have a lot more of those that I work on though. Bernard has about 20, then there are probably another 10 hanging around that I see occassionally.

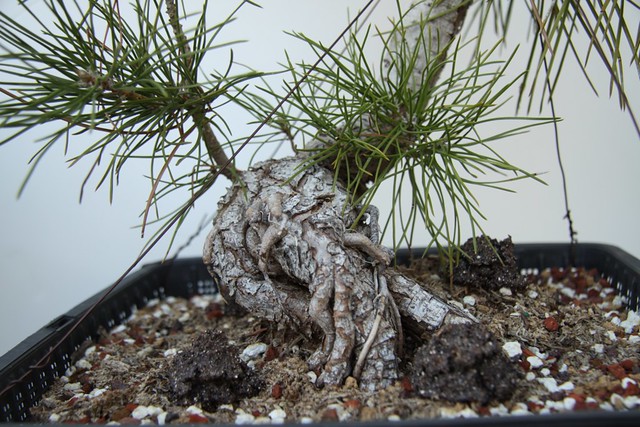
Just for fun, here's the current inventory of the 2006 batch. Two large exposed-root:

15520787479_7ec0fe496a_b.jpg


14454330416_14ced151f3_b.jpg


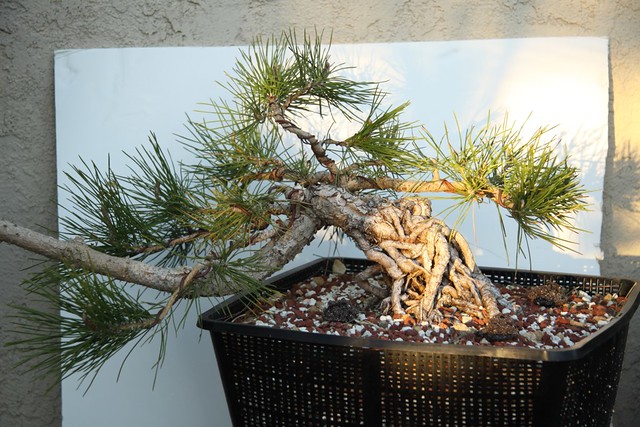
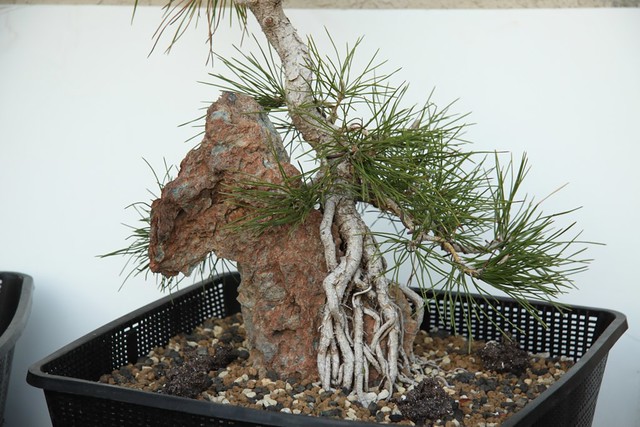
Large root-over rock. I don't like this rock, but am working on a plan to minimize it in the composition....basically, I'm going to grow it until the roots have almost swallowed the surface of the stone:

15643272217_2f5c06d621_b.jpg


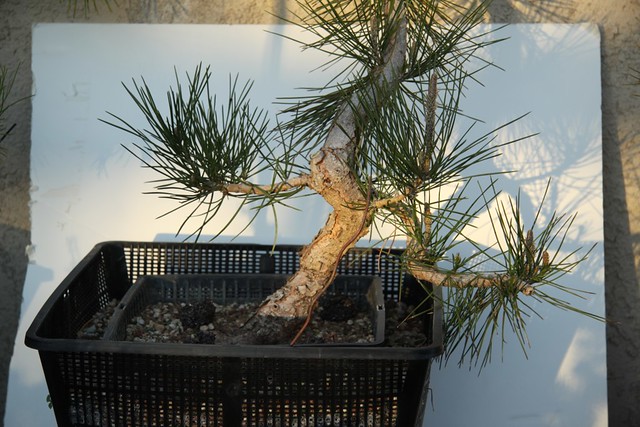
A strange little one with reverse taper due to poor planning in the way the bends were made years ago, I can't seem to part with it because it's weird:

15209001533_5b8e2ec436_b.jpg


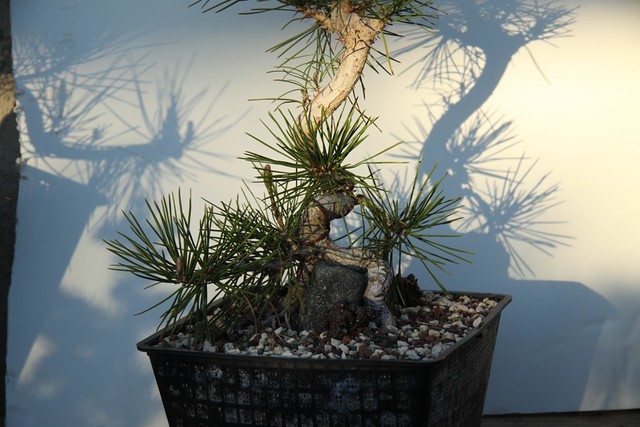
Small root over rock, about 11 inches high:

15643037418_435d25565c_b.jpg


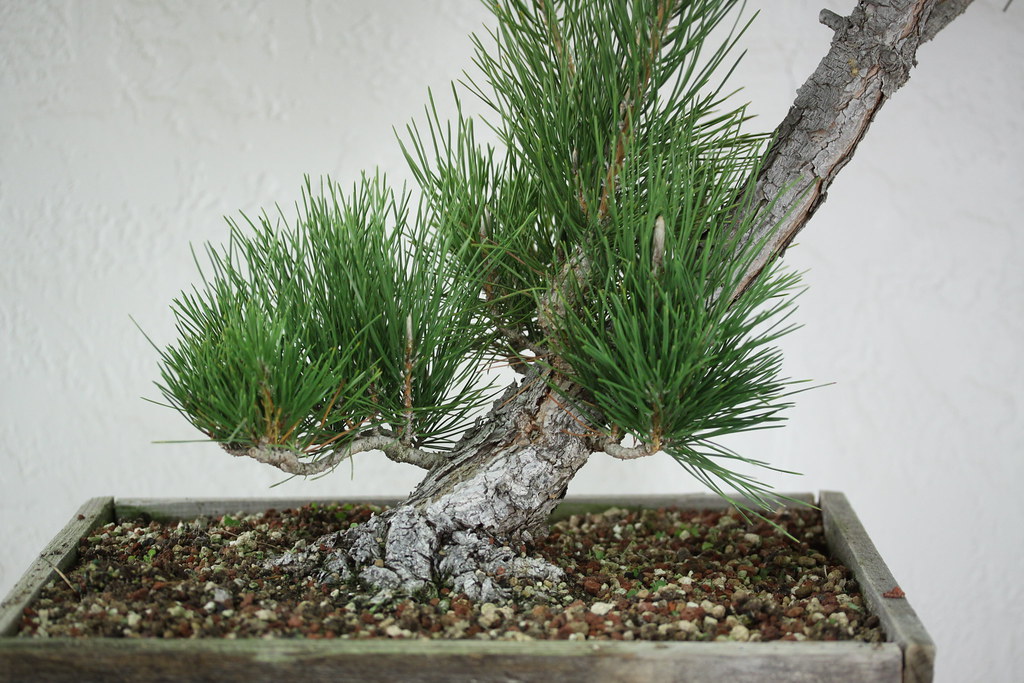
The slant style that I recently updated:

15642638729_b178f267dd_b.jpg


This slightly odd semi-cascade exposed root...it has amazing bark but the top needs a lot of work to form a good small crown.

15828467125_5d626d08d5_b.jpg


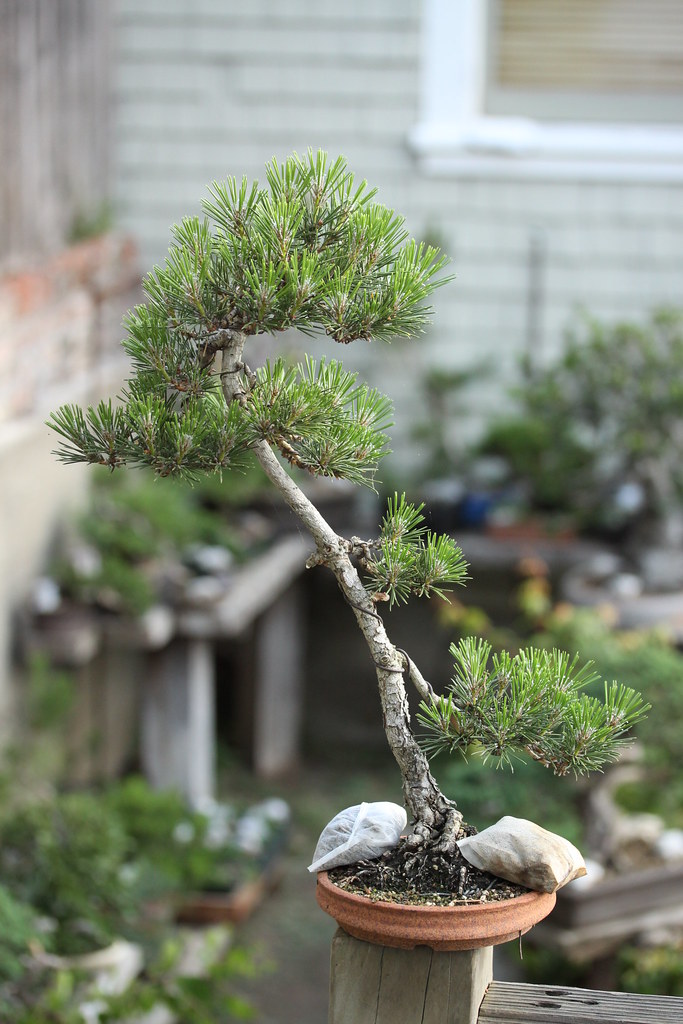
The formal upright (on the right) and an informal upright, both with 10 more years of growing to go at least:

15826588231_10a8b86cfa_b.jpg


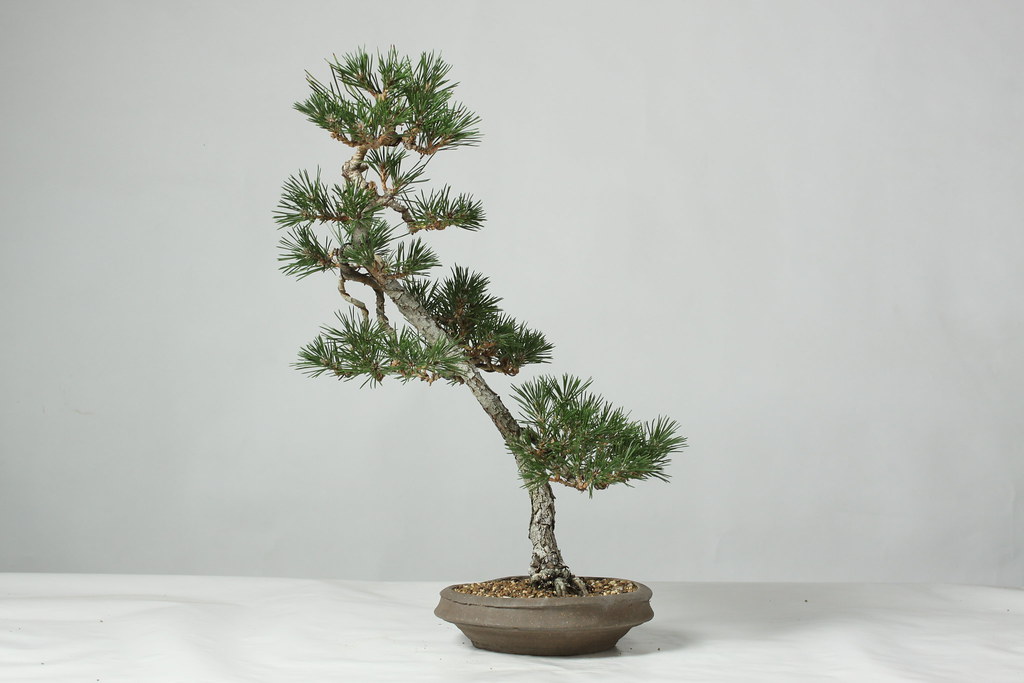
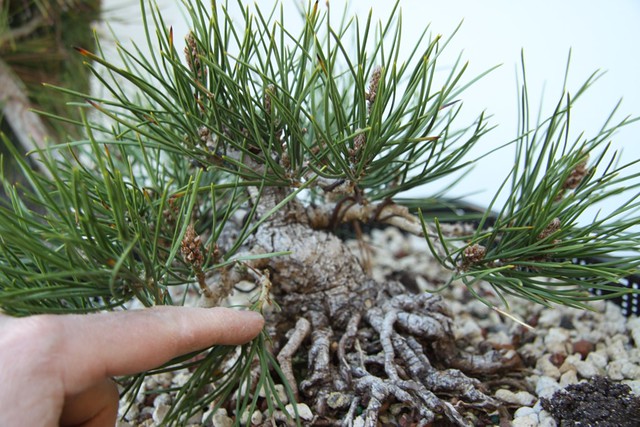
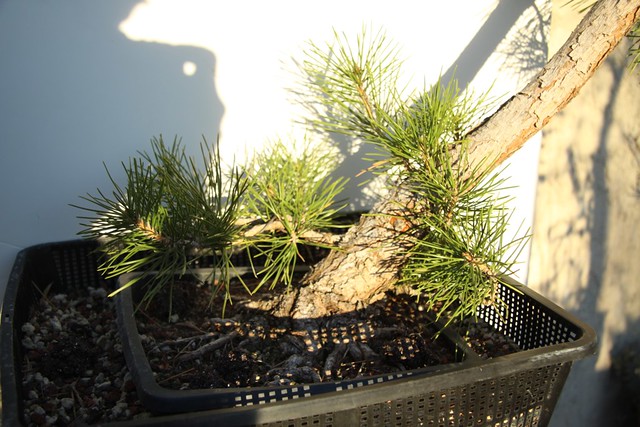
This informal upright has great bark and I need to wire it this winter...more to come:

15642659339_8db648794e_b.jpg


A tree that will end up being very short and fat...sacrifice wont come off until all those roots have fused together to make a sumo style:

15642658259_25d5ca67c6_b.jpg


The twins....these two were never in baskets. I left them in the small 4" containers for two years longer than the other trees, then potted them down into small bonsai containers. But, they're from the same 2006 batch:

15642676789_3e002d647e_b.jpg
I really like 'The Twins' in this post.

What are their dimensions, and roughly how many years could I expect before I achieve a similar one in a pond basket?

Also an update on them would be awesome if you have time.
 

Eric Schrader

Chumono
Messages
638
Reaction score
1,422
Location
San Francisco, CA
USDA Zone
10a
I'll see if I can manage an update in the next week. As for the dimensions - they're both about 18" high, 9 years old right now. They were never in pond baskets. They were the runts of the bunch and stayed in 4" containers for about 4 years before I potted them down into small containers and started training them as small bunjin. The interesting thing is that the bark on this batch is so good that these already have as much bark as some other bunjin that I have that are much older.
 

Eric Schrader

Chumono
Messages
638
Reaction score
1,422
Location
San Francisco, CA
USDA Zone
10a
All my pines are covered in crazy long candles this year. Just thought I'd share a few photos. It's been a warmer than average spring around here I think.

The basket is about 14" across, these candles are 8 to 10 inches on a tree that was completely decandled last summer:
16729491893_697d58a1e4_b.jpg


The longest candle on this one is about 2.5 feet, it was so tall that I couldn't get it in the photo. A couple of the ones at top are 18" tall:
17161945668_fc21fb286b_b.jpg


More 8-10" candles on this one, even after decandling last year and repotting:
17161922608_aee8af46fc_b.jpg


This tree isn't quite as vigorous as the others but still managed multiple 8" candles, even on the low growth. I cut half the sacrifice branch off over the winter:
17347872972_7aebf8f7bc_b.jpg
 
Last edited:

Eric Schrader

Chumono
Messages
638
Reaction score
1,422
Location
San Francisco, CA
USDA Zone
10a
I was looking through my files for images of "The Twins" that Joe asked for. I don't think I have any photos of them prior to potting them into the small ceramic containers. But, here are a couple older images and a newer one:

March 2013, I think this is the spring after the first time this tree was wired:
17348253282_b76c35fc5a_b.jpg


The January 2014 shot, previously posted:
17162408690_5c408cccbf_b.jpg


November 2014: after a little adjusting to the wire, this was the result of the second time the tree was deccandled. It typically seems to take three years of decandling to really get the branch structure down to size.:
17347959832_3d460466be_b.jpg


March 24th, 2015, candles elongating. I reduced the crown size on the twin on the far left over the winter and removed a couple branches that seemed irrelevant:
17163981139_c6e93b9052_b.jpg


May 3, 2015: Looking a bit overgrown as we approach decandling time next month:
17352626742_8f338654ae_b.jpg


16732030424_c19e59750a_b.jpg
 

Eric Schrader

Chumono
Messages
638
Reaction score
1,422
Location
San Francisco, CA
USDA Zone
10a
Yes, the batch of seedlings was started in 2006, so they are now starting their 10th growing season, 9 years and a couple months old as of May 2015. Three years after starting this thread it seems like the title could have been better thought out.
 
Top Bottom