Brian Underwood
Chumono
Fang - Nice little stand!
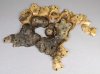
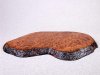
Smoke - Nope, not much burl in the guitar biz (at least not while I was there). The stuff I did end up finishing went fine with lacquer sealer and a few coats of semi-gloss lacquer. The burl was bone dry, about 3/8" thick, and I finished on pretty hot days so the lacquer dried almost instantly. So far, one year later they are all fine (pics below). These are buckeye and redwood. I did however try to dry some of the small ones in the oven to kill the bugs, they most definitely had the "Pringle" effect, bad idea. Do you have any pics of the Pinned slabs?
Woodguy - Thanks for all the advice. I had my last two BIG pieces flat under weight for about 6 months, so I hope they will be ok. I need to have them thickness sanded and then I will work on them this summer.
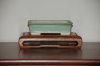
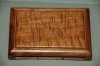
Would small ridges in the underside of the stand help keep the tension in the board and prevent warping? I'm thinking it will be similar to the bracing on the inside of a guitar, just routed in...
Smoke - Nope, not much burl in the guitar biz (at least not while I was there). The stuff I did end up finishing went fine with lacquer sealer and a few coats of semi-gloss lacquer. The burl was bone dry, about 3/8" thick, and I finished on pretty hot days so the lacquer dried almost instantly. So far, one year later they are all fine (pics below). These are buckeye and redwood. I did however try to dry some of the small ones in the oven to kill the bugs, they most definitely had the "Pringle" effect, bad idea. Do you have any pics of the Pinned slabs?
Woodguy - Thanks for all the advice. I had my last two BIG pieces flat under weight for about 6 months, so I hope they will be ok. I need to have them thickness sanded and then I will work on them this summer.
Would small ridges in the underside of the stand help keep the tension in the board and prevent warping? I'm thinking it will be similar to the bracing on the inside of a guitar, just routed in...
")