Aldingbonsai

Sapling
Messages
27
Reaction score
26
Location
West Sussex UK
USDA Zone
9
Hi everyone

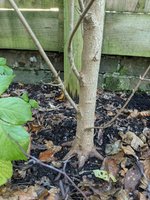
I'm looking for a bit of advice with a field maple (Acer campestre) I am currently ground growing. The tree is tall and straight, with the beginning of a good nebari. The trunk diameter is roughly 2.5"/6.5cm.

The first picture shows what I think is the best front, with several existing side branches.

The options as I see it are either to keep more of the straight trunk and make a formal upright with relatively little taper, or to chop lower for a more informal tree with better taper and movement.

I am currently planning on air-layering the top off around the red line in spring, then (assuming the layer roots) removing the layer in mid summer and cutting back down to the blue line to make the left branch the new leader. I'm concerned such a big chop will leave an ugly scar which will need lots of carving - I'm not really thinking of this tree being too gnarled and hollow, as I have another tree for that which I will post about another time.

It would be great to here anyone's thoughts on which route they would take with this tree.

Thanks in advance!
 

Attachments

  • PXL_20201224_142728305.jpg
    PXL_20201224_142728305.jpg
    316.5 KB · Views: 127
  • PXL_20201224_142707956.jpg
    PXL_20201224_142707956.jpg
    301.6 KB · Views: 110
  • PXL_20201224_142756927.jpg
    PXL_20201224_142756927.jpg
    367.1 KB · Views: 111
  • PXL_20201224_142707956~2.jpg
    PXL_20201224_142707956~2.jpg
    300 KB · Views: 117

BobbyLane

Imperial Masterpiece
Messages
6,062
Reaction score
17,712
Location
London, England
would you not be leaving the base in the ground long enough for any scars to heal over?
i like the roots, it would make a great broom.
if you go informal upright i think youd have to eventually plant the tree at an angle so you may have to obscure some of that lovely nebari.
 

Aldingbonsai

Sapling
Messages
27
Reaction score
26
Location
West Sussex UK
USDA Zone
9
would you not be leaving the base in the ground long enough for any scars to heal over?
i like the roots, it would make a great broom.
if you go informal upright i think youd have to eventually plant the tree at an angle so you may have to obscure some of that lovely nebari.
Thanks for that, for some reason I hadn't considered a broom style but you're right, I will try and sketch how that may work.
I intend to leave it in the ground for now. It has been planted in the ground for c.20 months so still gaining vigour really.
The roots are getting very strong already - is there any risk of these becoming too large or would it be safe to leave them untouched for the year? I am pretty happy with the root spread as it is, which was formed with a wire tourniquet below ground when I planted.

Thanks
 

BobbyLane

Imperial Masterpiece
Messages
6,062
Reaction score
17,712
Location
London, England
Thanks for that, for some reason I hadn't considered a broom style but you're right, I will try and sketch how that may work.
I intend to leave it in the ground for now. It has been planted in the ground for c.20 months so still gaining vigour really.
The roots are getting very strong already - is there any risk of these becoming too large or would it be safe to leave them untouched for the year? I am pretty happy with the root spread as it is, which was formed with a wire tourniquet below ground when I planted.

Thanks
ah cool so the tourniquet method worked great on your Field maple by the looks of it, thats good to know.
did you plant the tree on a tile too? if not, i think i would lift in spring, cut back the roots and plant on a tile to get them going horizontally. before they get too thick and grow too deep.
 

Paulpash

Masterpiece
Messages
2,008
Reaction score
6,025
Location
UK. Yorkshire
Try and do a rough mental sketch of what your aims are. Height and style are important, they will inform you where to chop. I grew mine in the ground too using a tray then a tile with a hole in it so I could screw it down - it's good fun to build your own tree and you'll have to watch for duelling leaders or other clusters that could cause inverse taper. They're very prone to throwing multiple shoots from the same area. Good luck!
 

Aldingbonsai

Sapling
Messages
27
Reaction score
26
Location
West Sussex UK
USDA Zone
9
ah cool so the tourniquet method worked great on your Field maple by the looks of it, thats good to know.
did you plant the tree on a tile too? if not, i think i would lift in spring, cut back the roots and plant on a tile to get them going horizontally. before they get too thick and grow too deep.
Yes the roots were a typical nursery stock mess when I got it, but it had several nice roots at this level which were strong so i put the tourniquet just below the nice roots and it seems to have spurred on new roots at a similar level.
It isn't on a tile currently but the bed it is in only holds about 6"/15cm of soil before hitting really compacted subsoil, so hopefully haven't got too deep yet. I will have a dig around in spring and see where the roots go, it sounds like giving them a prune and getting them onto a tile would be worthwhile. The tourniquet and roots beneath are still there so I should probably remove that now. I will post pics if I lift it in spring to see what the rootmass looks like now.
 

Aldingbonsai

Sapling
Messages
27
Reaction score
26
Location
West Sussex UK
USDA Zone
9
Try and do a rough mental sketch of what your aims are. Height and style are important, they will inform you where to chop. I grew mine in the ground too using a tray then a tile with a hole in it so I could screw it down - it's good fun to build your own tree and you'll have to watch for duelling leaders or other clusters that could cause inverse taper. They're very prone to throwing multiple shoots from the same area. Good luck!
Thanks for the guidance, yes I will drill a tile and give that a go. I am looking for an image of a tree I want to emulate now, and once I've got an idea I will try posting some sketches of how I think this could go.
Its great seeing a tree form from what was just a stick! This tree is developing much faster than many of the other trees I tried to style and root prune too quickly, so is a good learning exercise. I will keep an eye out for that inverse taper!
 

sorce

Nonsense Rascal
Messages
32,913
Reaction score
45,603
Location
Berwyn, Il
USDA Zone
6.2
I like the one you have planned in ground, but the layer is unnecessarily close to your new leader. Especially if you plan on doing the layer right!

Higher, on an angle, using that forward facing branch with movement as a second segment for the new tree would make more sense.

I'd keep it stripped of growth diligently between the layer and the low new leader. To keep it growing strongly down yonder.

The top shows exactly how much diligence will be necessary to keep your chop clean. Pick soon, pick correct, and kill everything else.

Sorce
 

keri-wms

Shohin
Messages
379
Reaction score
520
Location
S.E. UK
I’d be tempted to use the very lowest front/tight branch as the leader as it can be wired still, but cut back to it in two stages to prevent dieback....final cut only being made after the first cut covers the trunk in back buds/shoots. Also you could sneak some wire or zip ties round each root pretty close to the trunk to get secondary roots in place faster and safer and without slowing the tree down. Lop off the stuff underneith a year later during a lift/tidy up session?
 

Aldingbonsai

Sapling
Messages
27
Reaction score
26
Location
West Sussex UK
USDA Zone
9
I like the one you have planned in ground, but the layer is unnecessarily close to your new leader. Especially if you plan on doing the layer right!

Higher, on an angle, using that forward facing branch with movement as a second segment for the new tree would make more sense.

I'd keep it stripped of growth diligently between the layer and the low new leader. To keep it growing strongly down yonder.

The top shows exactly how much diligence will be necessary to keep your chop clean. Pick soon, pick correct, and kill everything else.

Sorce
Thanks for the advice, hahah yes I have read the thread and it has been helpful thanks! I have tried similar last year with good success but not used the disk, so maybe I should try that this time.

Sorry if I am being slow but do you mean I should move the layer up then use the green below as the new leader? I am definitely more concerned about getting the most from the base than getting the biggest layer possible, so leaving plenty of space for the layer is probably a good idea.

InkedPXL_20201224_142707956_2_LI.jpg
 

Aldingbonsai

Sapling
Messages
27
Reaction score
26
Location
West Sussex UK
USDA Zone
9
I’d be tempted to use the very lowest front/tight branch as the leader as it can be wired still, but cut back to it in two stages to prevent dieback....final cut only being made after the first cut covers the trunk in back buds/shoots. Also you could sneak some wire or zip ties round each root pretty close to the trunk to get secondary roots in place faster and safer and without slowing the tree down. Lop off the stuff underneith a year later during a lift/tidy up session?
Thanks for the ideas, I agree this would make the best taper and movement, its a big reduction to make but would probably result in a better tree if I do not go down the broom route.
I did consider wrapping wire on the roots, I will have a better look at them soon and see what is possible.
 

sorce

Nonsense Rascal
Messages
32,913
Reaction score
45,603
Location
Berwyn, Il
USDA Zone
6.2
I'd make the layer up here.
The blue chop is good.
Keep all this red bare of growth.
Capture+_2021-01-06-15-09-06.png

Trying to get as many buds to pop on your keeper as possible, for that diligent selection and continued growth. Preventing tweener growth till the layer takes should help.

Capture+_2021-01-06-15-10-47.png
Then once you get a branch growing out of the back of the future cut, try to cut off the nodes in between when you cut, like that one right below your blue line.
Leaving those just invites them to grow. So be sure to make the cut precisely.

Great base.

Sorce
 

Aldingbonsai

Sapling
Messages
27
Reaction score
26
Location
West Sussex UK
USDA Zone
9
for better surface roots, keep the nebari covered with soil.

Note, this species takes all sorts of abuse. Trimming the roots short will not hamper it in your climate.

View attachment 348076View attachment 348077
Thanks for the photos, it's good to know I can do some serious work on the tree.
That tree is gonna have great movement and taper. Does it have its own thread on here?
I pulled back the soil for the photos but will keep them covered otherwise.
 

leatherback

The Treedeemer
Messages
14,057
Reaction score
27,412
Location
Northern Germany
USDA Zone
7
That tree is gonna have great movement and taper. Does it have its own thread on here?
Na, this is one of my plants I am growing out. One of .. Maybe 30 I started 6,7 years ago. Meanwhile my growing beds have grown to 200+ trees. Not keeping track of the individuals. The original bunch are all pretty similar. Grown from cuttings, seed or one year olds

Most of this younger material can take quite a bit of work to be honest.

oak
1609969418690.png

Linden
1609969563515.png

zelkova
1609969489684.png
 

Aldingbonsai

Sapling
Messages
27
Reaction score
26
Location
West Sussex UK
USDA Zone
9
That's a great selection of native trees, getting good bark on them as well as the movement, taper and flare. I will have to find more ground growing space!
 

leatherback

The Treedeemer
Messages
14,057
Reaction score
27,412
Location
Northern Germany
USDA Zone
7
That's a great selection of native trees, getting good bark on them as well as the movement, taper and flare. I will have to find more ground growing space!
thx. I have realized that you do not need a lot of space to grow a couple of trees. But I take the slow root. cut downs every 2-3 years and digging pretty much the same years
 

clem

Chumono
Messages
780
Reaction score
1,877
Location
Normandy, France
you nebari is good on every sides, so it means that you can turn your tree to get the best front according to the fact you want to hide the big scar (from clip&grow) and the fact you want to have the 1rst right branch emerge on the side of the trunk. So, IMO, the front would be slightly on the left (turning the tree counterclockwise) (i drew an eye to represent the front)
For me it is better to avoid the left branche that will become the new trunk going too much towards your eye (it is agressive imo) so i would put a big wire (or a guy wire around if it isn't flexible with the wire) to stick that branche more to the trunk and give a movement on the left. If you put a wire, it is better to not put it on the part of the trunk you will keep, to avoid scars on it; so it is better to anchor the wire on the trunk above the future cut. You put the guy wire or the wire now and you remove it in the beginning of summer, before it makes scars, and then, you cut the trunk in summer. just my opinion ->


with a guy wire around the trunk ->
acer01jpg.jpg

or with a big wire if the branch is still flexible ->
acer02.jpg
 

Aldingbonsai

Sapling
Messages
27
Reaction score
26
Location
West Sussex UK
USDA Zone
9
Wow thanks for taking the time with the sketches clem! I hadnt got round to it yet, that helps visualise where it could go.
Thanks for the examples Bobby, I had something like the first two in mind after your previous comments.
Looks like I have a couple of good options here. I'll let you know when I take the next steps.
 
Top Bottom