Schinus Terenbentifolius (Brazilian Pepper)

TheAntiquarian

Sapling
Messages
36
Reaction score
24
Location
Lima, Peru
Having many trees of this species growing around where I live, since the species is native here, I have thought it would make a strong tree for me to learn the basics of bonsai.
In some forum I saw a guy say he'd achieved this tree basically by cutting and growing back, little wiring apparently, in about thirty to forty years:

1630539197192.png

This tree grows quite wild by itself, with intertwining ramification, not always really a clearly defined top. This tree, this guy says, grew its new top very gradually after existing as a chopped tree in a regular pot for about fifteen years or so, about half its miniaturized life.

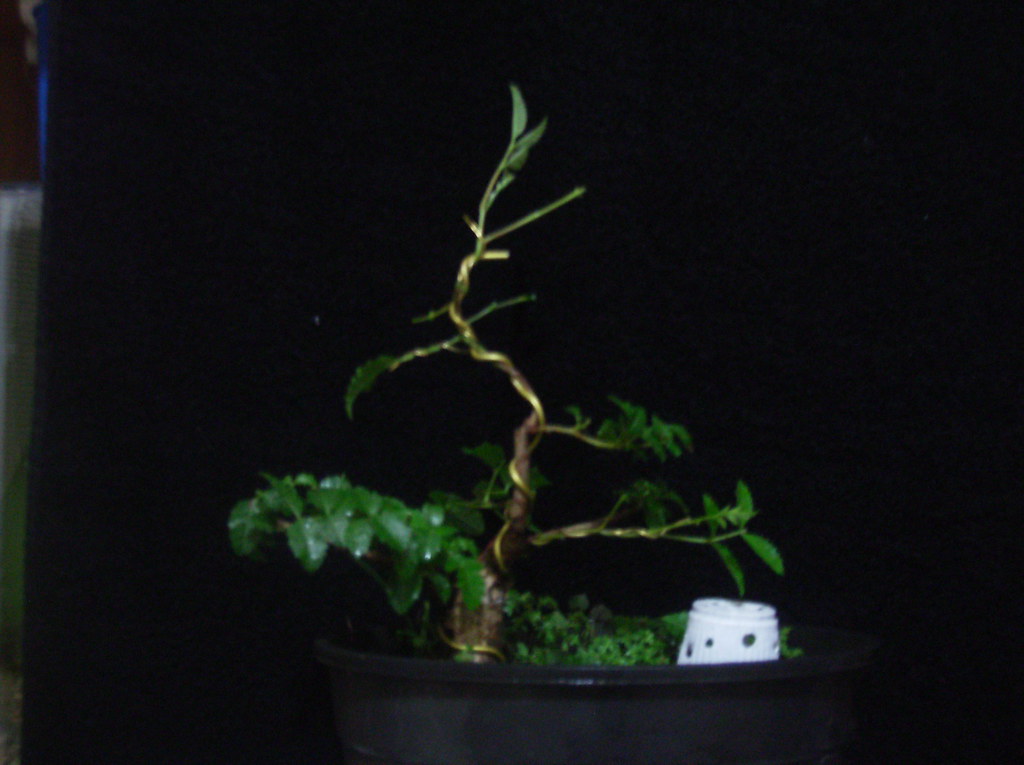
I have dug this, my first attempt or specimen, out of the ground three months ago. I chose it for its potential surface root thickness, nice trunk width, and nice low primary branching. I planted it in a pretty deep pot in the kind of soil where I've always seen the tree thrive, no special bonsai soil or root work yet. Only plenty of river sand which is what local growers use for drainage. I kept all the roots, all of which grow radially from the trunk and then for the time being still just go down into the soil, around the sides of the pot. I have just tried to mimic the tree's natural growing ground and root system for the time being, hoping first to develop some new/secondary branches and thickening both them and the trunk for a few years before starting to reduce the roots into a shallow pot idea. I hope to grow and/or graft some roots to polish the surface root structure, before I start to prune the roots into their final shallow-pot structure. At this point this is how much the tree has sprouted:

IMG_E0594.jpgIMG_E0595.jpgIMG_E0596.jpgIMG_E0597.jpgIMG_E0598.jpgIMG_E0599.jpgIMG_E0600.jpgIMG_E0601.jpgIMG_E0602.jpg

The reasoning now, if I am not badly mistaken, is mostly all about what branches to keep and stimulate; when and where to make the first cuts to ramify the projected structure, and when and where to wire... knowing this species doesn't particularly seem to like wiring.

Kind readers and forum members might have some advice. I will post a couple of drawings of my projected structure in a new message on this thread, since the software allows me only ten pictures per post...
 

TheAntiquarian

Sapling
Messages
36
Reaction score
24
Location
Lima, Peru
Based on the first and fourth photos in that series (the first and last being my intended front, and the series of photos shot at intervals of 45º rotation from one to the next, so the third being the profile view from the right), considering the branches the tree is offering I drew these front and right/profile projected views:

1630540622335.png

Then considering these projections I found only one branch I'd prefer growing in a different direction:

1630540704969.png
 

Forsoothe!

Imperial Masterpiece
Messages
6,878
Reaction score
9,248
Location
Michigan
USDA Zone
6b
Do you prefer the intertwining foliage/branching to either a more formal upright or broom style? The photo leads me to believe that orderly clouds could be formed easier on this species than most, if that's what you wanted, because the leaflets are arranged nicely in fairly flat planes. Even better, they present in a nice arc with the end leaf leaning lower. That makes for a very pleasant look for the outside edge of a cloud. If you wanted a more formal set of clouds for either of the above styles, that's just a matter of Clip & Grow removing stems growing in the ~wrong~ plane in favor of leaving those growth within the chosen plane. The planes being in the same attitude as the individual branches, and at first the foliage is only allowed to grow sideways, more or less horizontally from the branch; thence slightly up from that first layer which provides the footprint of a given cloud. As following the rules of bonsai, nothing allowed to grow straight up or down from a cloud to interfere with the airspace in-between clouds for the birdies to fly thru, giving a crisp appearance, -or not, as you see fit. Naturally, some modest wiring of hardened green shoots to locate the major branches is required first, but probably only C&G from there. Does that address your dilemma?

Your starter material is splendid! So is the photo'd.
 

Forsoothe!

Imperial Masterpiece
Messages
6,878
Reaction score
9,248
Location
Michigan
USDA Zone
6b
Here's an example of some more definition of the outside of the canopy showing modest clouds...
lima 2.JPG
 

TheAntiquarian

Sapling
Messages
36
Reaction score
24
Location
Lima, Peru
Do you prefer the intertwining foliage/branching to either a more formal upright or broom style? The photo leads me to believe that orderly clouds could be formed easier on this species than most, if that's what you wanted, because the leaflets are arranged nicely in fairly flat planes. Even better, they present in a nice arc with the end leaf leaning lower. That makes for a very pleasant look for the outside edge of a cloud. If you wanted a more formal set of clouds for either of the above styles, that's just a matter of Clip & Grow removing stems growing in the ~wrong~ plane in favor of leaving those growth within the chosen plane. The planes being in the same attitude as the individual branches, and at first the foliage is only allowed to grow sideways, more or less horizontally from the branch; thence slightly up from that first layer which provides the footprint of a given cloud. As following the rules of bonsai, nothing allowed to grow straight up or down from a cloud to interfere with the airspace in-between clouds for the birdies to fly thru, giving a crisp appearance, -or not, as you see fit. Naturally, some modest wiring of hardened green shoots to locate the major branches is required first, but probably only C&G from there. Does that address your dilemma?

Your starter material is splendid! So is the photo'd.

It is very interesting to think of the options this way, either a formal upright shape or a broom shape or a more heterodox shape or intertwined branching, so to speak. When I look at what this tree does in full size in real life, it's like a sort of intertwined broom, so to speak. Never an orderly upright style with radially orderly clouds, like pines and other trees do. Also, when I look at what I call this tree's profile (the third photo in the series, and the second drawing), I see the trunk slanting upward at a 45º angle, like an unbalanced rhino horn. So, my instinct (also seeing how it is sprouting) is to let the bottom two branches grow and thicken as much as possible, so they will eventually balance the "top" trunk section, growing into similar 45º compound primary branches, let's say between the two of them balancing the weight of the tall trunk, meanwhile keeping top trunk's branches short to prevent the top "horn" from growing thicker. I've put the tree in a big pot so there will be enough soil and roots to grow those two bottom branches' secondary branches really long, so as to thicken that base/front section, the two lower branches. Then I can have a sort of almost bifurcated broom (half the current top of the trunk, half the current lower two branches) and both halves can freely ramify upward. The final "top" can come from the current top, ramifying back toward the center and carving the top of the current rhino's horn to reduce it a bit; but a good part of the buildup toward that final "top" can be created out of the upward ramifications of the current bottom branches. So the upward sprouts from the two bottom branches, which the tree is vigorously producing, can be very useful. They can be cleverly shaped to grow upward in a 45º angle and balance the current trunk.

I think for a reasonably famous/successful example of such eccentric strategy I can think of this tree:

1630594875934.png

When the basic structure is developed, even clouds can be thought of, and defined. I just think developing such a structure will be more natural both for the tree and for myself, being not really an actual aspirant to the fine Oriental art of bonsai, but rather a small time keeper of decorative house plants who would like to gradually learn to create and keep miniature trees, just for his own use and decoration of his own space, not quite as actual bonsai.

Of course, the best such an aspiring amateur gardener could do to learn to miniaturize trees would be to listen to the experts in the traditional art of bonsai. I am most grateful for the advice I am finding in places such as this fine forum. For example, it is certainly helpful to think of this tree and consider three basic ranges of options, the formal upright, the broom, and the eccentric freestyle ramification way. As a designer and amateur gardener who is trying to ease into miniature tree crafting, and considering the natural impulses and shapes of this tree and species, I think the free intertwining ramification based on a basic almost-split shape is a good idea. It's what makes sense to me and it's what the tree itself is trying to do. Even clouds can be formed later, on that foundation, when ramification is developed and leaf size progressively reduced.

This inspires me to produce some further drawings, having a clearer, more developed idea now of where the tree may be going. I will try to post some new sketches soon. I am most grateful for the advice.
 

Fidur

Chumono
Messages
757
Reaction score
3,331
Location
Canary Islands , Spain. Europe
USDA Zone
12
Hi Aintiquarian.
I think you're in a usda hardiness of 12.
As you can see, mine is 11 (though I think i'ts closer to 12).
I tell you this, because I'm caring for one of these trees. My thread on it:


Also, you have this very useful reference: https://www.bonsai-bci.com/magazine/2016-Q1/mobile/index.html#p=36

I'm growing it "clip and grow". Two weeks ago I prunned it in some of the flushes, and it is back budding in the axile of every compound leave I chopped (1 to 3 buds per flush). So you can relay on this method.
As you, I live in a place where there are many in gardens and parks, and what I've seen is that it back buds no matter where you chop it.
 

TheAntiquarian

Sapling
Messages
36
Reaction score
24
Location
Lima, Peru
Hi Aintiquarian.
I think you're in a usda hardiness of 12.
As you can see, mine is 11 (though I think i'ts closer to 12).
I tell you this, because I'm caring for one of these trees. My thread on it:


Also, you have this very useful reference: https://www.bonsai-bci.com/magazine/2016-Q1/mobile/index.html#p=36

I'm growing it "clip and grow". Two weeks ago I prunned it in some of the flushes, and it is back budding in the axile of every compound leave I chopped (1 to 3 buds per flush). So you can relay on this method.
As you, I live in a place where there are many in gardens and parks, and what I've seen is that it back buds no matter where you chop it.
Hi Fidur,

I was just looking at your thread now, I see you're in Canarias. I'm in Lima. Not the very hardest part of the coastal desert. I think we have very similar climate. These trees are native here. They were here before we Spaniards brought everything here, many things from the South of Spain, like much of the local gardening. They would call these coastal cities "garden cities", in a state of endless spring due to the mild weather.

I did also see the magazine article. These trees are fascinating to me. Here's a very interesting thread where some people share their experience trying to grow bonsai versions of them. One of those guys has a wonderful tree he seems to have been growing for more than forty years, and so his advice seems worth listening to.


Your tree looks great. Looking forward to see its future development. We seem to be at the early stages of it. I would like to just clip and grow, as far as possible. This is also the advice that 40-year-old-pepper-tree guy has, just let the tree say where the branches will go, it seems to be a species that decides that well and with good criteria of its own. My biggest curiosity as a beginner is how all those big cuts will be disguised in time, particularly my main trunk's top cut where the trunk is slanting upward at a 45º angle and things look out of balance from the profile because the trunk is so thick up there. This seems to be the whole challenge with miniature trees after the first chop, and it seems it takes many years to really build the fading of the primary branches into the secondary branches and build the basic structure of the tree from that foundation. I have my tree in a very big deep pot and didn't touch the roots, hoping to grow some very long branches to finally just use the first couple of inches of each, but thick.
 

TheAntiquarian

Sapling
Messages
36
Reaction score
24
Location
Lima, Peru
After some initial prunning and with "Spring" just starting (though of course in thise climate zone there is no real Winter):

IMG_0872.jpg IMG_0873.jpg IMG_0874.jpg IMG_0875.jpg IMG_0876.jpg

I have been experimenting with two variables, cutting dead wood/stubs a little bit in order to see things more clearly, and cutting/pruning new sprouts to select the branches and nodes to be used in the design. Inevitably I think as a designer and in a way as a sculptor in this case, so on one hand it's useful to work out things on the computer and in drawing, but it's also nice to project the balance that can be achieved by optimal carving of the dead wood and thus optimal setting up of the healing process of those cuts. For example, at this point I think I have gotten rid of the hunchback-horn to a fair extent, and the problems left are now all related to taper. As all the buds in the new selected branches are allowed to grow for the following six months or so, and then cut and developed and ramified for the following years, the newest branches will fatten and this solves taper from one side; nevertheless I guess the other solution for taper, simultaneously, will be wise use of dead wood carving. So I have been experimenting a bit with my cut paste recipe, in order to make it more like the color of the bark, and thus more invisible. When the calluses form, they will form over already discretely concealed dead wood. I can also re-carve and correct, so I am cutting only very, very gradually. I like this way of using a "cosmetic" but healthy cut paste I have known since before getting interested in bonsai-like miniature trees. I use the plants as ornament and have no real work space for plants; so I prefer it if they look nice.

I also bought a second plant of the same species, already treated as a bonsai:

IMG_0877.jpg


Nice inspiration.
 

TheAntiquarian

Sapling
Messages
36
Reaction score
24
Location
Lima, Peru
I guess being a complete beginner, I am taking the first styling of the tree gradually. My first goal has been to eliminate the hunchback/horn in the back, the stump from the main trunk. I am doing the trunk-chop gradually, while trying to figure out where the tree could go and how that chop can be forgotten.

IMG_0914.jpg IMG_0916.jpg IMG_0917.jpg IMG_0918.jpg IMG_0919.jpg IMG_0919b.jpg IMG_0920.jpg IMG_0921.jpg IMG_0923.jpg IMG_0925.jpg
 

TheAntiquarian

Sapling
Messages
36
Reaction score
24
Location
Lima, Peru
A before-and-after comparison of the gradual trunk chop, but for some reason I get only very small images. I'll try to find the right way to show the images in high resolution, they're just "right" and "left" views taken from the 360º photos.

1633109691933.png1633109706769.png1633109762796.png
1633109812186.png1633109834906.png1633109856752.png
 
Last edited:

TheAntiquarian

Sapling
Messages
36
Reaction score
24
Location
Lima, Peru
I have been trying to change those side by side low resolution photos with the real high resolution photos but something's not letting me do it. I can't figure out a way to erase this message altogether and the previous one either. Trying to upload some comparison photos I have produced two unwanted messages, one which repeats the 360º series of images...
 
Top Bottom