Kintsugi Pot Repair

This to me is the best example of the artistic craft of Kintsugi. I appreciate the imaginative artistry on the Hattori, but to me it’s a different discipline entirely. The simplicity of this repair of the HK made pot is so beautiful and perfect. You always make my heart sing when I see these images of your work, so thank you for your posts!
Dang, you made my day. Thank you!

You're right about the Hattori design; it's considered a version of Maki-E, which is a lacquer design.
 

Heian Tofukuji - Shohin Rectangle - Completed​

This Heian Tofukuji has one of the most luxurious emerald green glazes I've ever seen. It's got a crystalline structure in certain parts and the glazes pool in all the right places, revealing sharp lines and edges. This pot was also valuable enough for someone to repair by applying epoxy super glue. It is very stable and did not require me to come back and disassemble, as it was aligned perfectly. Some glazing was missing on the feet, but that was easily corrected, and the cracked lines were easily scribed and repaired.

IMG_1842.JPG
IMG_1828.JPG
IMG_1811.JPG
IMG_1813.JPG
IMG_1826.JPG
IMG_1840.JPG
 

Heian Kouzan Second Generation - Shohin Oval - Completed​

This one was fun. It's cool to have a father-son pot composition. This pot is of the Kouzan Jr with the previously posted mame round being the Sr. One of the things I really like about this repair is the clean line work. So clean, I was able to scribe out a middle speck of glaze to stand out between the gold lining. This was another epoxy-repaired piece. I had a lot of mechanical scraping done to flake off all the dried epoxy. Good to know the crack is stable. Good clean pot.

IMG_1814.JPG
IMG_1829.JPG
IMG_1791.JPG
IMG_1793.JPG
IMG_1794.JPG
IMG_1792.JPG

FYI, in case you were wondering, the faint crack that goes east-west is negligible.
 

Antique Japanese - Shohin Square - Completed​

This pot couldn't be identified, but is an antique Japanese pot. It's got some pretty deep fissures in the glaze but nothing made it completely through to the other side. This had to have been the most extensive in regards to how massive cracks were. It turned out very nicely. Also diversifies my display as I have a ton of round or oval pots.

IMG_1833.jpg
IMG_1818.jpg
IMG_1836.jpg
IMG_1809.jpg
IMG_1824.jpg
 

ABS Kintsugi Pot Display - Preliminary Composition​

Here is my preliminary setup of pots with stands in the "Nanaten Tana-kazari" (七点棚飾り) following the shohin display standard.

(七) Nana = 7
(点) Ten = Measure word for point
(棚) Tana = Shelf
(飾り) Kazari = Decoration
= 7 Piece/Point Shelf Decoration AKA 7 Point Display

IMG_1907.jpg

Here's my breakdown of things I'd like to elaborate on and possible changes:

IMG_1907.jpg

1) This main pot is the largest pot and sets the foundation and direction. The joinery with the missing foot is set on the right, suggesting motion towards the right.
2) This pot is already fairly large and doesn't need a stand. This stand will likely be removed.
3) Not all pots will need stands. Some will be removed, and some will remain.
4) These pots will likely swap spaces with (5) move down with the Hattori pot (designed pot) swapped to the left. One has to imagine a tree in that spot, and it'll most likely be a tree that semi cascades, motioning to the right with the oval being the landing in the 5th spot (bottom right).
5) These pots will go up to contrast with the main pot. Will likely remain in the same position to separate the round features. The Tofukuji, with its straight lines and corners, will be a good separator.
6) This pot is too large between (7) and (8). It's too large and round to be set high between the three. This pot will be removed.
7) This accent Heian Kouzan will need a slab; I'll be borrowing from a study mate. A slab could either be singular or could be large enough that have to also include (8).
8) This antique Japanese pot is perfect but needs to be set higher. I have a round tall stand but it's round and does not fit this square pot. The same study groupmate also has a square tall stand, which will be very delicate and be perfect for this composition.
9) This is the seki or the boundaries of the Nanaten Tana-Zakari.

I'll be grabbing the missing pieces tomorrow and repositioning these changes.
 

Heian Tofukuji - Shohin Rectangle - Completed​

This Heian Tofukuji has one of the most luxurious emerald green glazes I've ever seen. It's got a crystalline structure in certain parts and the glazes pool in all the right places, revealing sharp lines and edges. This pot was also valuable enough for someone to repair by applying epoxy super glue. It is very stable and did not require me to come back and disassemble, as it was aligned perfectly. Some glazing was missing on the feet, but that was easily corrected, and the cracked lines were easily scribed and repaired.

View attachment 613455
View attachment 613453
View attachment 613450
View attachment 613451
View attachment 613452
View attachment 613454
I’ve never been a fan of the the larger crystal forming crystalline glazes for bonsai pots for the most part. These are so subtle and match the over color so well! Your craftsmanship of repairing these with the kintsugi method make these gems I feel!
 
I’ve never been a fan of the the larger crystal forming crystalline glazes for bonsai pots for the most part. These are so subtle and match the over color so well! Your craftsmanship of repairing these with the kintsugi method make these gems I feel!
Thank you! I do like the smaller crystals as well vs the larger ones. They definitely will be much more expensive after the repair for sure haha.
 

ABS Kintsugi Pot Display - Proposed Composition​

Decided to go with this set up. I got some small slabs and a taller stand for the lone square pot. Ended up keeping stands in the main box interior as I don’t have a usable jitta. Wished I had more diverse pot shapes as well but this is working for the moment.

IMG_1944.jpeg
 
Hello, loving your kintsugi work! I have a kintsugi set with urushi lacquer etc, and plan to do a hybrid repair. What type of epoxy do you recommend? I was thinking the consitency of JB weld might be superior for this? Especially for chip filling.
 

ABS Kintsugi Pot Display - Proposed Composition​

Decided to go with this set up. I got some small slabs and a taller stand for the lone square pot. Ended up keeping stands in the main box interior as I don’t have a usable jitta. Wished I had more diverse pot shapes as well but this is working for the moment.

View attachment 613596
Wonderful! Thanks for sharing your thoughts on display and your changes. I love the art of display almost as much as the trees, or pots in this case!
 
Hello, loving your kintsugi work! I have a kintsugi set with urushi lacquer etc, and plan to do a hybrid repair. What type of epoxy do you recommend? I was thinking the consitency of JB weld might be superior for this? Especially for chip filling.
I can't really tell you. I did use the gorilla glue epoxy and that's worked well.
 
Made it to the show and set up today. The ceramics display looks fantastic and there were a lot of fantastic pots! Some are just very unique. The coordinators also updated their webpage with all the pots on display.

Here’s a link to my kintsugi display. Nothing really different than what I’ve posted.
Kintsugi Display

Got a chance to show the repaired Minarai pot to Roy to see in person.
 
I had the good fortune to attend the National this past weekend & see these beauties in person. As nice as the look here, they're even more impressive in the flesh (clay?). Really fantastic work!
 

Horie Bikoh Pot & Daisuke - Shohin Round (Painted)​

This was supposed to be one of the pots that could have been shown at the ABS ceramics show. It was meant to be a pot that would add diversity. It didn't get a chance to be displayed because it took too long, as there was an issue that needed client confirmation. The pot is cracked about 75% through the entire way, and the pot actually separates quite a bit when forced apart. I asked the client to see what their thoughts were regarding the break. There are two ways around this, one way being to impregnate the cracked space with raw urushi, since cured urushi can be very strong. However, another effective repair would be to fully disassemble the pot and then reassemble it with the mugi urushi compound.

20250830_181124.jpg
20250830_181134.jpg
20250830_181139.jpg
20250830_181146.jpg

The client had to really think about it. My caveats were asking about how the pot would be used. If the pot is to be a show pot or a display pot, approaching the repair by impregnation would suffice. However, if the pot is to be used for a prolonged period of time, I've noticed that a fully disassembled and reassembled pot holds a lot better. I can see how the client wouldn't want to break the pot, so I respected their perspective and approached this repair via impregnation.

One of the key techniques used in this raw urushi impregnation approach is pressure. I used a clamp to force the cracked surfaces together before applying the raw urushi.

20250830_181359.jpg
20250830_181410.jpg

Raw urushi was added drop by drop into the crack. The crack soaked up a substantial amount of raw urushi and was then left to cure for 3 weeks. The joint now does not separate and is very strong.

20250904_154204.jpg
20250904_154158.jpg

Next steps would be to backfill the joint with polishing urushi to level out the crack.
 

Attachments

  • 20250830_181408.jpg
    20250830_181408.jpg
    187.1 KB · Views: 1
I was wondering when it'll happen, It sucks but I got hit with tariffs for goods for kintsugi. It was pretty substantial, well over 50% of my total value. I usually order my stuff from Japan as this stuff is really really niche and can only be found in Japan. I bought some gold substitute because the gold is well over $200 a gram. You can imagine why I’m thankful I didn’t buy a huge substantial amount of gold, as that would have driven up the tax. I’ll likely be saving my 23.44K gold to clients who want it and from now on, I’ll be using brass pigmented gold powder for most of my repairs, it’ll be disclosed to my clients. This is shitty news to say the least…
 
I was wondering when it'll happen, It sucks but I got hit with tariffs for goods for kintsugi. It was pretty substantial, well over 50% of my total value. I usually order my stuff from Japan as this stuff is really really niche and can only be found in Japan. I bought some gold substitute because the gold is well over $200 a gram. You can imagine why I’m thankful I didn’t buy a huge substantial amount of gold, as that would have driven up the tax. I’ll likely be saving my 23.44K gold to clients who want it and from now on, I’ll be using brass pigmented gold powder for most of my repairs, it’ll be disclosed to my clients. This is shitty news to say the least…
I got hit with tariffs for two items I purchased months ago but have yet to arrive, well over double what I paid for the actual item with shipping costs added in. If you're buying stuff from Japan, expect triple costs of what you pay for things.
 

Heian Kouzan (平安香山) - Shohin Rectangle​

Man oh man, am I tickled to have this pot come across my repair table. I have the honor to repair this post-war Kouzan pot. There are three potters considered to be the pinnacle of Japanese bonsai aesthetics in bonsai ceramics: Heian Tofukuji, Tsukinowa Yusen, and Heian Kouzan; also known as the “Big Three”. I have had the pleasure to repair a few Tofukuji pots, both Sr and Jr Kouzan, and that leaves a Yusen being the missing one. Born April 28, 1905, Heian Kouzan comes from a long line of Seto potters going back more than 12 generations. By 1918, at the age of 13, he was already making an income with Bonsai and pottery. By 1948, at the age of 33, he was famous. He passed away in 1990.

His ceramics are known to be very mathematically exact; he built very thin walls, and the corners and lines were very straight and exact, which earned him the nickname of "The Razor."

Because of his status, there are a few peculiarities that make his pots rare and nuanced. Before the war, he used white clay, while after the war, his pots were made with reddish clays. In a way, Kouzan's pots that were pre-war are considered more valuable and rare; however, that was made before he became famous.

But Kouzan's best work came from 1973 to 1990 before he passed and after he transitioned his business over to his son. He then went by another chopmark KouOu, which means Oldman Kouzan.

This pot sits squarely between those times, I'm assuming. Here is a quick timeline.

1759340243063.png

Regardless, this pot came from one of "The Big Three," and it commands respect. This will be one pot that'll test the ability to preserve patina, sculpt what's missing, and overall match Kouzan's precise aesthetic.

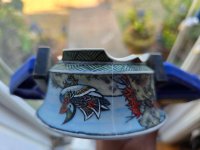
Here is the pot and how it came to me for repair.

20250701_015115.jpg
Some things to note: this pot broke in some of the most interesting ways possible. The bottom separated from the walls and the walls broke off as a quadrant. It's also missing one foot and on one of the feet, 25% of it is missing. The bottom plate is also cracked. Where there is a crack, there was glazing that was applied almost like that crack was original to when the pot was fired and the glaze was used to "fix" the crack. The crack ended up appearing on the glazing, unfortunately.

20250701_015151.jpg
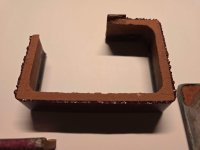
Here is a close-up of the walls and the thin glazing. The glazing is left very jagged.

20250701_015226.jpg
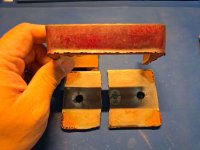
Note the very substantial crack. This is a fairly thin bottom plate. I will likely scribe the crack to force the crack to open a bit further, but I suspect this plate may crack all the way through since the clay feels very light and porous.
 

Attachments

  • 20250701_015138.jpg
    20250701_015138.jpg
    121.2 KB · Views: 0

Heian Kouzan (平安香山) - Shohin Rectangle - Assembly​

Just as I suspected, the bottom plate broke. It probably was for the best because it broke so easily. I applied the slightest of pressure on the crack, and the bottom plate separated fairly effortlessly. I suspect microcracks formed, and it just needed a nudge to force the plate to split.

20250703_175916.jpg
Note the slight glaze on the bottom that ran 25% of the way from the bottom. This was the glaze I was referring to.

20250703_175932.jpg
The edges for all the pieces were filed down, and the jagged glaze is a bit less sharp after the rough-in. The next step would be to assemble the pieces back together.
 

Attachments

  • 20250703_175928.jpg
    20250703_175928.jpg
    242.8 KB · Views: 1

Heian Kouzan (平安香山) - Shohin Rectangle - Assembly​

Patina is everything on this pot; the less smudging I can get away with, the less I will have to clean off the pot, which may also clean away patina. The assembly of this pot was pretty uneventful; everything fit back together, and there were no tensions in the clay (most slab-built pots won't have that issue). My main concerns after assembly will be sculpting the missing foot. I'll have to place a crudely formed foot so that I can whittle it down once the foot cures.

20250708_104322.jpg
To save curing time, I usually make a bit more mugi urushi (adhesive urushi), where I'd add tonoko (clay) powder and elm wood shavings to create a composite for the foot. Note the foot is very crude and will cure with the mugi urushi.

20250708_104336.jpg
I encourage the mugi urushi to seep out; that way, I'd apply less filler, and in this case, this was almost the entire circumference.

20250708_104326.jpg
Check out all the patina to avoid. There are pros and cons to unglazed and glazed surfaces. I can be A LOT harsher on unglazed surfaces, but, that surface stains extremely easily and it'll likely never come out. On glazed surfaces, the patina restricts, but stains won't remain. It's annoying....

20250708_104340.jpg
Note: the feet are "somewhat" similar. In shape, yes...but they are different. The top two are similar to each other, and the bottom two are similar to each other. It's harder to tell in this angle but if you look at previous pictures, you can see their profile a lot better.

20250708_104345.jpg
Here is that crude foot. The foot will hold, but it'll likely fall out without the mugi urushi adhesive. This is just to get the foot in place and curing in the spot intended for it. Once I've shaped it a little bit more, I'll use mugi urushi to affix it in place. This clay is porous, so I'll drill three little holes into the clay for the mugi urushi to hold for more purchase.
 
Back
Top Bottom