Bonsai photos

radsnell

Sapling
Messages
33
Reaction score
0
I am trying to figure out the best way to photograph my bonsai collection. I have tried with my brick wall as the backdrop (not bad), a bamboo roll backdrop (not good at all), and a blank beige wall of my pergola (pretty good). I was going to look for a photographer's backdrop but I'd like to get some opinions. I've seen such a variety of good photos. What color and what material?

Thanks
 

Thomas J.

Chumono
Messages
595
Reaction score
1,443
Location
DFW area
USDA Zone
7
As in all of photography, it's all about light and which subject will do good with what kind of light.
The pic with the dark background was taken at night on the patio with a patio light and a hand held light shining on the subject. No background other than the night darkness, and a std lens.

The second pic was taken during the day in semi shade with a high power telephoto lens using nothing more than a picket fence for the background. I will say it's probably a lot cheaper to buy some sort of background than a high powered lens.

The third pic was taken with a std white roll up shade about 60 inches in width and a std lens set at about 50mm and the white balance set to give a blue cast.:p
 

Attachments

  • bonsai91.jpg
    bonsai91.jpg
    77.7 KB · Views: 124
  • btree41.jpg
    btree41.jpg
    102.9 KB · Views: 145
  • jbp31.jpg
    jbp31.jpg
    97.3 KB · Views: 139

John Ruger

Shohin
Messages
470
Reaction score
2
It seems as if the nicest photos use as backdrops neutral earth tones that complement the season and foliage.
 

Brian Underwood

Chumono
Messages
930
Reaction score
214
Location
Santa Rosa, CA
I think we were all in your shoes at one point in the past. All the hard work to learn bonsai, and you finally have something you feel is worth sharing, but now you need to learn to be a photographer too?! Here is a link to one of the most helpful articles tackling the subject, and the exact one I used to get my start; http://octavia.zoology.washington.edu/bonsai/photography/

My favorite backgrounds are still black, white, blue, and grey. To get pure black is tricky and the article describes how, but the rest of the colors are easy! My all-time favorite is blue, and all I use is a simple piece of LARGE construction paper, and a point-and-shoot camera with a couple desk lamps pointed at the subject (also described in the article).

It can be frustrating, but have fun and stick with it! -=Brian=-
 

radsnell

Sapling
Messages
33
Reaction score
0
I appreciate the responses. Being photography illiterate, that article really helps.
 

Brian Van Fleet

Pretty Fly for a Bonsai Guy
Messages
13,959
Reaction score
45,886
Location
B’ham, AL
USDA Zone
8A
I like night shots, many don't. A good tip to remember is:

Light background: highlights detail
Dark background: highlights silhouette

Exemplified in Thomas' pine photos (nice trees, BTW!)

Also, notice the angle; the lens should be at about 1/2 to 2/3 the height of the tree, and squared off.
 

xghostx

Yamadori
Messages
92
Reaction score
0
Location
Upstate NY
USDA Zone
5
it doesnt hurt to know somebody with the gear already. All of these things get very pricey and how often are you going to use them.
 

coh

Imperial Masterpiece
Messages
5,781
Reaction score
6,822
Location
Rochester, NY
USDA Zone
6
Because of ongoing discussions about photography in a thread on Rocky Mountain Junipers (http://bonsainut.com/forums/showthread.php?8639-First-RMJ), I've decided to revive this thread, which contained some good information about photographing bonsai. I believe people will have a better chance of finding information they are looking for in a thread titled "bonsai photos". So, please post your photographic methods and tips.

The two problems I see most often are:

(1) photos taken from bad angles: Unless one is looking to highlight a specific aspect of a tree (apex structure, for example), it is generally best to take photos from straight on, with the camera height at about the mid point of the trunk. A little lower or higher works as well, but views taken from too far above distort the tree structure and don't allow one to visualize the branch structure. This makes it difficult to give advice on pruning, chopping, etc.

(2) photos with bad/distracting backgrounds: If possible, get a plain background behind the tree. This can be accomplished by moving the tree in front of a wall. If the tree cannot be moved, one can place something behind the tree, such as a piece of white board, or a dark cloth. Actually, any color (other than green) would probably work, but the key is to make it simple.
 

jk_lewis

Masterpiece
Messages
3,817
Reaction score
1,160
Location
Western NC
USDA Zone
7-8
This is the best article I've found on photographing bonsai specifically:

http://www.artofbonsai.org/tutorials/photoguide.php

HOWEVER, taking a picture of your bonsai is nothing more or less than still life photography, and every basic photography book has at least one chapter on that subject. Check your local library.

It doesn't really matter what kind of camera you have, EXCEPT that the camera on your phone isn't meant for this kind of work -- and be CERTAIN the your pictures are right side up! You will be better off with a real camera. And then, learn to use the software that came with it! If this 76-year-old technophobe can do it . . .

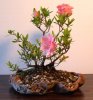
Keeping in mind that most of my bonsai are under 2 feet in height, here's what I have:

For a background, a white matboard, or the natureal yellow wall, depending on the tree and desired lightng.

Coming in from the left, natural light through a glass door and either from overhead right, or from the right front, an artificial light and reflector. Most of the time I use overhead right (first picture).

I do NOT use flash -- not ever.

Piuctures of the setup and some results.
 

Attachments

  • Photo setup 1.JPG
    Photo setup 1.JPG
    52.7 KB · Views: 44
  • Photo setup 2.JPG
    Photo setup 2.JPG
    33.8 KB · Views: 39
  • Photo setup 3.JPG
    Photo setup 3.JPG
    60.3 KB · Views: 44
Last edited:

jk_lewis

Masterpiece
Messages
3,817
Reaction score
1,160
Location
Western NC
USDA Zone
7-8
A photo using the yellow wall as a background.
 

Attachments

  • CASCA009.JPG
    CASCA009.JPG
    76.3 KB · Views: 37

coh

Imperial Masterpiece
Messages
5,781
Reaction score
6,822
Location
Rochester, NY
USDA Zone
6
That's pretty much the same setup I use for smaller trees. I do the photos inside with all artificial light. I'll place a board behind the tree which I drape with either a black or white cloth. I set the lights up so that either one is overhead and one to a side, or one to each side. I don't use flash for this setup, as it would produce too much in the way of shadowing behind the tree.

Most of the time I have to adjust the images afterwards, usually to make the background darker or lighter, or modify the contrast. These images, from another thread, were made using this setup:

willow2_nov2012_05.jpg willow2_052813_04.jpg

I find that I often prefer trees with a canopy against a dark background and leafless trees against a light background, but will usually take photos each way and then choose the best one later.

For larger trees, I'll usually take the photos outside...placing the tree on a table and hanging a black or white cloth behind the tree (usually on the side of the barn). I'll also occasionally recreate the indoor setup on a larger scale in the garage or barn. Sometimes I use the flash; if so, it's important to have the tree well in front of the backdrop to avoid distracting shadows.

Chris
 

lordy

Omono
Messages
1,537
Reaction score
370
Location
central Maryland
USDA Zone
7a
Sometimes I use the flash; if so, it's important to have the tree well in front of the backdrop to avoid distracting shadows.

Chris
REALLY important. Shadows are a major problem.
 

jk_lewis

Masterpiece
Messages
3,817
Reaction score
1,160
Location
Western NC
USDA Zone
7-8
REALLY important. Shadows are a major problem.

If you can't keep the tree away from the background a black background will eliminate shadows. Just be sure the background is matte black, so you don't get a reflection glare off a shiny surface. Velvet is good.
 

coh

Imperial Masterpiece
Messages
5,781
Reaction score
6,822
Location
Rochester, NY
USDA Zone
6
I was hoping someone else was going to mention the idea of taking photos after dark to eliminate the background...but since no one did, I'm going to.

In the RMJ thread (http://bonsainut.com/forums/showthread.php?8639-First-RMJ/page3) Vance described a method he uses. I'm copying the text from one of his posts:

"Here is the easiest way to get a quality photo without a fancy setup or background. All you need is a digital camera, which I assume you have, a small table or stand, enough of a light source that the camera can focus on the tree and a background, that is so muted or of one color that it more or less becomes a big blur. Set the tree on a table and shoot your photos after dark so that your flash will illuminate only your tree. Using this method usually the background will not show any color other than black or white of any significance and the tree will turn out better than you can imagine."

I tried this method two evenings last week with mixed results. A few of the images turned out quite well - for example, this trident maple. I did not need to adjust the photo at all:

night_photo_trident1.jpg

However, many of the other images were not nearly as successful. Often the image was under-exposed, other times blurry as the camera had difficulty focusing on the tree. I'm going to experiment more with this procedure, as I did not test every camera setting and didn't really pay much attention to the distance from camera to tree...there's probably a certain distance that works best. If anyone else has used this (or a similar) approach, what have you found?

Chris
 

Vance Wood

Lord Mugo
Messages
14,002
Reaction score
16,911
Location
Michigan
USDA Zone
5-6
Here is another method: Making the assumption that you have a digital camera that is more sophisticated than just point and shoot and you are given some shooting options here is a method you can use that will give you some pretty good photos. It is in reality almost the day light version of my night time shooting.

You will need the table or something to set the tree on that has a background that is at least ten feet away from the camera and more or less void of any real distinctive details like maybe some trees in the landscape. You use the manual settings that are usually in a silver oval on the knob that has all the settings on it for the ways the camera will shoot. Set that knob to A this is the aperture default setting where in you set the aperture and everything else adjust itself around that setting. I have my aperature set for F5.6. This aperature setting gives you a narrow dept of field focus where everything that does not fall within that window will be out of focus. With the larger F stops the depth of field become narrow and this is what you want. You will see the results in the photos.

The back grounds are at the back edge of my property and the trees that grow there. The narrow depth of field when focused on a tree near to the camera does not allow the items in the background to come into clear focus making more of a soft blur while the tree is in clear focus. This ads a three dimensional aspect to the picture. These pictures were taken about 10:00 AM the Sun is coming in from the left. If you set your camera as I have you can shoot with or without flash. Sometimes the flash will give you details of the trunk a flashless photo cannot pickup.

DSC_1359.jpg

This is one of the trees that I plan on using during the club show this month. I sell small and newly designed trees. I am always working on a tree just to keep things interesting. It is a Scots Pine that has been joyfully neglected to a point that it is now worth working on. I have had it about fifteen years. It was originally a little field liner given to one of my children by a local politician.


DSC_1342.jpg

The second tree is another Scots Pine that was obtained from a nursery that grows trees for the Christmas tree trade. It is either a French Blue Scots or East Anglean. It was cut back hard two seasons ago and will be worked on this summer.


DSC_1337.jpg

The third tree is a Mugo Pine, another product of neglect that is ready to run through the mill. I have had this guy about 7 years.
 
Last edited:

coh

Imperial Masterpiece
Messages
5,781
Reaction score
6,822
Location
Rochester, NY
USDA Zone
6
Thanks for the additional suggestions. I mostly use the manual option on my camera and set the shutter speed and f-stop myself. Unfortunately, I can never remember whether it is the higher or lower f-stop that gives the narrower depth of field.

This method would work even better if you are able to place the tree in a location where it is in light and the distant background is in shadow. You've kind of done that in your photos, at least the part of the background behind the tree canopies is relatively dark which makes the tree stand out. Best would be against a uniform dark wall (or something similar) but that is not always available.

Chris
 

berobinson82

Omono
Messages
1,515
Reaction score
441
Location
Central Virginia, US
USDA Zone
7a
Thanks for the additional suggestions. I mostly use the manual option on my camera and set the shutter speed and f-stop myself. Unfortunately, I can never remember whether it is the higher or lower f-stop that gives the narrower depth of field.

This method would work even better if you are able to place the tree in a location where it is in light and the distant background is in shadow. You've kind of done that in your photos, at least the part of the background behind the tree canopies is relatively dark which makes the tree stand out. Best would be against a uniform dark wall (or something similar) but that is not always available.

Chris

depthoffield.jpg

from photography101.org
 

Poink88

Imperial Masterpiece
Messages
8,968
Reaction score
119
Location
Austin, TX (Zone 8b)
USDA Zone
8b
Unfortunately, I can never remember whether it is the higher or lower f-stop that gives the narrower depth of field.

Thanks for the pic berobinson82

What makes it confusing (at least to myself) is that it is in fraction format...which is counter intuitive. The smaller the f-stop number (denominator of the fraction)...the bigger the aperture opening (which results to faster shutter speed and narrower depth of field).

Believe me, I will forget this again a few seconds after it is posted. LOL :eek:
 
Last edited:

coh

Imperial Masterpiece
Messages
5,781
Reaction score
6,822
Location
Rochester, NY
USDA Zone
6
To quote a photo website I found: "Depth of field increases with f-number", i.e. f32 has very large depth of field, f11 has large depth of field, f8 less depth of field, and f5 even less, etc. Maybe I'll remember it that way - big f-number, big depth of field. Don't have to remember what that means in terms of aperture size.

Chris
 
Top Bottom