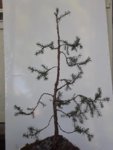
First wiring job - Eastern Red Cedar

Laurel Cherry, Prunus laurocerasus, would be my guess. Anyway, whether Ligustrum privet or Prunus (laurel cherry) it can make a good bonsai. The privet will be better, as leaves are smaller. But both can work. Care is somewhat similar. Cherry have a different constellation of diseases than the Privet, but by the time you need to diagnose a disease you will likely have the id nailed down.
 
Ok, with wiring, you need all the sizes. 1mm is pretty small.

Aluminum is sized by milimeters. And steps up in half milimeters. So, it goes 1, 1.5, 2, 2.5, 3... And so on.

Copper is sized by gauges. So a size 4 copper wire is 1/4 inch wide. It would take 4 wires laying side by side to make an inch wide band of copper. 16 gauge is thinner. It would take 16 of them lying side by side to make an inch wide band.

Please watch colin’s Video. I think everything will made more sense after you’ve seen it!
 
I went to www.craftsy.com site but even for free trial stuff I need to do credit card input which I just can't do right now. The site looked like it would be very informative. However I will still study other sources and re-wire the tree.
 
I received my wire today so got right on to wiring what I now know is an Eastern Red Cedar. It has hung in there after a heavy pruning recently. It was cut down 8 inches. This was my first time wiring a tree. It does look a little clumsy but I probably should have used thinner wire. Being on a budget I only ordered 1 size. I got 3 mm which was fine on the trunk but the branches could have used 1 mm I think. I'll eventually get the smaller size but for now went with what I had. I plan on trimming some bottom branches but after so much pruning already I will wait.View attachment 189109
welcome to crazy! did you have fun? I hope so! Your bonsai hobby may have a long way to go, but everyone is always trying to improve. Just as long as you have fun with it then it's all good. Good luck! I remember my first trees/wiring. Oh dear lord were they special ;)
 
Weeeeee! Why yes I am having fun. I'm very excited about my trees. My ERC looks a lot like a Charlie Brown xmas tree now, but I think it will be very cool someday. And my not a contest tree - ligustrum privet, has a lot of great possibilities too.
 
Colin Lewis has a free online course on www.craftsy.com. You have to register, but it’s free. Once you get in, search for “bonsai”. You’ll see a couple of pay courses offered, but the wiring class is free!
This is the best option for anyone looking to improve their wiring skills.
 
Yes, but registering involves putting in credit card info and I can't do right now. Maybe someday. I'll have to look for other options.
 
Hello, I was just able to watch the video. Was seriously an enlightening game changer for me, thanks all.

It required downloading the Craftsy app after confirming registration from email link..then went to cart checkout—> ‘watch now’ tab. I did this on my phone, not sure downloading the free app is also required on computer.

... I’m definitely gonna be needing more variety of wire sizes, good things
 
Ok - I avoided the registration by just typing in the search area 'bonsai wiring essentials'. When that came up I added it to my cart and then was able to play it. I got through several lessons but hopefully I can rewatch again to help remember it.
 
Ok - I avoided the registration by just typing in the search area 'bonsai wiring essentials'. When that came up I added it to my cart and then was able to play it. I got through several lessons but hopefully I can rewatch again to help remember it.
Rewatch, then go wire. The best way to learn to wire is to do it!

Practice, practice, practice!
 
Here's my second wiring of my Eastern Red Cedar after viewing the free wiring essentials video by Colin Lewis on craftsy.com. thumbnail222.jpg As a reminder here was my first wiring attempt before the videothumbnailwire2.jpg Hopefully a little improvement. I only have 2 sizes of wire - 1 mm and 3 mm. For most of the branches the 1 mm worked. The 3 mm would have worked on the trunk but I did not wire it, deciding to focus on branches. This tree needs to grow more branches before I can start doing the descending wire sizes like Colin did anyway (going from thick to thinner wires as the branches get thinner). The bottom 2 branches I don't intend to keep but wired them anyway. I also used a different angle for the front view the second time.
 
Last edited:
As I recall from the wiring video the wire should be kept on no longer than 6 weeks. My understanding is that this is a very slow growing tree so I figure a couple months before cutting off the wire. These branches are very thin and flexible and more time should allow them to set, I would think.
 
Thank you so much. This was probably a good basic tree to start with. Not a lot of branches!
 
As I recall from the wiring video the wire should be kept on no longer than 6 weeks. My understanding is that this is a very slow growing tree so I figure a couple months before cutting off the wire. These branches are very thin and flexible and more time should allow them to set, I would think.
Likely much longer. Don’t let it embed more than halfway, but let it bite in. Many wires stay on for a year or two, or even longer. Better wiring work the second time around.
 
If it hardly shows the 'bite in' in a couple months I'll keep it on longer.
There is no way to know in advance how long you can keep wire on. Biting in is not the horrible thing that most newbies think it is! It’s how branches get set. And most wiring scars heal pretty quickly once the wire is removed.

1mm wire is pretty thin. And here’s the thing, it tends to “cut in” faster than thicker wire!

Remember, the wire doesn’t “cut in”. Theveire foesnt move. The branch thickens as it grows. And if it touches wire, it bulges up on either side of the wire. The best way to remove wire when this has happened is to unwind it. NOT cut it out. Unwinding will lift it straight out of the groove. Trying to cut it will require you to cut the bulges on the sides.

Thicker wire makes a wider contact area so the scars are broader. And less apparent.

So, since you only have two sizes of wire, if often better to choose a thicker wire than a thinner one.

By the way, 1mm is really too thin to do anything but the smallest of twigs. Branches, it’s too weak. Oh, I know you think you’ve wired the branches! But I bet if you give them a light tap, they will vibrate back and forth! When we wire, and positioned the branches, we don’t want them to move. They should stay put!

Your wiring is much, much better! Still room for improvement, but it’s a LOT better than before!

The shape of a lot of your branches needs improvement. Several are bent in “rainbow” curves. It would look better if the branch was bent down right where it attaches to the trunk. This requires good wiring right at the trunk-branch junction, and stronger wire!

You’ll develop a touch for it as you practice!

Colin’s video talks about wiring. How to put on the wire. He doesn’t spend a lot of time talking about how to bend branches if I recall. Putting the wire on is step one. Step two is bending and styling. And is much harder to teach!

For now, see if you can find some more wire. As you’ve discovered,you really do need a full set of thicknesses.
 
Back
Top Bottom