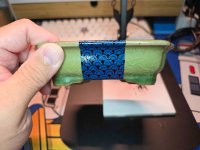
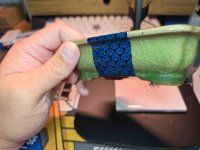
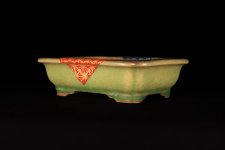
Kintsugi Pot Repair

New Kintsugi Equipment - Charcoal and Burnishing Tool​

I've recently come across three new pieces of equipment to add to my arsenal of tools for kintsugi. To start, the charcoal I'm currently using is binchotan, which is, for the most part, sufficient. However, just like how we have various grits for sandpaper, various types of charcoal have various grits as well. Binchotan is VERY hard and would probably be considered the lowest grade grit, which is great to sand off preliminary areas. However, binchotan is not great for refinement or polishing surfaces. It will scratch the repaired areas too hard, which can cause unnecessary damage, setting back the project. These were pretty hard to source because not all places were carrying the same types of charcoal and calling them differently. Cost was also very important; sourcing these pieces of coal was extremely expensive, mainly the shipping costs would sometimes be 5 to 6 times the amount of the actual piece of charcoal. I ultimately sourced my new charcoal from France, which definitely helped with shipping costs.

Here are the details of the two types of charcoal I recently acquired.

Suruga-Zumi (駿河炭)
- This is charcoal made from tung wood. Suruga zumi is considered a very fine yet durable charcoal and is best used to polish the middle or top layer of urushi. The physiology of the tree also plays a role in why this is optimal. The vessels on the end grain are thick, making it easy to polish and grind (it has good abrasive power). The wood, which is quite narrow, is very densely packed with the annual growth rings; yet, it is evenly spaced, making it optimal when used to polish. I would use this to polish the very last layer before I would gild with gold powder.

1755844407800.png

Hoh-Zumi (朴炭極)
- This is charcoal made from magnolia wood. Hoh zumi is considered a fairly dense yet much coarser than suruga zumi. This coarseness is why it is very durable that is best used to sand down your preliminary steps, like sabi urushi, which is the filler material, once the piece is reassembled with mugi urushi. It is also very suitable to sculpt when trying to recreate missing pieces.

1755844424560.png

These two newly acquired pieces have been so beneficial to my refinement process. They really do gently sand yet does not scratch any other surface.

The way to use the charcoal is to cut these pieces so that the pieces are oriented so that the grain of the wood (end of the wood) is exposed. That part does the work in polishing or sanding.

Here is a diagram of how I would cut my pieces.

1755845503759.png

It definitely is a lot of work, but you have to, so that you may save as much of the charcoal is you can, which is a pretty big downside to using this resource. Also, I would use a very fine saw to cut these pieces.

Here are the results:

1755845582114.png
Note the very fine grain that is densely packed and evenly spaced apart.

Lastly, I USED to have a tool where I took a tooth of my puppy for when he lost his puppy teeth, we picked them up for keepsakes, and attached it to a stick so I could burnish my finished pieces. I had to get approval from my wife allowed me to take and use as a burnishing tool as he did not drop very many of his puppy teeth that we could find. I somehow lost it. So I can't ask for another, hence why I had to buy the authentic tool called the "tai-ki-bo" (鯛牙棒) which is the tooth of a snapper or sea bream. This tool is actually quite useful due to its shape. I can get into very od shaped areas to burnish.

20250822_014405.jpg

Here is my old tool.
20230427_015805.jpg
20230427_020422.jpg

Just wanted to share because I was quite excited to get some authentic stuff to apply to my projects. They've been amazing additions so far.
 

New Kintsugi Equipment - Charcoal and Burnishing Tool​

I've recently come across three new pieces of equipment to add to my arsenal of tools for kintsugi. To start, the charcoal I'm currently using is binchotan, which is, for the most part, sufficient. However, just like how we have various grits for sandpaper, various types of charcoal have various grits as well. Binchotan is VERY hard and would probably be considered the lowest grade grit, which is great to sand off preliminary areas. However, binchotan is not great for refinement or polishing surfaces. It will scratch the repaired areas too hard, which can cause unnecessary damage, setting back the project. These were pretty hard to source because not all places were carrying the same types of charcoal and calling them differently. Cost was also very important; sourcing these pieces of coal was extremely expensive, mainly the shipping costs would sometimes be 5 to 6 times the amount of the actual piece of charcoal. I ultimately sourced my new charcoal from France, which definitely helped with shipping costs.

Here are the details of the two types of charcoal I recently acquired.

Suruga-Zumi (駿河炭)
- This is charcoal made from tung wood. Suruga zumi is considered a very fine yet durable charcoal and is best used to polish the middle or top layer of urushi. The physiology of the tree also plays a role in why this is optimal. The vessels on the end grain are thick, making it easy to polish and grind (it has good abrasive power). The wood, which is quite narrow, is very densely packed with the annual growth rings; yet, it is evenly spaced, making it optimal when used to polish. I would use this to polish the very last layer before I would gild with gold powder.

View attachment 611369

Hoh-Zumi (朴炭極)
- This is charcoal made from magnolia wood. Hoh zumi is considered a fairly dense yet much coarser than suruga zumi. This coarseness is why it is very durable that is best used to sand down your preliminary steps, like sabi urushi, which is the filler material, once the piece is reassembled with mugi urushi. It is also very suitable to sculpt when trying to recreate missing pieces.

View attachment 611370

These two newly acquired pieces have been so beneficial to my refinement process. They really do gently sand yet does not scratch any other surface.

The way to use the charcoal is to cut these pieces so that the pieces are oriented so that the grain of the wood (end of the wood) is exposed. That part does the work in polishing or sanding.

Here is a diagram of how I would cut my pieces.

View attachment 611373

It definitely is a lot of work, but you have to, so that you may save as much of the charcoal is you can, which is a pretty big downside to using this resource. Also, I would use a very fine saw to cut these pieces.

Here are the results:

View attachment 611374
Note the very fine grain that is densely packed and evenly spaced apart.

Lastly, I USED to have a tool where I took a tooth of my puppy for when he lost his puppy teeth, we picked them up for keepsakes, and attached it to a stick so I could burnish my finished pieces. I had to get approval from my wife allowed me to take and use as a burnishing tool as he did not drop very many of his puppy teeth that we could find. I somehow lost it. So I can't ask for another, hence why I had to buy the authentic tool called the "tai-ki-bo" (鯛牙棒) which is the tooth of a snapper or sea bream. This tool is actually quite useful due to its shape. I can get into very od shaped areas to burnish.

View attachment 611375

Here is my old tool.
View attachment 611377
View attachment 611376

Just wanted to share because I was quite excited to get some authentic stuff to apply to my projects. They've been amazing additions so far.
You are a crazy(in a good way) mad ceramic repair artist.
Really appreciate the work you are doing
 

Minerai Oval - Completed​

Not much to write home about this because the repairs were pretty simple. Nothing too crazy, the main thing with this pot was making sure the surfaces were flush because the pot itself was not exactly flush in all the areas. The rim, fortunately, was, vs some dips and such in other locations. Didn't have to do too much guesswork. Here are the pretty shots of the repaired surfaces. This will be going home to its owner in a very packed and well-insulated box. This is my second Roy Minerai pot. This was a very fun project.

20250822_235023.jpg
20250822_235036.jpg
20250822_235112.jpg
20250822_235617.jpg
20250822_235748.jpg
 

Sano Daisuke Mame - Completed​

Wanted to share this little guy. It didn't really get a ton of introduction, but the owner needed this to be completed quickly because it was needed for the National Show coming up in September. This little pot had a chip on the rim and a small round chip on the foot. Although I completed this task relatively quickly, it still took approximately two months for everything to cure correctly and be polished.

20250822_234851.jpg
20250822_234814.jpg
20250823_000008.jpg
 

Mame Pot - Completed​

Here is another mame pot that was also completed for the same client of the Diasuke pot. I can't recall the artist but this is another little pot that will hold a small accent plant for the coming National Show. This was a bit more labor-intensive but took roughly the same amount of time due to size.

20250822_234917.jpg
20250822_234929.jpg
20250823_000116.jpg
20250823_000124.jpg
20250823_000131.jpg
 

US National Bonsai Exhibition - Entry of Kintsugi Repaired Pots​

My long stints of being MIA have mainly been focused on repairing an important group of bonsai pots I'll be entering as a composition of bonsai pots to display like a 7-point shohin display. It's been accepted and will not be part of the main juried portion of the ceramic challenge with over 200 entries. I've been wanting to do this for a very long time, and have bigger dreams using this collection as experience to showcase abroad if possible. So I have shown a kintsugi display at the local PBA club show in DC this past spring. But that display was sort of a swiss cheese of various types of pots. Sizes were all over the place, and not really all that well thought out.

This go round, I have borrowed broken pieces to fix and all the pots have some form of provenance to each of them. Mostly comprising of mainly Japanese potters. Here is a listing of pots I'll be submitting:

Roy Minerai
439678560_3751890431725314_6106227646614679281_n.jpg
439908169_937295274847133_8423449011444211668_n.jpg
439684235_7617143891680434_2979718830969713227_n.jpg
This Minerai pot is the only pot completed currently. It will be sit on the top position of the shoku, box shelf. It was the most ambitious and most serious project, which is why it should sit atop the shoku to fundamentally set the display. This is the only pot that isn't of Japanese origin.

Heian Kouzan
20250701_020338.jpg
This small little pot has a global crack that was fixed with epoxy. It's held on very tightly, but the crack is very apparent and never dealt with. This would be a mix of new and old techniques.

Horie Bikoh Pot & Daisuke
20250701_020535.jpg
20250701_020510.jpg
This pot is most problematic. It's broken 80% of the way through; however, the pot is still together. The issue with this is that it's porcelain, and it is quite thin. The other issue is, it's painted, which can be disturbed using a knife or my carbide-tipped pen. This is a very risky repair.

Heian Tofukuji

20250701_020138.jpg20250701_020203.jpg
20250701_020151.jpg
This pot had epoxy added sometime ago. The pot is holding extremely well, but the surface of the break is very ugly. This pot would be a mix and match of old world techniques to finish the pot; but, with new world adhesives to bond the pot back together and hold it tighter than mugi urushi could ever.

Heian Kouzan Second Generation
20250701_020901.jpg
The interesting thing about this pot is there was an attempted repair on it using super glue. I had to scrape off all of the super glue, which ultimately failed and flaked off upon disturbing it with my carbide-tipped pen.

Antique Chinese
20250701_020723.jpg
20250701_020650.jpg
This pot has a very established and pronounced patina; thankfully, the repair on this pot is not extensive. I'd hate to disturb ANY of this wonderful patina.

Heian Tofukuji
20250701_020828.jpg
20250701_020802.jpg
This pot is most interesting. The inscription states that this is a commemorative pot for a late bonsai practitioner who was held in high enough esteem to have a third pot honoring him. (Hideo Sakao)

Antique Japanese
20250701_020410.jpg
This may or may not be part of the group; however, I chose to also fix this up to give some variation, most of the pots here are very round, this would be a nice addition if needed if a square pot was required to break up the round theme.

Still mending these up and hopefully get these on display by the time the National Show rolls around. Wish me luck!
 

Attachments

  • 435397458_431053232880453_1105579704863717589_n.jpg
    435397458_431053232880453_1105579704863717589_n.jpg
    125.7 KB · Views: 3
So happy for you that you are doing this display, such a great art form of its own and deserves recognition. Only sad that only one aspect of the kintsugi will be viewable as a static display. Will they allow you to show photos of the other sides of the pots?
 
So happy for you that you are doing this display, such a great art form of its own and deserves recognition. Only sad that only one aspect of the kintsugi will be viewable as a static display. Will they allow you to show photos of the other sides of the pots?
The coordinator asked us to send pictures, so I will be able to submit pictures of the pots, which will be available on the ABS pot website.
 

Pattern Design Progression V.2 - Hattori Soft Rectangle​

In previous posts, I've shared my attempts at pattern design. I've attempted the kumiko pattern and found it to be rather difficult. However, I'm much more experienced now and able to apply better techniques and have better resources now to help with re-attempting this pattern. One of the things I have now is colored urushi. This colored urushi is meant to be a showcase, much like the gilding powder. I acquired Red, Blue, Green, Yellow, and White.

I've experimented with patterns before in a previous post, but that was on a gilded surface and didn't require a great amount of accuracy or intricate detail. The kumiko pattern will absolutely be difficult. Another added level of difficulty is that this Hattori pot has a chamfered corner, which is also part of the pot lip, so getting a design on this curved surface will be rather difficult.

This Hattori pot will be featured in the ABS show to showcase pattern capabilities. I figured to make this a two sided design based on which one came out better haha.

Here is the one side with the kumiko pattern. I always thought a red background would be superior.

Here is the pigmented urushi with the gilding lacquer applied in kumiko pattern. This was a very difficult exercise as the red lacquer was practically invisible before curing.
20250830_185211.jpg
20250830_185216.jpg

Here you can see once it started to cure, the pattern started to show.
20250830_191014.jpg
20250830_191021.jpg

Next is gilding the cured urushi.
20250830_192606.jpg
20250830_213407.jpg
20250830_213412.jpg

Here is the completed one side.
20250904_154455.jpg

Now onto the back side.
20250903_112041.jpg

I made a stencil because I'd like to create this pattern, Japanese scallop pattern.
20250903_234732.jpg
Screenshot_20250903_161238_WhatsApp.jpg

In progress.
20250904_152854.jpg

Completed.
20250904_172032.jpg

The next step is to go through the lines and line the mock-up lines with urushi.
 
I almost like kumiko pattern in the light and dark red of the uncured urushi more than the gold! The seigaiha is looking great too. Will that be gold or silver?
 
I almost like kumiko pattern in the light and dark red of the uncured urushi more than the gold! The seigaiha is looking great too. Will that be gold or silver?
It'll be platinum, so a little darker than silver. Thank you!
 

Pattern Design Progression V.2 - Hattori Soft Rectangle​

In previous posts, I've shared my attempts at pattern design. I've attempted the kumiko pattern and found it to be rather difficult. However, I'm much more experienced now and able to apply better techniques and have better resources now to help with re-attempting this pattern. One of the things I have now is colored urushi. This colored urushi is meant to be a showcase, much like the gilding powder. I acquired Red, Blue, Green, Yellow, and White.

I've experimented with patterns before in a previous post, but that was on a gilded surface and didn't require a great amount of accuracy or intricate detail. The kumiko pattern will absolutely be difficult. Another added level of difficulty is that this Hattori pot has a chamfered corner, which is also part of the pot lip, so getting a design on this curved surface will be rather difficult.

This Hattori pot will be featured in the ABS show to showcase pattern capabilities. I figured to make this a two sided design based on which one came out better haha.

Here is the one side with the kumiko pattern. I always thought a red background would be superior.

Here is the pigmented urushi with the gilding lacquer applied in kumiko pattern. This was a very difficult exercise as the red lacquer was practically invisible before curing.
View attachment 613050
View attachment 613049

Here you can see once it started to cure, the pattern started to show.
View attachment 613048
View attachment 613047

Next is gilding the cured urushi.
View attachment 613046
View attachment 613045
View attachment 613044

Here is the completed one side.
View attachment 613043

Now onto the back side.
View attachment 613042

I made a stencil because I'd like to create this pattern, Japanese scallop pattern.
View attachment 613041
View attachment 613040

In progress.
View attachment 613039

Completed.
View attachment 613038

The next step is to go through the lines and line the mock-up lines with urushi.
Wow. That is pretty cool.!
 
Thank you for documenting all of this- your work is very impressive and the results are absolutely beautiful.
You mentioned in some of your recent posts that you'll be taking a hybrid approach to some of these repairs that have already had work done in the past. Could you go into more detail on that? I am asking because I have a few ceramic pieces (none especially valuable) that have had prior repairs done. Some will need to be totally redone, but others are decent enough and just need "dressing up." Think smeared epoxy, ooze-out that stands proud of the surface, that kind of thing.
If the pot is out of true due to the pieces being badly aligned, I'd assume that would require full disassembly. What about cases where repairs are mechanically sound and properly aligned, but not aesthetically pleasing? Is it feasible to remove some of the old epoxy to allow for new infilling, polishing, gilding, etc., or is it better to begin with a clean slate?
Another question: have you ever tried doing this with glass, or just clay-based pottery?
Great questions!

To answer your question, I still haven't really done a proper epoxy adhesive & traditional methods combo myself. What I do practice is, as you mentioned, if a piece is previously epoxied together, I generally leave the pot intact and scribe into the epoxy lines like I'd do normally. Not unless it was put together terribly, I boil the piece so that it will soften the epoxy, and I'll reattach with traditional means.

Regarding the smearing, if it is not truly aligned, I will follow my previous statement to reattach. However, if it IS aligned well, I will use a chisel or scalpel and tease the smeared pieces off as they generally do flake off. I will then etch into the epoxy and follow my general infilling process to achieve an epoxy and traditional combo approach.

It is definitely feasible to remove the smearing; most approaches to removing it is purely mechanical and may take MANY passes. Acetone works, and a heat gun will also help, but it can NOT be at the highest setting. It'll cause the bonded joints to fail.

I haven't done this with glass, but I have done kintsugi with jade, but they are not similar. I just wanted to mention some other materials that aren't clay or stoneware. Glass adheres and can be repaired in a similar way to how I repair pots, but it doesn't look good with kintsugi for a few reasons, with the main one being its transparent nature. The breaks show quite a bit and detract from the beauty. It does work. The other is glass, which takes quite a bit of skill to make it look great. It's just not something I'd think to repair because it'll just look too busy.

Here's an example of repaired glass:
1757135016307.png
Disclaimer: Yes, I am aware this is done quite stylistically, but it's still something that just feels way too busy because the glass is see-through effectively.

Conversely, I'd be totally down with adding a piece of glass to a pot that is missing a piece. Like this piece, for example:
1757134938627.png
Disclaimer: to each their own, I like my lines to be super thin, but thick kintsugi lines is a thing. Something about more material will hold better, but to me that's trading a great deal to sacrifice elegance for stability, ends up looking contrived.
 

Pattern Design Progression V.2 - Hattori Soft Rectangle - Gilding​

Gilding day! I generally am very anxious when I line and gild pieces I'm finishing up. Today was like on steroids; I was very sweaty, hands were very shaky. But the lining turned out pretty good. The lines were fairly consistent, and the use of the new metal powder came out pretty good.

Here is the other side of the Hattori pot, completed with the scalloped design aka Seikai Ha (青海波). Quick aside regarding this pattern I found interesting.
This is one of the more recognizable patterns today. In the past, it first appeared in the 6th century after the Japanese cartographers imitated it from ancient Chinese maps. Both Chinese and Japanese cultures used this pattern of repeating concentric semicircles to represent bodies of water.

20250906_235544.jpg

20250906_235553.jpg

20250906_235557.jpg

20250906_235616.jpg

I was very relieved when the pattern was completed. I was hesitant because I had gotten a new brush liner, I'm working with a new pattern, I was working with a new metal powder, AND finally I was working with a new blue pigmented lacquer. But having applied this on the opposite side, I was very sure it'll turn out fine.

Here is the platinum powder applied.
20250907_002642.jpg

20250907_002647.jpg

20250907_002653.jpg

The blue background worried me a bit because with the powder applied it felt like the blue background was taking in the powder because the lacquer is cured, not tacky, but it's definitely not glossy like the surrounding surface. But I was very confident it was going to be fine.

Here is the pattern after I spent about 20 minutes blotting the entire surface dozens of times with my silk cotton ball loaded with the metal powder. After 20 minutes, I went from a blotting motion to a side-to-side motion to start clearing the surface of the excess powder.

Here is the preliminary result before I clean it after it comes out of the muro, aka my bathroom, after I took a hot shower.
20250907_002825.jpg

Thankfully, the excess wiped off and the blue is showing through. After tomorrow, it'll be cleaned up with a Clorox wipe, my secret to cleaning off everything once the pattern cures. I use Clorox to clean all my tools, as urushi is essentially an oil, it cleans urushi off my brush and other tools and surfaces VERY well.

Will post tomorrow once it cures.
 

Attachments

  • 20250906_235606.jpg
    20250906_235606.jpg
    208.7 KB · Views: 3
  • 20250906_235612.jpg
    20250906_235612.jpg
    200.3 KB · Views: 3

Pattern Design Progression V.2 - Hattori Soft Rectangle - Completed​

This pot is ready to rock and roll. Cleaned up the excess with the wipe and everything came off as hoped. Here are some glamor shots.

IMG_1806.jpg
IMG_1804.jpg
IMG_1786.jpg
IMG_1787.jpg
IMG_1788.jpg
IMG_1790.jpg
IMG_1789.jpg
IMG_1843.jpg
IMG_1816.jpg
IMG_1848.jpg
IMG_1821.jpg

This pot will be part of the line up for the ABS pot show coming this weekend. Excited to say the least.
 

Attachments

  • IMG_1807.jpg
    IMG_1807.jpg
    76.3 KB · Views: 0

Heian Kouzan - Mame Round - Completed​

Here's the line-up for the display of kintsugi-repaired pots. This is a pretty tiny pot about 3" in diameter. This pot was initially repaired with some epoxy and is quite stable. Even with the initial repair by others, I scored the surface to create a channel to pool more lacquer into its cracked seam as needed. It took about two rounds of lining the crack seam to convince me the crack is filled. The rest of the process was the typical follow-through.

IMG_1808.JPG
IMG_1835.JPG
IMG_1820.JPG
IMG_1823.JPG
 

Heian Tofukuji - Shohin Oval - Completed​

This was a pretty rare and valuable pot. As previously mentioned, the inscription on the bottom of the pot states that this is a commemorative pot for a late bonsai practitioner who was held in high enough esteem to have a third pot honoring him (Hideo Sakao). It's a pretty gunky pot. I'm consulting others, but I'd be curious to see if I should leave it gunky or apply camellia oil like you would with a tree in the pot.

This pot has damage on multiple parts of its circumference. 12 O'clock, 3 O'clock, 6 O'clock and 9:00 O'clock sides all have a small crack. It is also initially repaired with epoxy and is stable. The crack doesn't seem to have traveled any further. A nice old and rare pot.

IMG_1827.JPG
IMG_1841.JPG
IMG_1810.JPG
IMG_1819.JPG
IMG_1822.JPG
IMG_1834.JPG
IMG_1837.JPG
IMG_1849.JPG
 

Heian Kouzan - Mame Round - Completed​

Here's the line-up for the display of kintsugi-repaired pots. This is a pretty tiny pot about 3" in diameter. This pot was initially repaired with some epoxy and is quite stable. Even with the initial repair by others, I scored the surface to create a channel to pool more lacquer into its cracked seam as needed. It took about two rounds of lining the crack seam to convince me the crack is filled. The rest of the process was the typical follow-through.

View attachment 613413
View attachment 613415
View attachment 613417
View attachment 613414
This to me is the best example of the artistic craft of Kintsugi. I appreciate the imaginative artistry on the Hattori, but to me it’s a different discipline entirely. The simplicity of this repair of the HK made pot is so beautiful and perfect. You always make my heart sing when I see these images of your work, so thank you for your posts!
 
Back
Top Bottom