sorce
Nonsense Rascal
Nutters,
You may have noticed I almost always jump to recommending airlayers. I don't think I will ever lose my fascination with the process. In attempts to perfect it, I have worked out some tweaks so it is time to share my method.
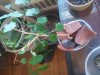
I don't understand haphazardly throwing long Sphagnum in plasticwrap (though I do this too), just to sort out the roots later. This Bonsai thing takes long enough as it is. This method has gotten me off to a good start on a couple plants, (pom, elm) Now that I remembered to add the support putty, and to take photos, well... Here it is on a ficus.
Photos in order. Backwards.
Materials.
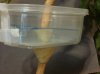
Zip tie. Jewel ham container. Regular soil mix. Finely chopped Sphagnum. Plumbers putty. Broken pot chunks. 4 inch packing film. Sharp knife. Scissors. Tape.
Beleive it or not, salami containers work just as well.
Process.
I mark A/L spots with zip ties as soon as I know they will take place. For a bit of girdle too. I cut off the zip tie and use it to judge the size of the hole to cut in the Radialdisc™ (blue lid, many substitutes), and the container bottom.
Standard ringbarking. Cut deep. Strip with knife from top to bottom.
Apply Radialdisc™. See photo. Just below top cut.
Punch drainage holes in container. Apply.
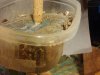
Fill bottom with soil.
Top with finely chopped Sphagnum.
Add pot chunks(many better substitutes). For a bit of weight to keep Sphagnum compact.
No pic of wrapped in plastic to keep moist.
This was done last night. I will repost when the roots hit the pot side. And repot shortly after with a repost!
About three years ago I had my only failed air layer. On a nursery redbud I was keeping inside. (Go figure) I have since had nothing but success on ficus, elm, pomegranate, and a Cali Plant once.! I look forward to my first Juniper attempt this Spring. And I have my eye on a possible Hawthorn. Dying to acquire one and I blame BVF for that! In a good way!
I know there is a better way to accomplish this. Brainstorming comments welcome.
I have another elm I poured a fast setting concrete pot around. And I would use a kiddie pool as the Radialdisc ™ if I had space.
Thanks for reading. I hope this helps better your Nebari beginnings!
Sorce
You may have noticed I almost always jump to recommending airlayers. I don't think I will ever lose my fascination with the process. In attempts to perfect it, I have worked out some tweaks so it is time to share my method.
I don't understand haphazardly throwing long Sphagnum in plasticwrap (though I do this too), just to sort out the roots later. This Bonsai thing takes long enough as it is. This method has gotten me off to a good start on a couple plants, (pom, elm) Now that I remembered to add the support putty, and to take photos, well... Here it is on a ficus.
Photos in order. Backwards.
Materials.
Zip tie. Jewel ham container. Regular soil mix. Finely chopped Sphagnum. Plumbers putty. Broken pot chunks. 4 inch packing film. Sharp knife. Scissors. Tape.
Beleive it or not, salami containers work just as well.
Process.
I mark A/L spots with zip ties as soon as I know they will take place. For a bit of girdle too. I cut off the zip tie and use it to judge the size of the hole to cut in the Radialdisc™ (blue lid, many substitutes), and the container bottom.
Standard ringbarking. Cut deep. Strip with knife from top to bottom.
Apply Radialdisc™. See photo. Just below top cut.
Punch drainage holes in container. Apply.
Fill bottom with soil.
Top with finely chopped Sphagnum.
Add pot chunks(many better substitutes). For a bit of weight to keep Sphagnum compact.
No pic of wrapped in plastic to keep moist.
This was done last night. I will repost when the roots hit the pot side. And repot shortly after with a repost!
About three years ago I had my only failed air layer. On a nursery redbud I was keeping inside. (Go figure) I have since had nothing but success on ficus, elm, pomegranate, and a Cali Plant once.! I look forward to my first Juniper attempt this Spring. And I have my eye on a possible Hawthorn. Dying to acquire one and I blame BVF for that! In a good way!
I know there is a better way to accomplish this. Brainstorming comments welcome.
I have another elm I poured a fast setting concrete pot around. And I would use a kiddie pool as the Radialdisc ™ if I had space.
Thanks for reading. I hope this helps better your Nebari beginnings!
Sorce


")
")