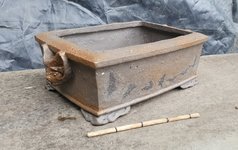
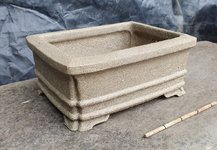
Those are some really nice clean looking edges on your horizontal lines. Do you have a form/template that you are using to keep them consistent - it looks like it since I see the same pattern/lines on both pots.I'm so slow at making pots, it takes me a long time to make enough to fill my small kiln. Perhaps because I'm experimenting with so many things. Anyhow, I thought I'd share a pic of what I'm up to, trying to fill a kiln of unglazed pots:
View attachment 445534
The design is based on a bag/incurved rim, but it has an internal wall too, so no incurve to battle when repotting. They're still drying, and I'm weeks away from having a kiln full! This potter can't exist in isolation.
Bonus points if you can name the potter who inspired this design
You are using an out of date browser. It may not display this or other websites correctly.
You should upgrade or use an alternative browser.
You should upgrade or use an alternative browser.
A Potters Progress
- Thread starter JeffS73
- Start date
HorseloverFat
Squarepants with Conkers
I'm working on a decent reply...
In between sculpting work.. working on larger pieces... and all my crazy high-summer plant chores...
Looking GREAT!
(just wanted to let you know I'm still watching.. just lengthy responses are tough.. and I feel your claywork warrants a full response.)
In between sculpting work.. working on larger pieces... and all my crazy high-summer plant chores...
Looking GREAT!
(just wanted to let you know I'm still watching.. just lengthy responses are tough.. and I feel your claywork warrants a full response.)
HorseloverFat
Squarepants with Conkers
Bonus points if you can name the potter who inspired this design
Definitely Nao.
JeffS73
Chumono
Thanks, it's like the Oribe glazed pot above, I make ribs from plastic and use these to form the sides. If there's a bead or indent that's normally part of the rib. It's a versatile method, but the outward bulge of this pot is tricky as the flat wall slab has to be stretched/deformed a lot. It would possibly be better to use coil & pinch instead of a slab.Those are some really nice clean looking edges on your horizontal lines. Do you have a form/template that you are using to keep them consistent - it looks like it since I see the same pattern/lines on both pots.
JeffS73
Chumono
Weeeeell, I love Naos work, but not this time!Definitely Nao.
It's Peter Krebs, German potter extraordinaire
HorseloverFat
Squarepants with Conkers
This is a great method..Thanks, it's like the Oribe glazed pot above, I make ribs from plastic and use these to form the sides. If there's a bead or indent that's normally part of the rib. It's a versatile method, but the outward bulge of this pot is tricky as the flat wall slab has to be stretched/deformed a lot. It would possibly be better to use coil & pinch instead of a slab.
I've watched a Japanese potter make pots this way.
It's not, personally, my favorite..
But I have respect for any method that produces results.
Watch all those potter "Immersives", and you will see quite quickly that beyond "making your piece, ONE piece".. there are really no INCORRECT methods..
I've been trying sculpture, recently... SO different than my normal methods operation.
Damn it.. this WASN'T what I wanted to respond to.
I'll be back
JeffS73
Chumono
JeffS73
Chumono
And what can I say, she must have popped the kool aid and gone to sleep, just like me!
Not a total disaster, but...


This is black clay, chunky grog. Difficult build due to thin slabs and the grog, so I'd build thicker if I use it again. The base bowed and cracked. I'd tested a Soda ash spray for a slight sheen, but I must have got the amount wrong, because look at the surface!
Not a total disaster, but...


This is black clay, chunky grog. Difficult build due to thin slabs and the grog, so I'd build thicker if I use it again. The base bowed and cracked. I'd tested a Soda ash spray for a slight sheen, but I must have got the amount wrong, because look at the surface!
JeffS73
Chumono
JeffS73
Chumono
JeffS73
Chumono


I was a bit sad about this one. My Bat pot. Grey clay again, fumed again. But, I did a test where I added black to the grey clay, to try and make it darker, but Manganese + chrome (in the grey clay) does not make darker grey! So, for this one, I added crushed bisqued black clay as grog. But, the off gassing from the black clay has bloated the grey clay! Gah. Maybe it would work if I full fired the black clay instead?
JeffS73
Chumono
JeffS73
Chumono
JeffS73
Chumono


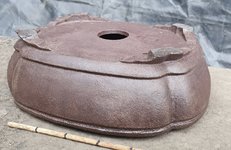
Saved my favourite for last. The colour is kind of liver purple, not brown. Pics are so-so I'm afraid. I did the Soda ash on this one too, less, but it still puckered the surface. The feet must have been slightly saturated, because two broke when I removed it.
So many lessons.... Next firing will be better!
Colorado
Masterpiece
Really good looking pots.
I really like the “fancy” feet. How do you make them? Any tips would be greatly appreciated!
I really like the “fancy” feet. How do you make them? Any tips would be greatly appreciated!
JeffS73
Chumono
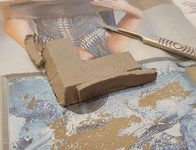
Ha, I'm doing some right now. I carve them, I suppose I broke it down into manageable steps:

I cut a slab to the thickness I want, I like thin feet at the moment. I use my paper template for the base which is marked equally for feet. Accuracy is harder with carving and you spot imbalance when they're on very easily. My wife kindly pointed this out straight away on my first pots

Cut a slant on outside faces.

I made a foot template from watercolour paper. I use this to get the bottom edge the same on each foot.line up off the middle corner.

I freehand the internal pattern with a needle, then go over that with the knife to the right depth.

Then I can slice that off from the top.
I let the clay firm up to leather hard, then I can tidy them up and stick them on. Final fettle after they've been on for a day or so. I use some wax tools, the metal ballpoint tools and a silicone brush to finish. Hope that helps.

I cut a slab to the thickness I want, I like thin feet at the moment. I use my paper template for the base which is marked equally for feet. Accuracy is harder with carving and you spot imbalance when they're on very easily. My wife kindly pointed this out straight away on my first pots

Cut a slant on outside faces.

I made a foot template from watercolour paper. I use this to get the bottom edge the same on each foot.line up off the middle corner.

I freehand the internal pattern with a needle, then go over that with the knife to the right depth.

Then I can slice that off from the top.
I let the clay firm up to leather hard, then I can tidy them up and stick them on. Final fettle after they've been on for a day or so. I use some wax tools, the metal ballpoint tools and a silicone brush to finish. Hope that helps.
Colorado
Masterpiece
Ha, I'm doing some right now. I carve them, I suppose I broke it down into manageable steps:
View attachment 449105
I cut a slab to the thickness I want, I like thin feet at the moment. I use my paper template for the base which is marked equally for feet. Accuracy is harder with carving and you spot imbalance when they're on very easily. My wife kindly pointed this out straight away on my first pots
View attachment 449106
Cut a slant on outside faces.
View attachment 449107
I made a foot template from watercolour paper. I use this to get the bottom edge the same on each foot.line up off the middle corner.
View attachment 449108
I freehand the internal pattern with a needle, then go over that with the knife to the right depth.
View attachment 449109
Then I can slice that off from the top.
I let the clay firm up to leather hard, then I can tidy them up and stick them on. Final fettle after they've been on for a day or so. I use some wax tools, the metal ballpoint tools and a silicone brush to finish. Hope that helps.
Super helpful, thank you!
HorseloverFat
Squarepants with Conkers
I've been doing 'non-assuming' feet lately. But when I was messing with low-fire, I spent time doing a lot of weird "foot stuff".
Time to revisit "fancy feet"! I'm inspired by yours.. they really are super!
I like the black ones. (and the ones I "loved", I love!)
Be careful when sanding down those feet... there's a "post-leather stage" that marks the realistic wet-sanding "end mark"... If you miss it.. gotta do it dry.
This is particularly aggravating with chunky/higher grogged clay... sanding destroys the "friction treated surface" which leaves chunks exposed and apt to move and crumble off during firing..
Beyond this..... are you waxing your feet?
JeffS73
Chumono
Sanding - most of these I've had to do a small grind to stop any wobble. With the really low ones, there's not much room for error. I need to refine the design a bit so it doesn't show.I've been doing 'non-assuming' feet lately. But when I was messing with low-fire, I spent time doing a lot of weird "foot stuff".
Time to revisit "fancy feet"! I'm inspired by yours.. they really are super!
I like the black ones. (and the ones I "loved", I love!)
Be careful when sanding down those feet... there's a "post-leather stage" that marks the realistic wet-sanding "end mark"... If you miss it.. gotta do it dry.
This is particularly aggravating with chunky/higher grogged clay... sanding destroys the "friction treated surface" which leaves chunks exposed and apt to move and crumble off during firing..
Beyond this..... are you waxing your feet?

I haven't been waxing the feet on unglazed pots, do you do that as a matter of course? I didn't expect unglazed to stick, but the Soda ash would have changed that.
HorseloverFat
Squarepants with Conkers
I don't 'fuse' my benches... so I HAVE to wax my feet..Sanding - most of these I've had to do a small grind to stop any wobble. With the really low ones, there's not much room for error. I need to refine the design a bit so it doesn't show.
I haven't been waxing the feet on unglazed pots, do you do that as a matter of course? I didn't expect unglazed to stick, but the Soda ash would have changed that.
And what I'm saying is..
If you get everything 'even' BEFORE the piece slips too much
past Leather-hard, then dry real slow.. it won't be an issue... Because any substantial dry sanding of anything BUT ultrafine or supersmooth clay will produce this issue. (Even on smooth clays... I find leather-stage((and slightly post)) sanding to be far superior.. and keeps the clay as "one piece")
I literally JUST solved this problem in my own work, quite recently...
Also... setting them on something that will "give" horizontally to any slight changes in the drying piece, but still allow vertical force to remain consistent from weights or gravity, is a real plus, for me.
...In other words... drying them on wax/parchment paper, even a little square under each foot, has helped me immensely in the "working the wobbles out of my modus operandi" department.
Last edited:
Similar threads
- Replies
- 25
- Views
- 4K
- Replies
- 48
- Views
- 6K


