I like these... really easy to work with, and works really good with Western Red Cedar 2 x 4s... the price can vary a lot, I buy them for $20.00 a pop. Great for shelving in the shop and I even built a computer table using the kit.

I like your benches though, don't get me wrong.

https://www.strongtie.com/miscellaneousconnectors_woodconnectors/wbsk_kit/p/wbsk
 
Well done on the woodwork. Myself?......I'd make the bench feet wider/longer. At least a little wider...I feel the top, with the weight of trees, containers and water weight, may make it a bit tippy if bumped at all, a windstorm or accidentally in the way of a hose dragged around. Just me....safeguarding all of the collection and work.

I'd probably move the bench more over that back soil area and plant a couple of properly placed stakes in the ground...attached on top to the feet...on both ends....and call it secure and stable.

I'm not wild about the cedar part....at least for the feet anyway. I've build boxes of cedar and they just don't last as long as I want. I've switched to treated wood...box feet....especially for foot contact areas where water, ice, snow and animal chewing seem to reality happen.
 
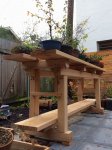
Okay! Bench #2 is now truly finished. I've added the lower shelf and added critical structural bracing that's disguised as architectural accents.
IMG_0012.JPG
IMG_0007.JPG

I've braced the lower shelf with 8" steel mending plates to prevent warping and cupping.
 
How I build these benches

The cuts of lumber: (pick your grade of wood)
  • 2" x 12" x 8' (3; bench tops)
  • 4" x 4" x 76" (3; horizontal bench supports)
  • 4" x 4" x 23.75" (10; frame elements and legs)
  • 4" x 4" x 2" (4; feet)
  • 2" x 2" x 16" (6; tie members)

Connectors: (galvanized or better)
  • 6" screws (40; frame connectors)
  • 6" x 5/16" carriage bolts (20; bench connectors)
  • 5/16" washers (20; bench connectors)
  • 5/16" nuts (20; bench connectors)
  • 3" screws (32; for tie members and feet)
  • Optional: 3–5 mending plates per bench top to reduce their cupping and warping

Build order: (or whatever… I’m not your dad)
  1. Start right-side up with two horizontal bench supports
  2. Affix top frame elements, checking for square with the tape measure
  3. Flip the table upside down
  4. Attach remainder of frame and legs, checking for square with a 90º tool
  5. Attach feet
  6. Flip the table back to right side up
  7. Attach bottom bench support, checking for square with the tape measure
  8. Optional: attach mending plates to the bottom of bench tops
  9. Attach all bench tops
  10. Attach the tie members
  11. Optional: sanding and finishing
  12. Move it where you want it (two people required, or one person plus a furniture dolly)
  13. Enjoy your handiwork

Tools:
  • Saw
  • Drill (and bits)
  • Screw driver (and bits)
  • Tape measure
  • Clamps (at least 2)
  • Something to ensure 90º corners
  • Wrench

Feel free to copy these plans and modify however you want—alter dimensions, add finishes, upgrade to stainless steel connectors, use cheapass lumber—whatever! I claim original authorship but disclaim any non-commercial exclusivity to this information. Use it for your own delight :)
 
Last edited:
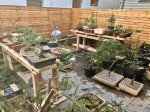
@barrosinc I genuinely LOLed. Nearly all of my shohin and kifu are now off the ground! The bigger trees will do okay on the ground :)
 
View attachment 121069
View attachment 121070

It's 8 feet long, 12 inches deep, and 18 inches tall. The total material cost was about $75 for this bench, and I have materials for five more benches. Some of the coming benches will be taller and twice as deep. I've intentionally put money into the lumber—select tight knot grade Western redcedar—so they're durable and don't require weatherproofing. I want these benches to develop a weathered color and texture.

I was variously going for a fundamental, natural, elegant, and balanced design. I'm not wild about the feet.

The top is attached with five, six-inch carriage bolts. The frame is attached with four, six-inch lag screws.
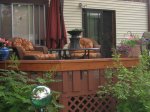
Oustanding! #2 looks like a Japanese garden shoe in. I took a chance and removed a deck railing and turned it into a bench.
Hope to add more single stands to my back yard this year as well. Yours turned out great.
 

Attachments

  • IMG_1111.JPG
    IMG_1111.JPG
    363.9 KB · Views: 109
  • Fishy1022005 001.jpg
    Fishy1022005 001.jpg
    492.9 KB · Views: 106
Last edited:
No. If I must stare at this every day then I'm going to do it right and with materials and style that bring me joy ;)
Personally I prefer rich red undertones ( most of my collection is conifers and grey benches seem too old in appearance ).
I use tung oil on my wood benches ( red cedar, and mahogany if my financial planner ( wife ) ok's it ) and the weathering is almost halted.
 
I took a chance and removed a deck railing and turned it into a bench.
Hope to add more single stands to my back yard this year as well. Yours turned out great.
Nice yard and neighborhood.
CW
 
No. If I must stare at this every day then I'm going to do it right and with materials and style that bring me joy ;)

Great selection of material and nicely assembled. :)

Any special reason to keep the bolts as long as they are? And I am also curious about the underlying wooden blocks. It looks as if the vessels of these blocks are directed from the ground to the upper wood. In my experience this could be a problem for many types of wood. No experience with red ceder though.
 
Back
Top Bottom